HTTPie Desktop is a cross-platform API testing client for humans. Use it to test REST, GraphQL, and HTTP APIs painlessly.
Getting started
HTTPie Desktop is available for desktop and mobile browsers and as a dedicated desktop app for macOS, Windows, and Linux.
HTTPie Web
HTTPie’s Web app is equivalent to the desktop app, except for certain limitations.
- Go to httpie.io/app
- Or use the short & sweet alias req.new
HTTPie Desktop
HTTPie's desktop app lets you work locally and has a distraction-free interface.
macOS
- Go to httpie.io/download and click Download for Mac.
- Open your Finder and go to Downloads.
- Open the .dmg file and drag HTTPie into your Applications folder.
Windows
- Go to httpie.io/download and click Download for Windows.
- Open the .exe file and follow the instructions to install.
Linux
The Linux package uses AppImage, and you need to install it using AppImageLauncher for the app to work:
- Install AppImageLauncher (instructions)
- Download
HTTPie-*.AppImage(orHTTPie-*arm64.AppImagefor ARM64 architecture) from the latest release page - Run
$ AppImageLauncher HTTPie-*.AppImage
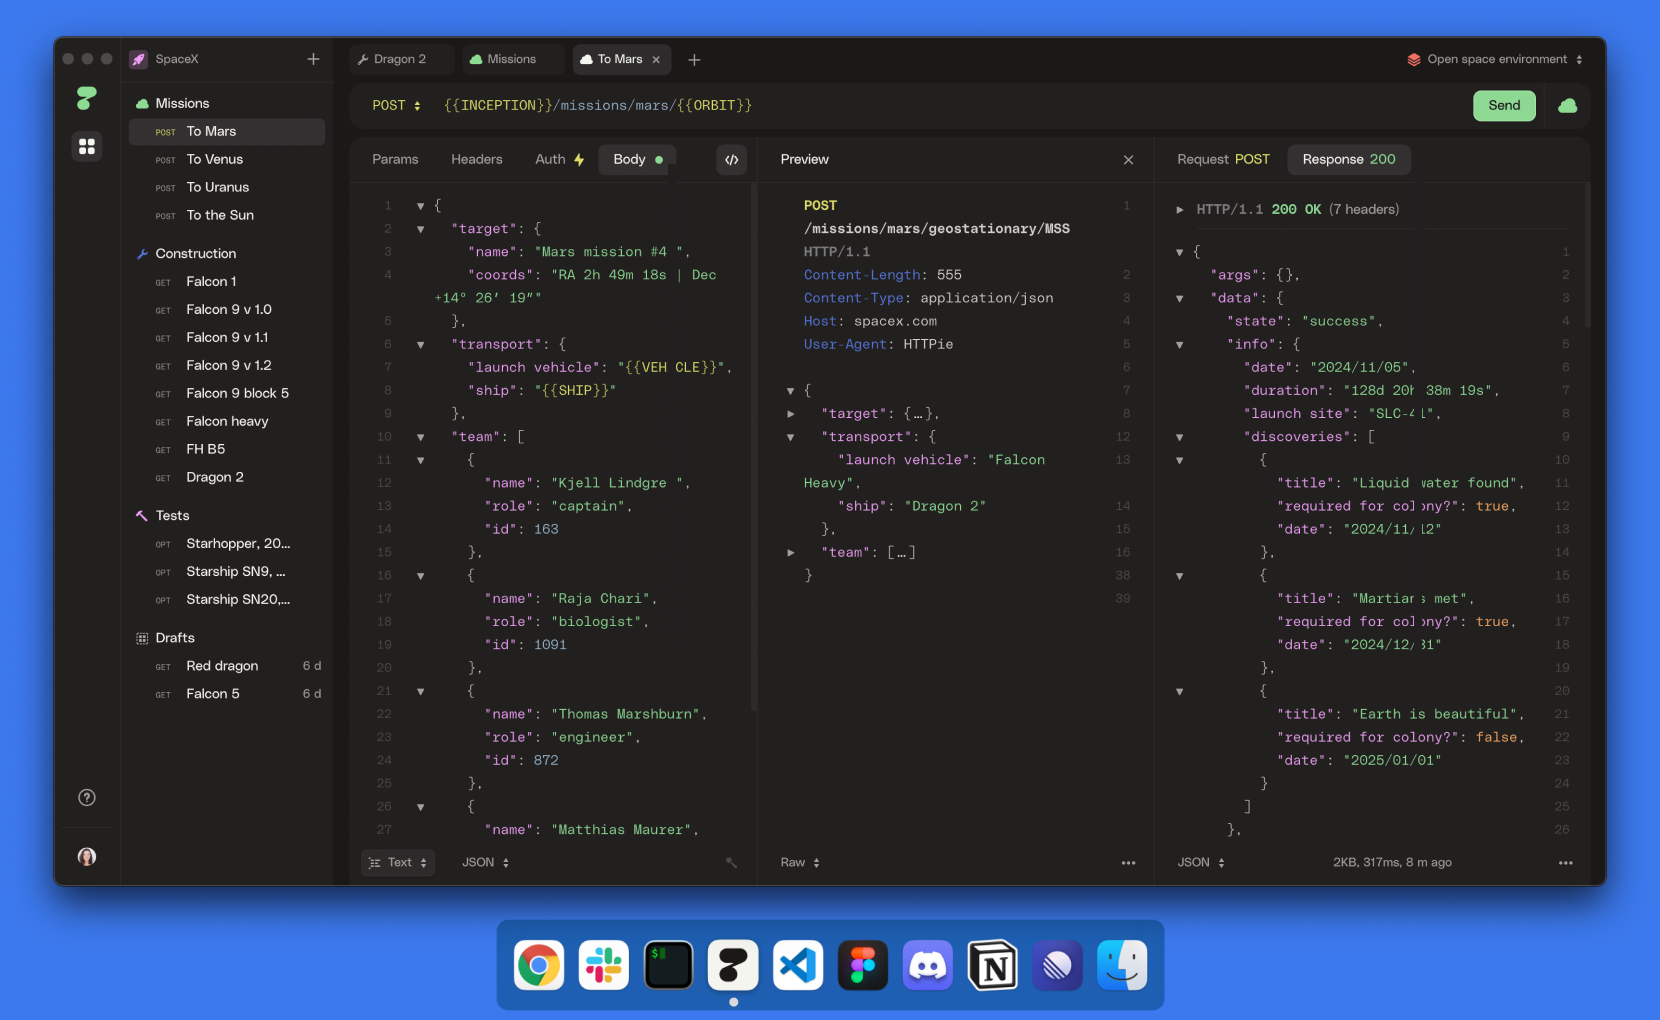
Defining requests
Create and send requests to APIs with HTTPie.
To perform a request, HTTPie needs at least a method and a URL. Then, you can specify a variety of other details, such as headers, authentication, and body.
Request method
You need a method to indicate the desired action of your request. You can choose a variety of conventional methods (GET, POST, HEAD, PUT, PATCH, DELETE, OPTIONS).
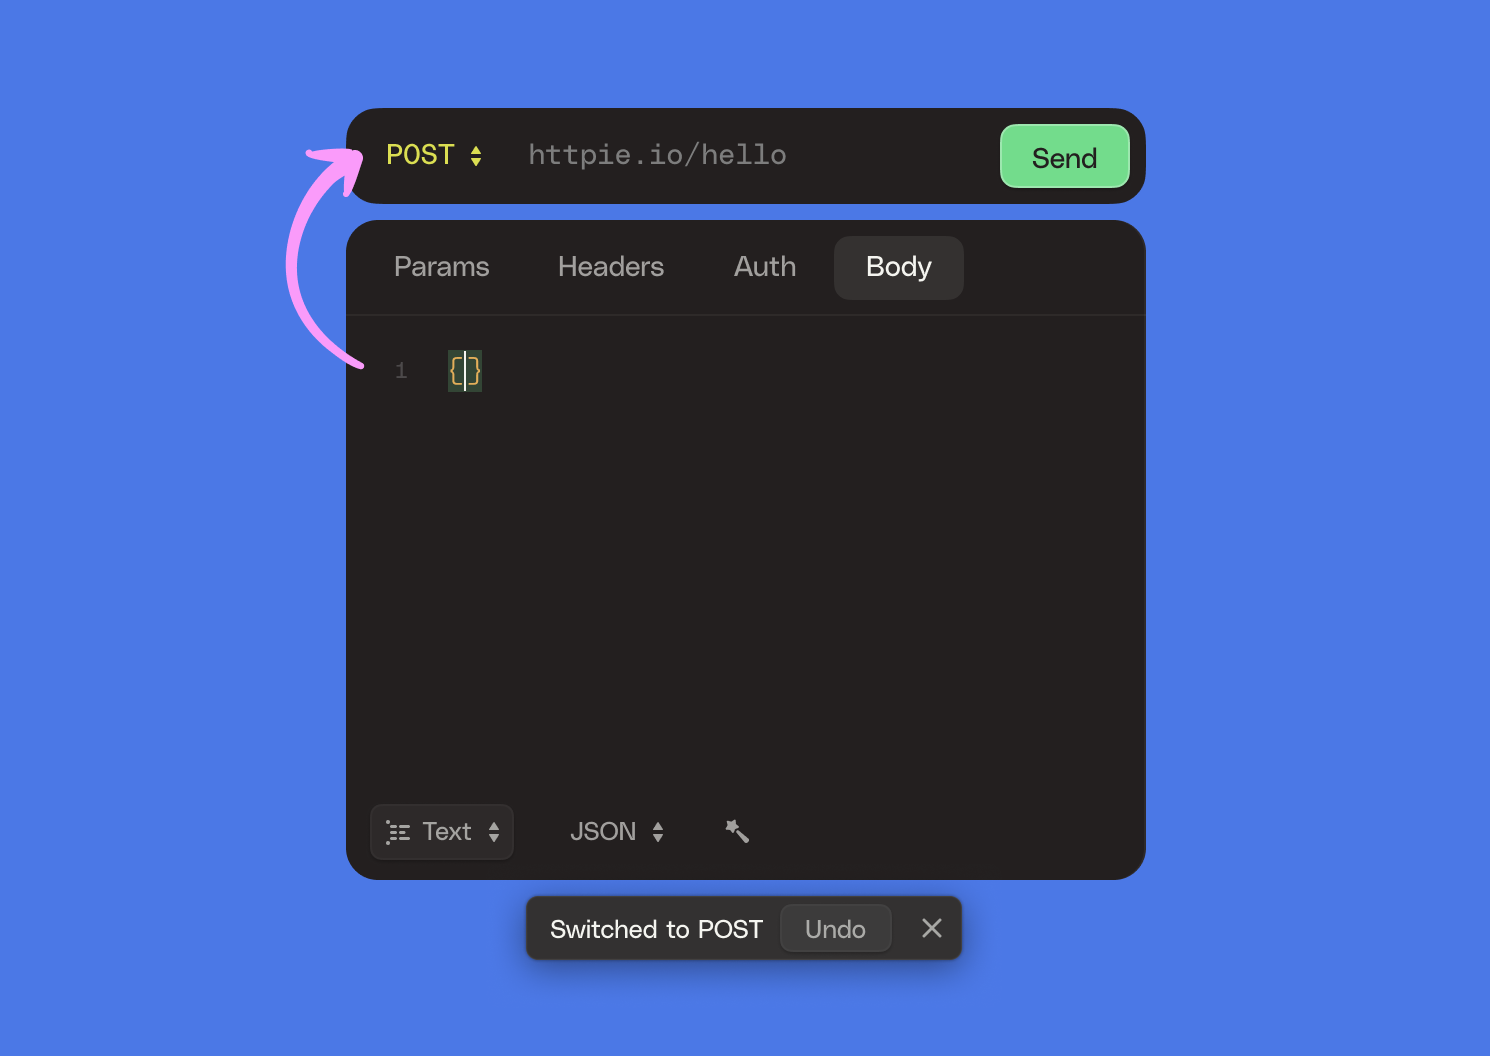
Default methods
When starting a new request, HTTPie defaults GET and auto-switches to POST as soon as you add a body.
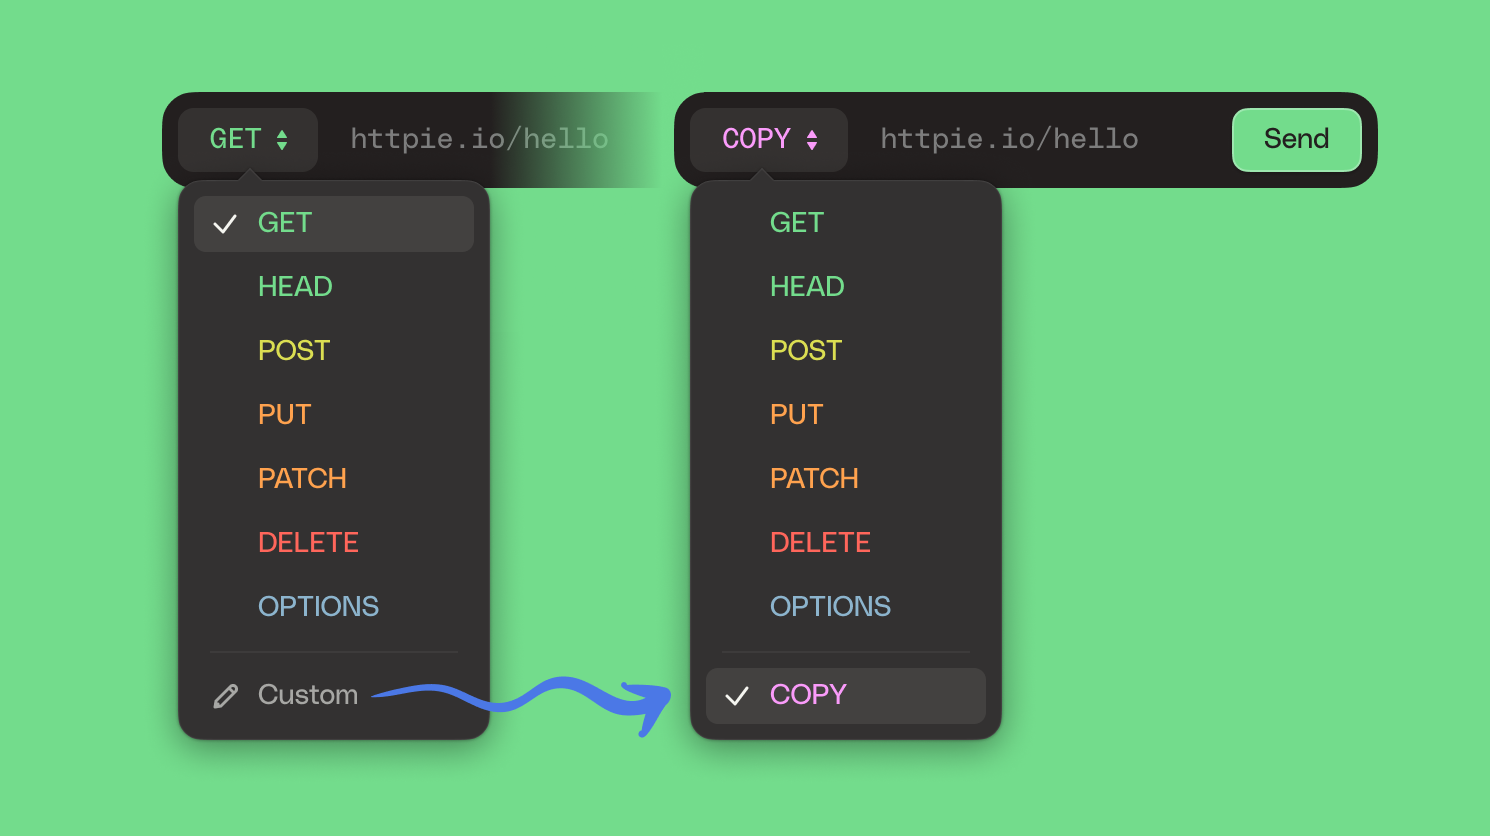
Custom methods
When testing APIs that use unconventional HTTP methods, you can supplement the default list with a method of your choosing.
Select the last option in the method drop-down and type away.
Request URL
You need a URL to indicate the address your request will go to. HTTPie highlights its path granularly for readability.
You can also use the URL for inserting query parameters directly.
Params
If you find yourself manually constructing URLs with querystring parameters on the app, you may appreciate the parameters form for appending them to the URL.
Check the preview to debug the final results.
Request headers
To set custom HTTP request headers, use the headers form.
HTTPie will send them sorted by name and capitalized. Check them out in the preview.
Default headers
There are a couple of default headers that HTTPie sets.
Content-LengthContent-TypeHost: pie.devUser-Agent: HTTPie
These can be overwritten when you manually insert another header with the same name.
Headers auto-complete
HTTPie auto-completes the header names you start typing. Choose the right one from the suggestions, and you're set.
Same-name headers
If you define multiple headers with the same name, HTTPie will merge their values into a single comma-separated header.
Request auth
You may set Authentication at the request level or collection level.
The currently supported authentication schemes are Basic, Bearer token and API key. Look for the switcher at the bottom left.
Basic auth
Bearer auth
API key auth
For when you need to authenticate requests using API key as a header or a URL parameter.
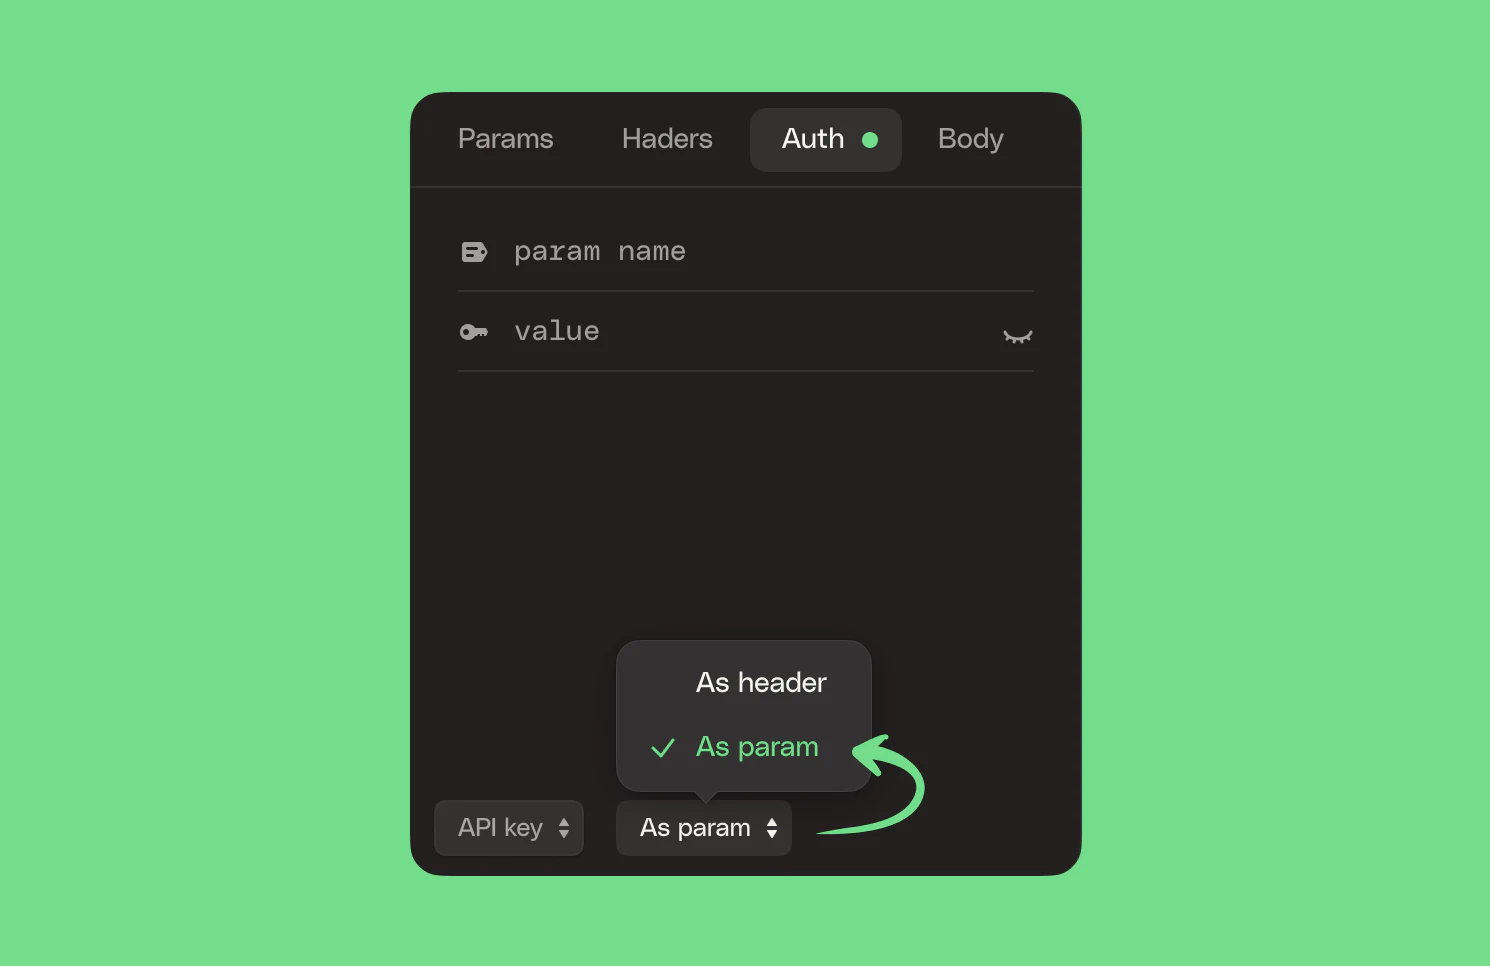
It's incredibly convenient because it allows you to specify your auth at the collection level and have HTTPie add it to the headers or URL automatically.
Request body
The currently supported body types are Text, Form, File and GraphQL. Look for the switcher at the bottom left.
Text requests
Any text should be comfortably editable directly in HTTPie, no matter how big. That's why HTTPie accepts any raw text, but also includes built-in support for three leading languages:
JSON- the lingua franca of modern web services, and also the implicit body text type HTTPie uses by defaultXMLYAML
Check also the ability to search & replace. It might come in handy.
Form requests
HTTPie takes two form types:
URL-encoded- for text or text-files onlyMultipart- accepts any file
You can easily switch from one to the other while keeping its content.
File uploads
GraphQL requests
HTTPie has built-in support for crafting GraphQL requests. ← Check the dedicated doc section.
Multi-body
You can specify multiple body types and quickly toggle between them. This feature is useful when a specific API endpoint accepts both JSON and form data, for example.
There's an indicator in the switcher for each body type that has some data specified.
Prettify
To ensure the body of your request is humanly readable and navigable, use the prettify feature. It will automatically format your code so that your brain’s free to do other things.
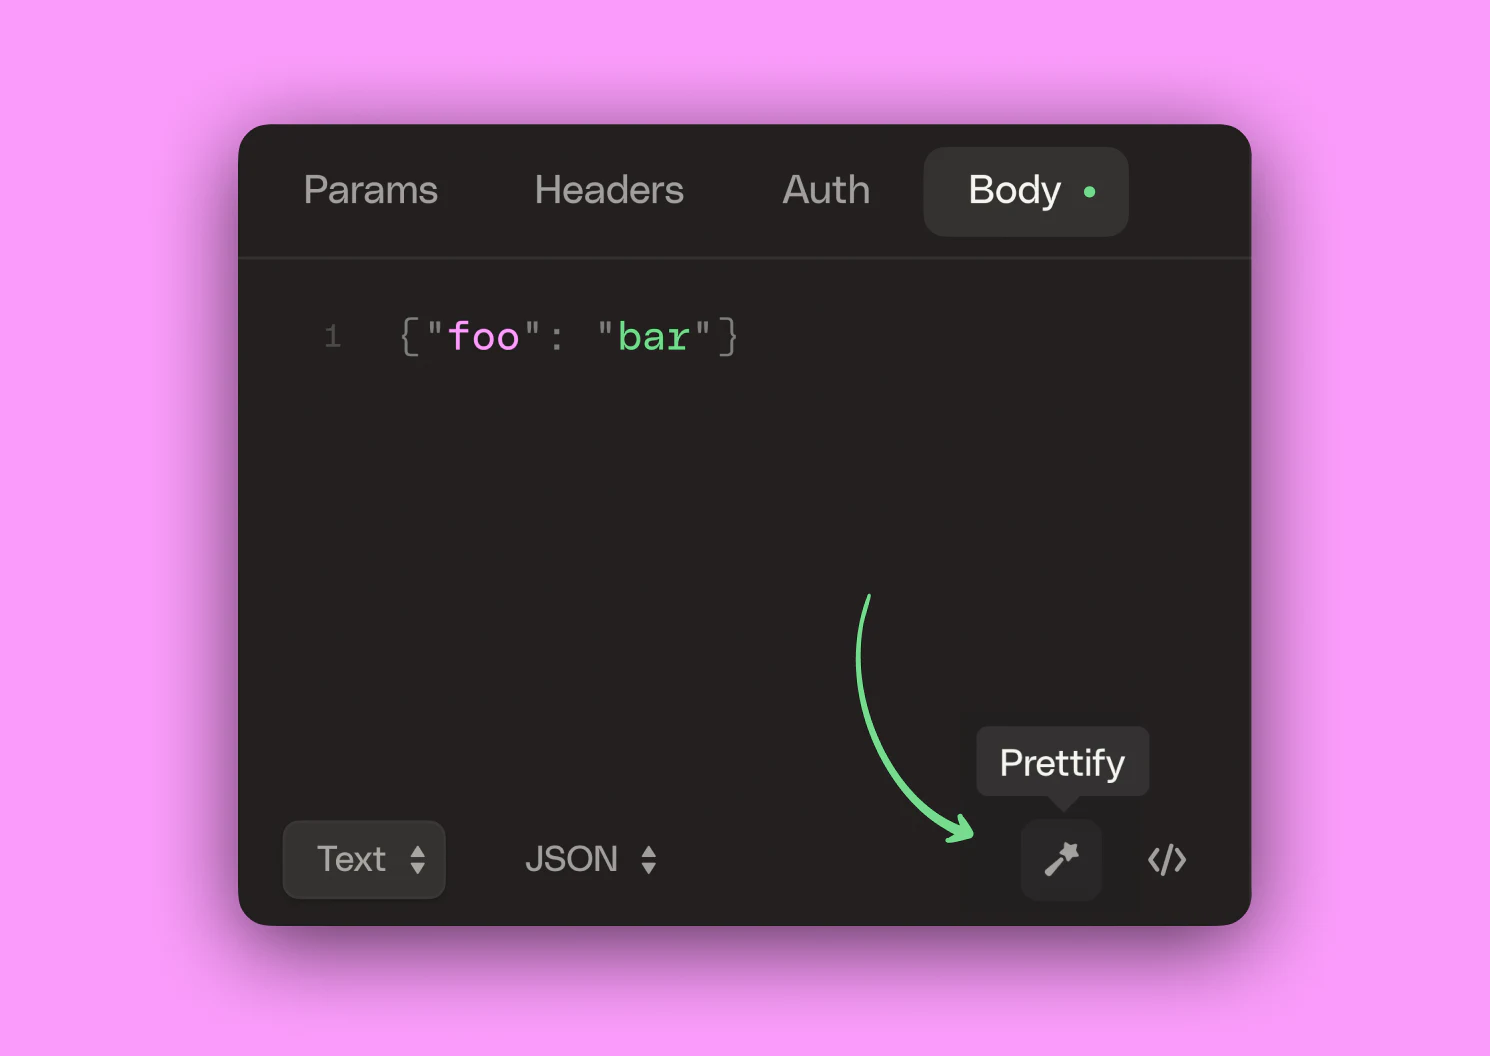
Look for the wand icon at the bottom of the code editor. Currently available for JSON and GraphQL requests.
GraphQL
GraphQL is a popular API query language created at Facebook. It’s designed to help develop strongly typed APIs that give clients the power to ask for precisely the data they need while minimizing the number of requests.
GraphQL requests
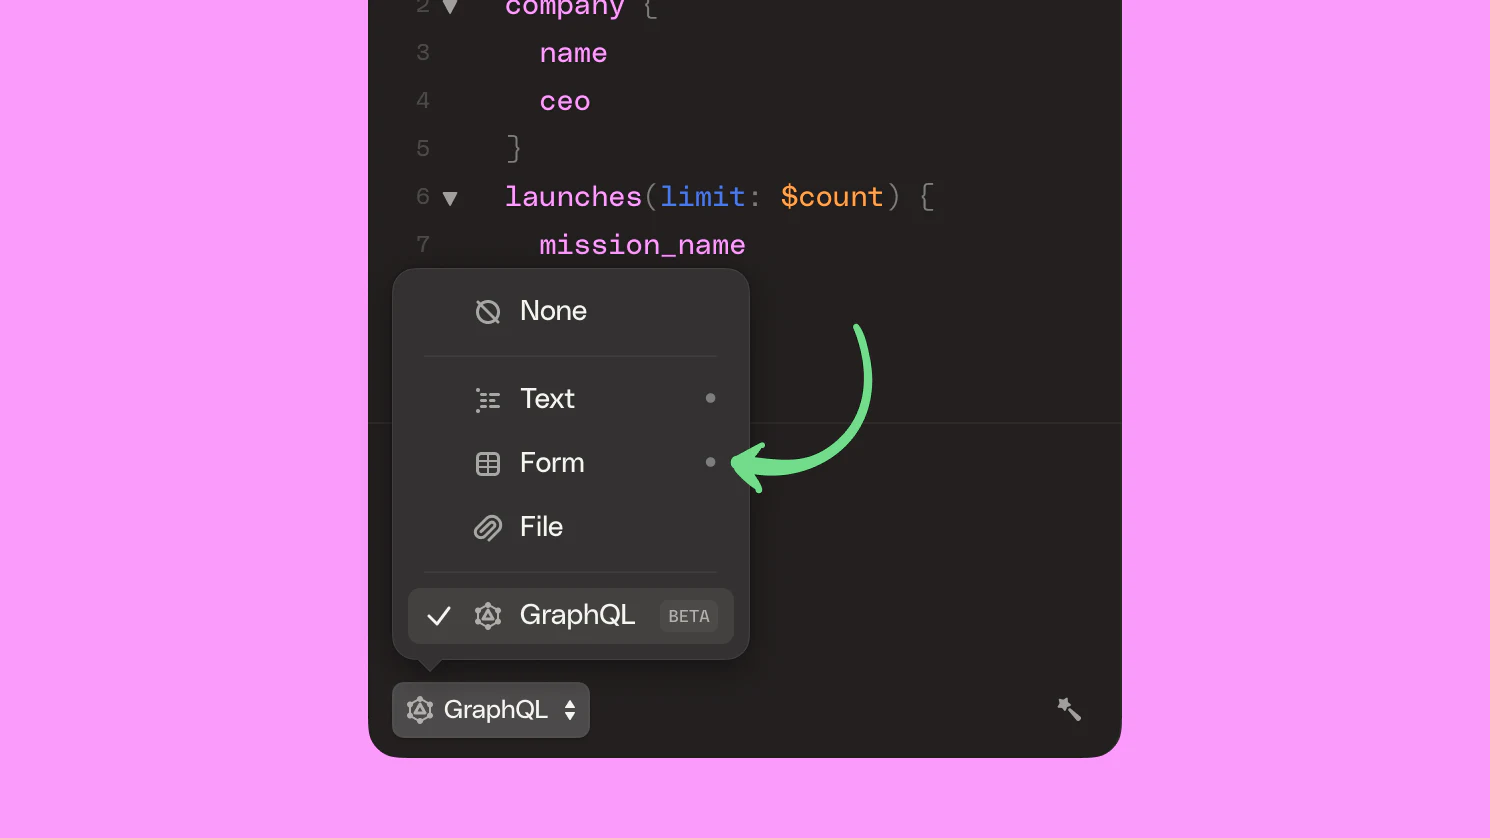
Under the hood, GraphQL requests are regular POST requests. But HTTPie has built-in support for crafting GraphQL requests to improve your experience when talking to GraphQL APIs.
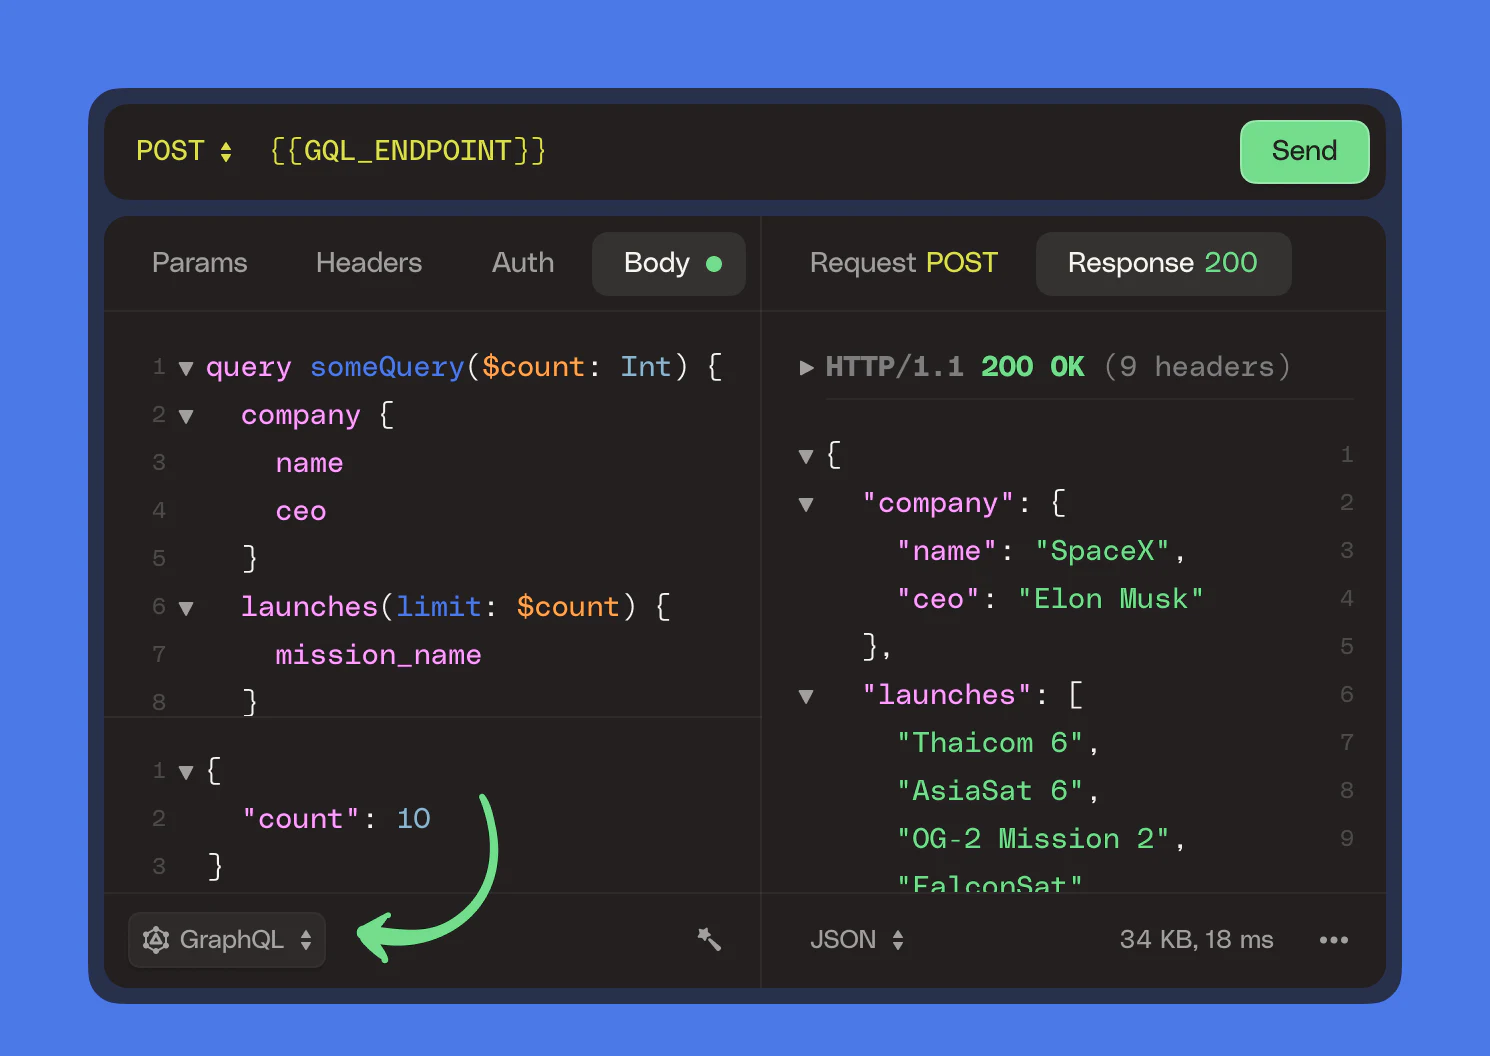
Choose “GraphQL” as the body type, then specify your GraphQL query and JSON variables separately. You get syntax highlighting and other features specific to each language.
GraphQL schema
HTTPie auto-fetches the schema from the server. That means the app is aware of all the available queries, mutations, and the hierarchy of types, which allows us to boost your productivity with auto-complete and validation.
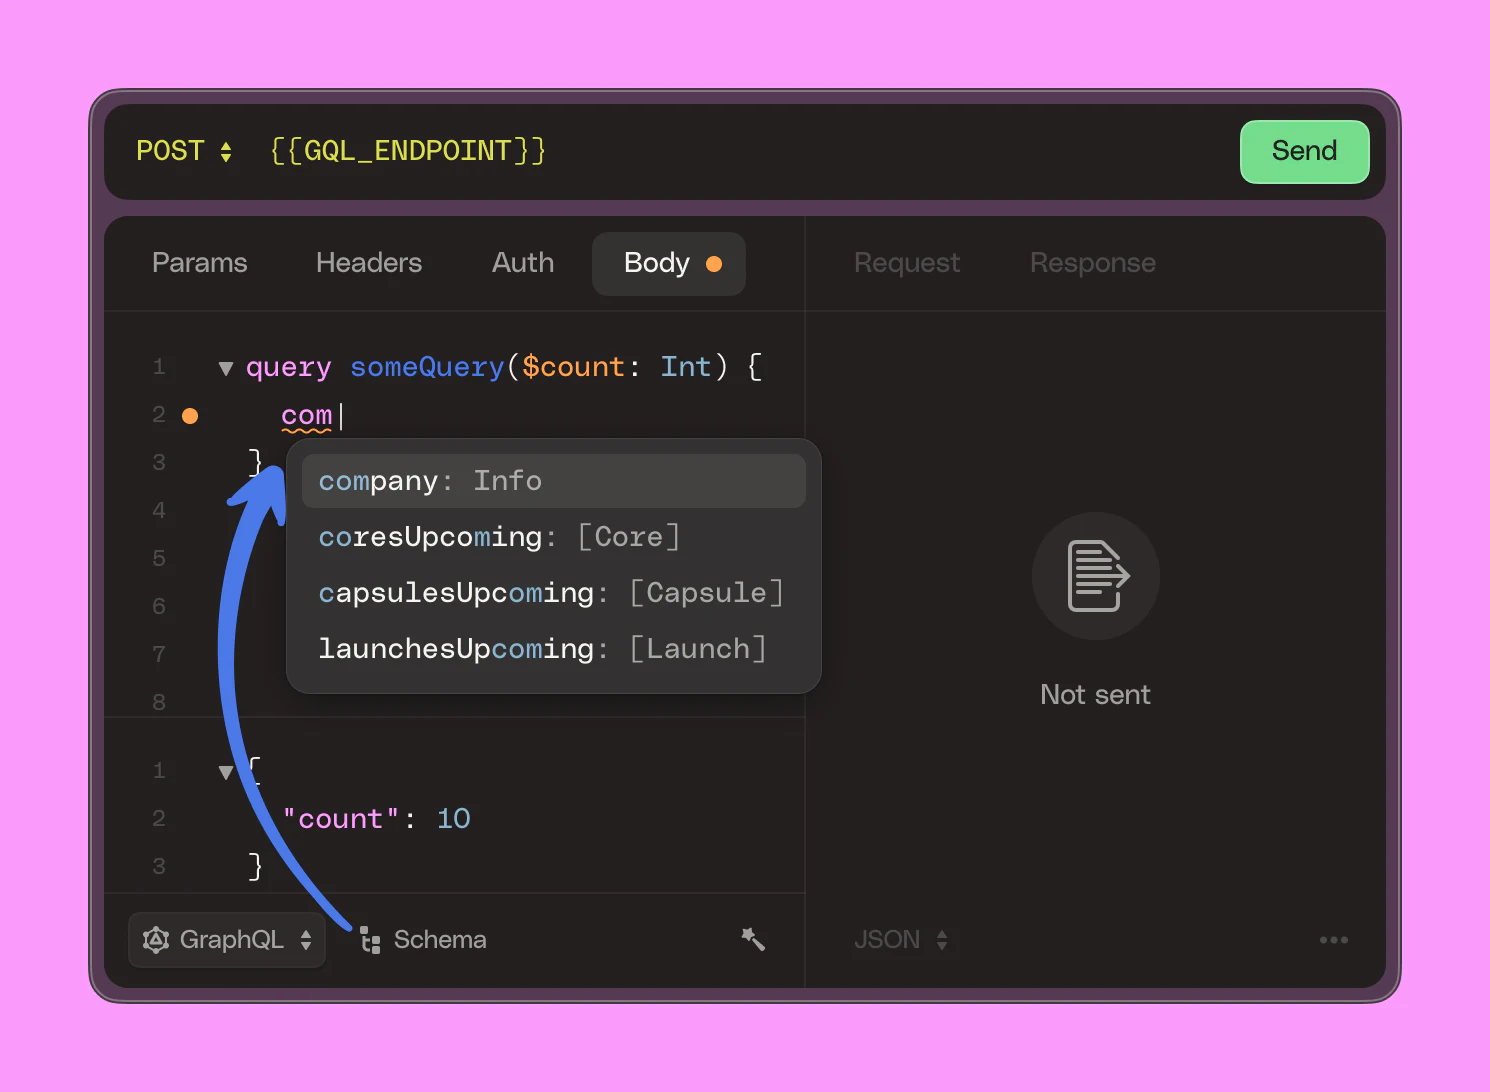
See auto-complete suggestions as you type, and to invoke the menu manually, press ⌃Space.
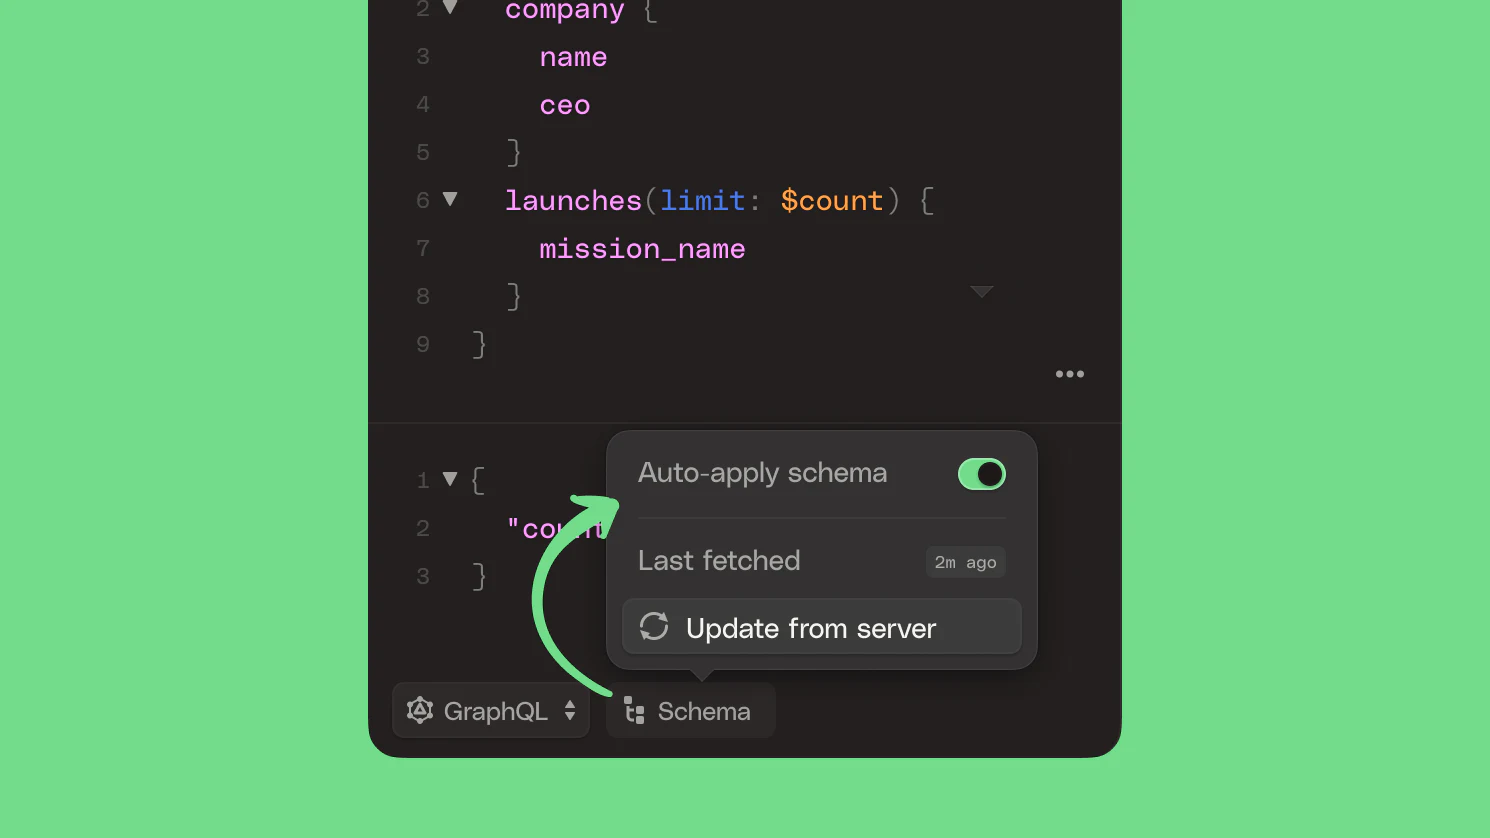
Schema auto-fetch
HTTPie auto-fetches the schema using the current request’s URL and authentication. To refresh the schema, select “Update from server” from the new “Schema” menu. And to turn off schema for a particular tab, uncheck “Auto-apply schema.”
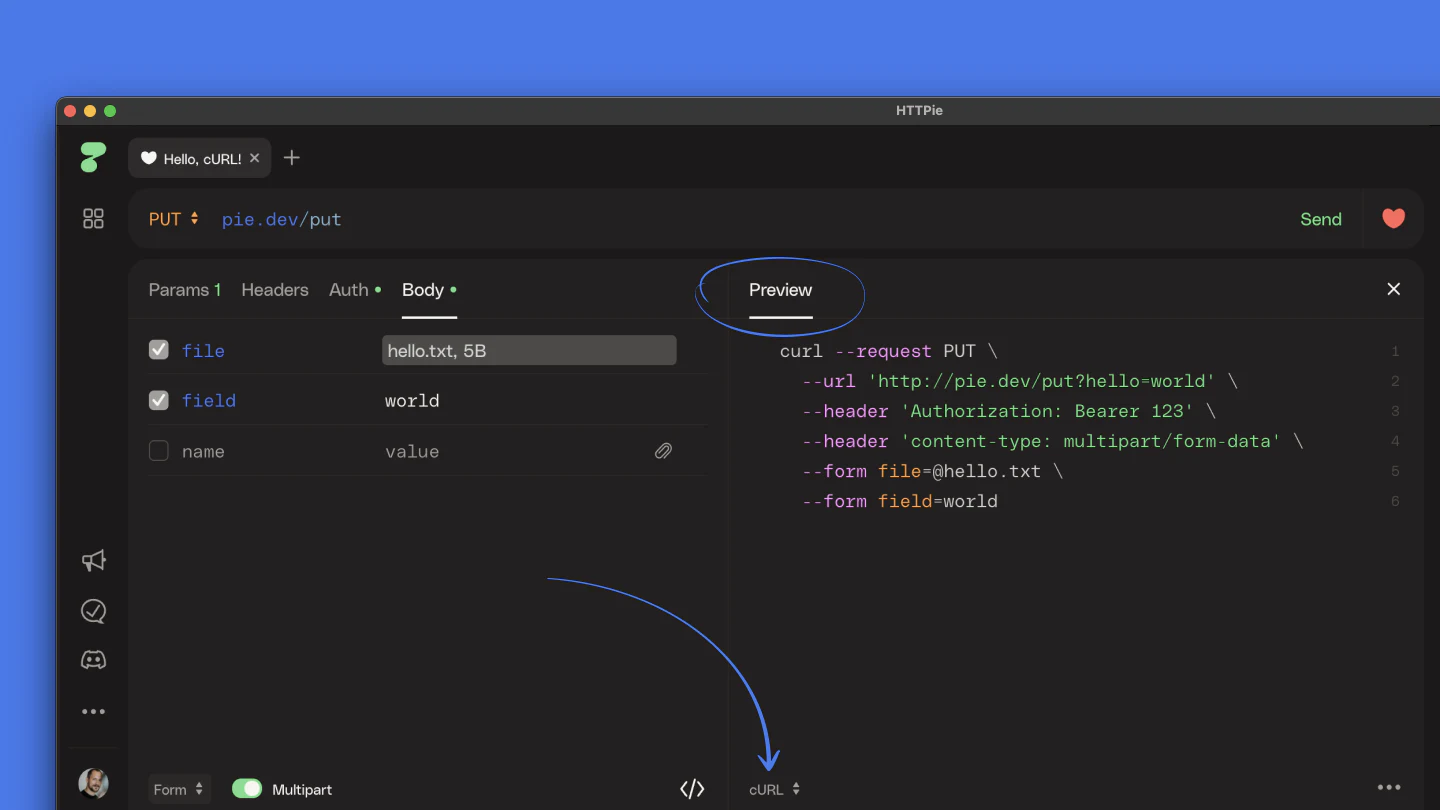
Preview
HTTPie provides a preview of the request without the need to send it. Make some changes to your request and see them instantly reflected in the code preview — it’s like a WYSIWYG editor for API calls code.
Code generation
The preview is very useful for debugging and analyzing HTTP. But also for exploring other languages. Look for the switcher at the bottom left.
Export
Open the preview and select the export format you like. Hit the three dots at the bottom right, and copy the generated code to export and share.
Export cURL
You can export code and commands for many other languages and tools, including cURL, HAR, JavaScript, Node, Java, PHP, Objective-C, Swift, Python, Ruby, C#, Go, OCaml, and more.
Export HTTPie CLI
HTTPie for Terminal is still our most beloved child, and we want it to go hand in hand with Web & Desktop. You can generate HTTPie commands in the app:
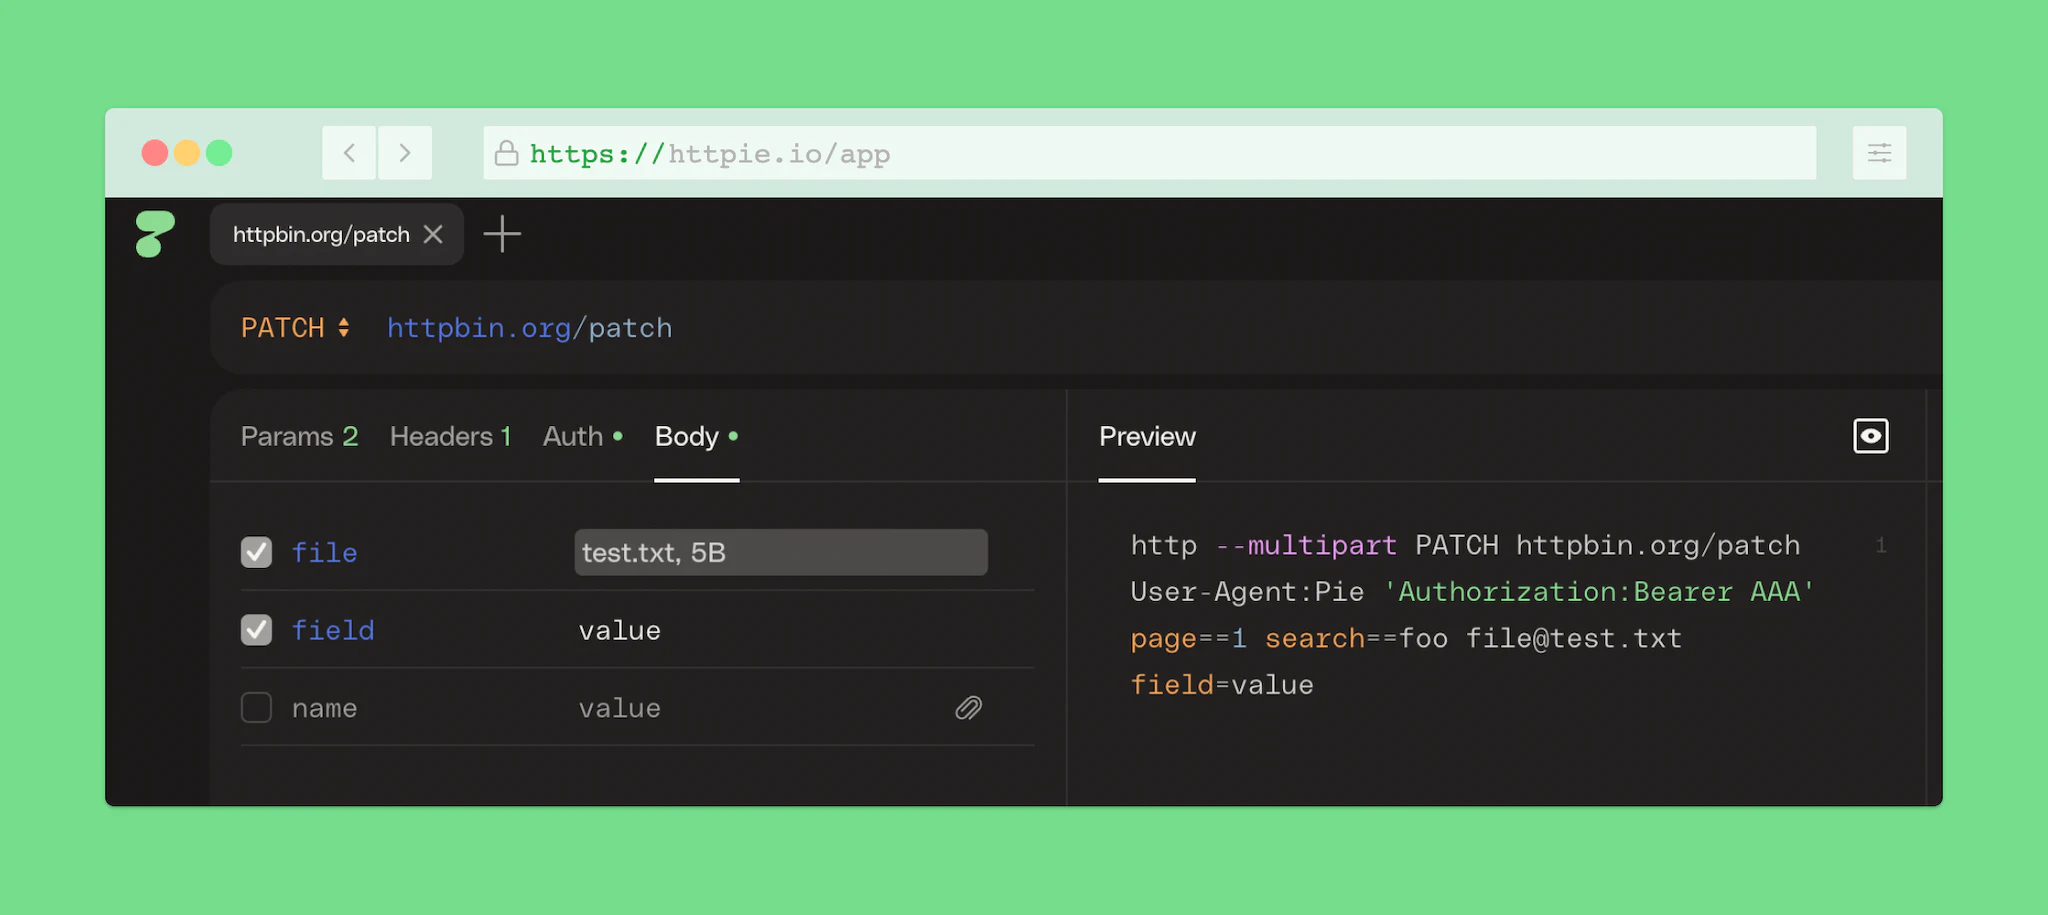
Open the preview and select the HTTPie option. Check the generated command, and copy it to your terminal or share it with a CLI-first colleague.
Import
cURL import
You can import cURL commands as requests into HTTPie:
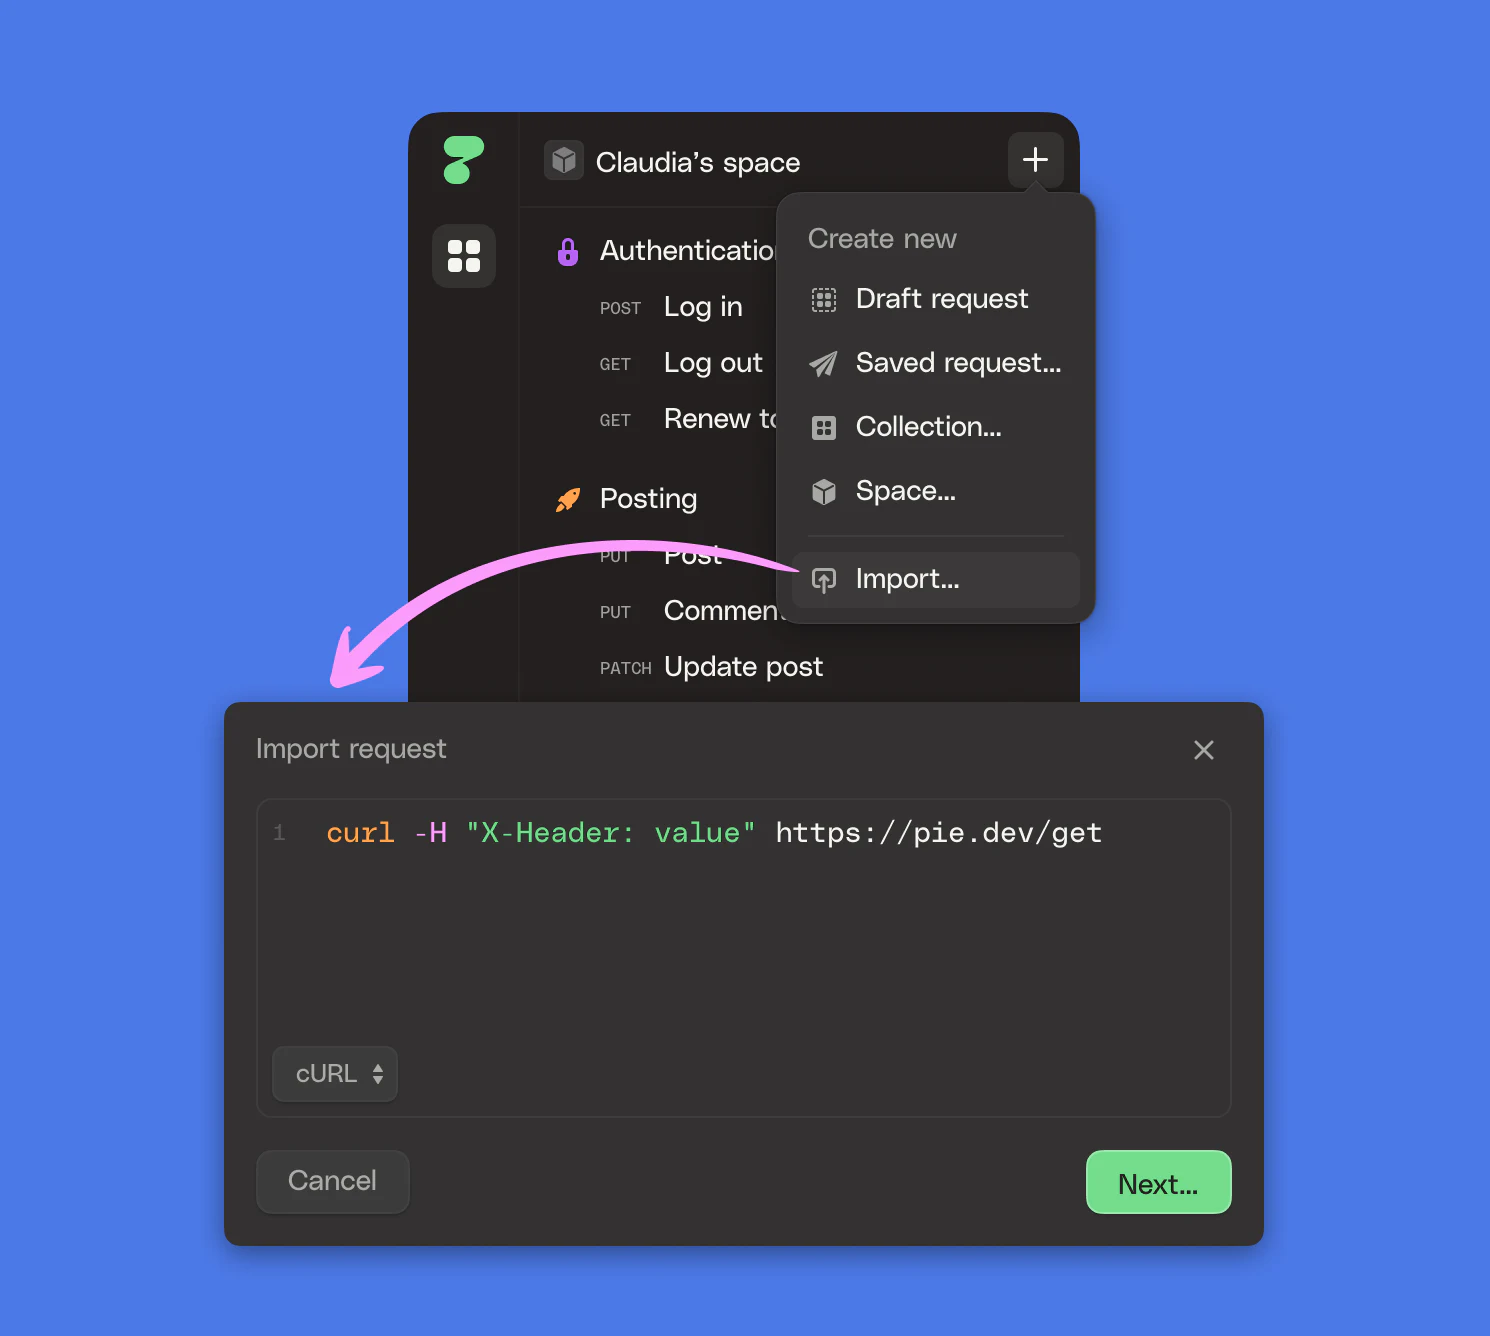
This lets you quickly import cURL calls from scripts or import requests from Chrome DevTools. Find the “Import…” option under the + menu in your space library.
cURL import supports for ANSI-C quoting shell syntax (e.g., $'string'). This syntax is used by Chrome DevTools when exporting a request that includes a body as cURL, among others.
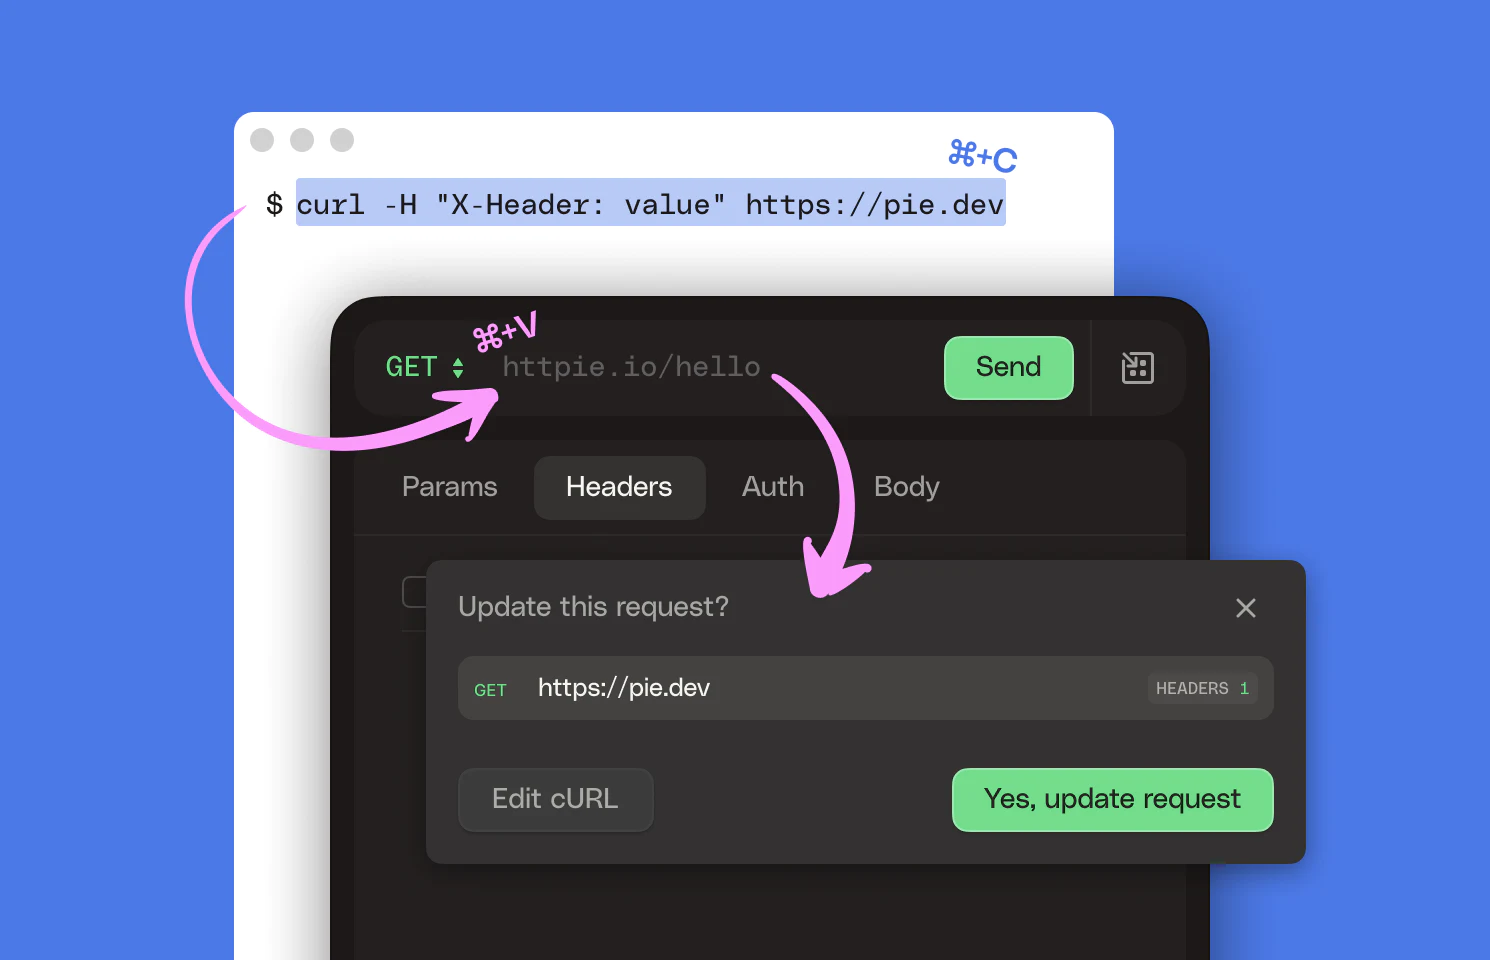
cURL shortcut
There’s also a quick hidden shortcut for importing cURL. Just paste a cURL command into the URL field and see what happens.
cURL input mode
Similar to AI-assisted request prompts, you can also manually type a cURL command into the URL field to switch it to cURL mode and import the resulting request:

Postman and Insomnia import
You can import entire collections, environments, and data dump zips from Postman and Insomnia.
- Export your data from Postman or from Insomnia.
- Open the import dialog (Library → “+” → “Import…”).
- Drag & drop the exported file and click “Next…”.
- Select the target space and click “Import.”
- Done! Welcome to HTTPie!
Tip: Create a new space during the import to keep things tidy.
Import compatibility
Here’s an overview of what elements HTTPie currently imports from Postman and Insomnia and how. As we gradually add new features to HTTPie, we’ll continue to improve the import as well.
Importing requests
| Request element | Imported? | Notes |
|---|---|---|
| HTTP Requests | ✔ | |
| GraphQL requests | ✔ | |
| gRPC requests | ✘ | |
| WebSockets | ✘ | |
| Request method | ✔ | Including custom ones. |
| Request URL | ✔ | |
| URL parameters | ✔ | |
| Headers | ✔ | |
| Auth | ✔ | Basic, bearer, API key, and inherited auth. |
| Body | ✔ | Text, raw, JSON, and form request bodies. |
| Body files | ✘ |
Importing containers
| Container | Imported? | Notes |
|---|---|---|
| Collections | ✔ | See collection variables below. |
| Sub-folders | ✘ | Folder hierarchy is preserved as breadcrumbs in request names. |
Importing environments & variables
| Element | Imported? | Notes |
|---|---|---|
| Environments | ✔ | |
| Default variables | ✔ | |
| Collection variables | ✔ | We move non-global variables to the space level and refactor names and references to ensure uniqueness. |
Importing other elements
| Other element | Imported? | Notes |
|---|---|---|
| Scripting | ✘ | Pre-request scripts, tests, and dynamic tags. |
| Meta data | ✘ | Schemas, documentation, field descriptions, and response examples. |
| Custom settings | ✘ | |
| Cookies | ✘ |
Sending requests
When you are done defining a request, just hit "Send."
You'll receive back two messages: the request sent and the response.
Cancel requests
When you send a request and then change your mind, you can still cancel the in-progress transaction.
Request stats
For metadata on your request, check out the time and size info at the bottom of the response panel.
When you hover over it, you get more granular time & size stats.
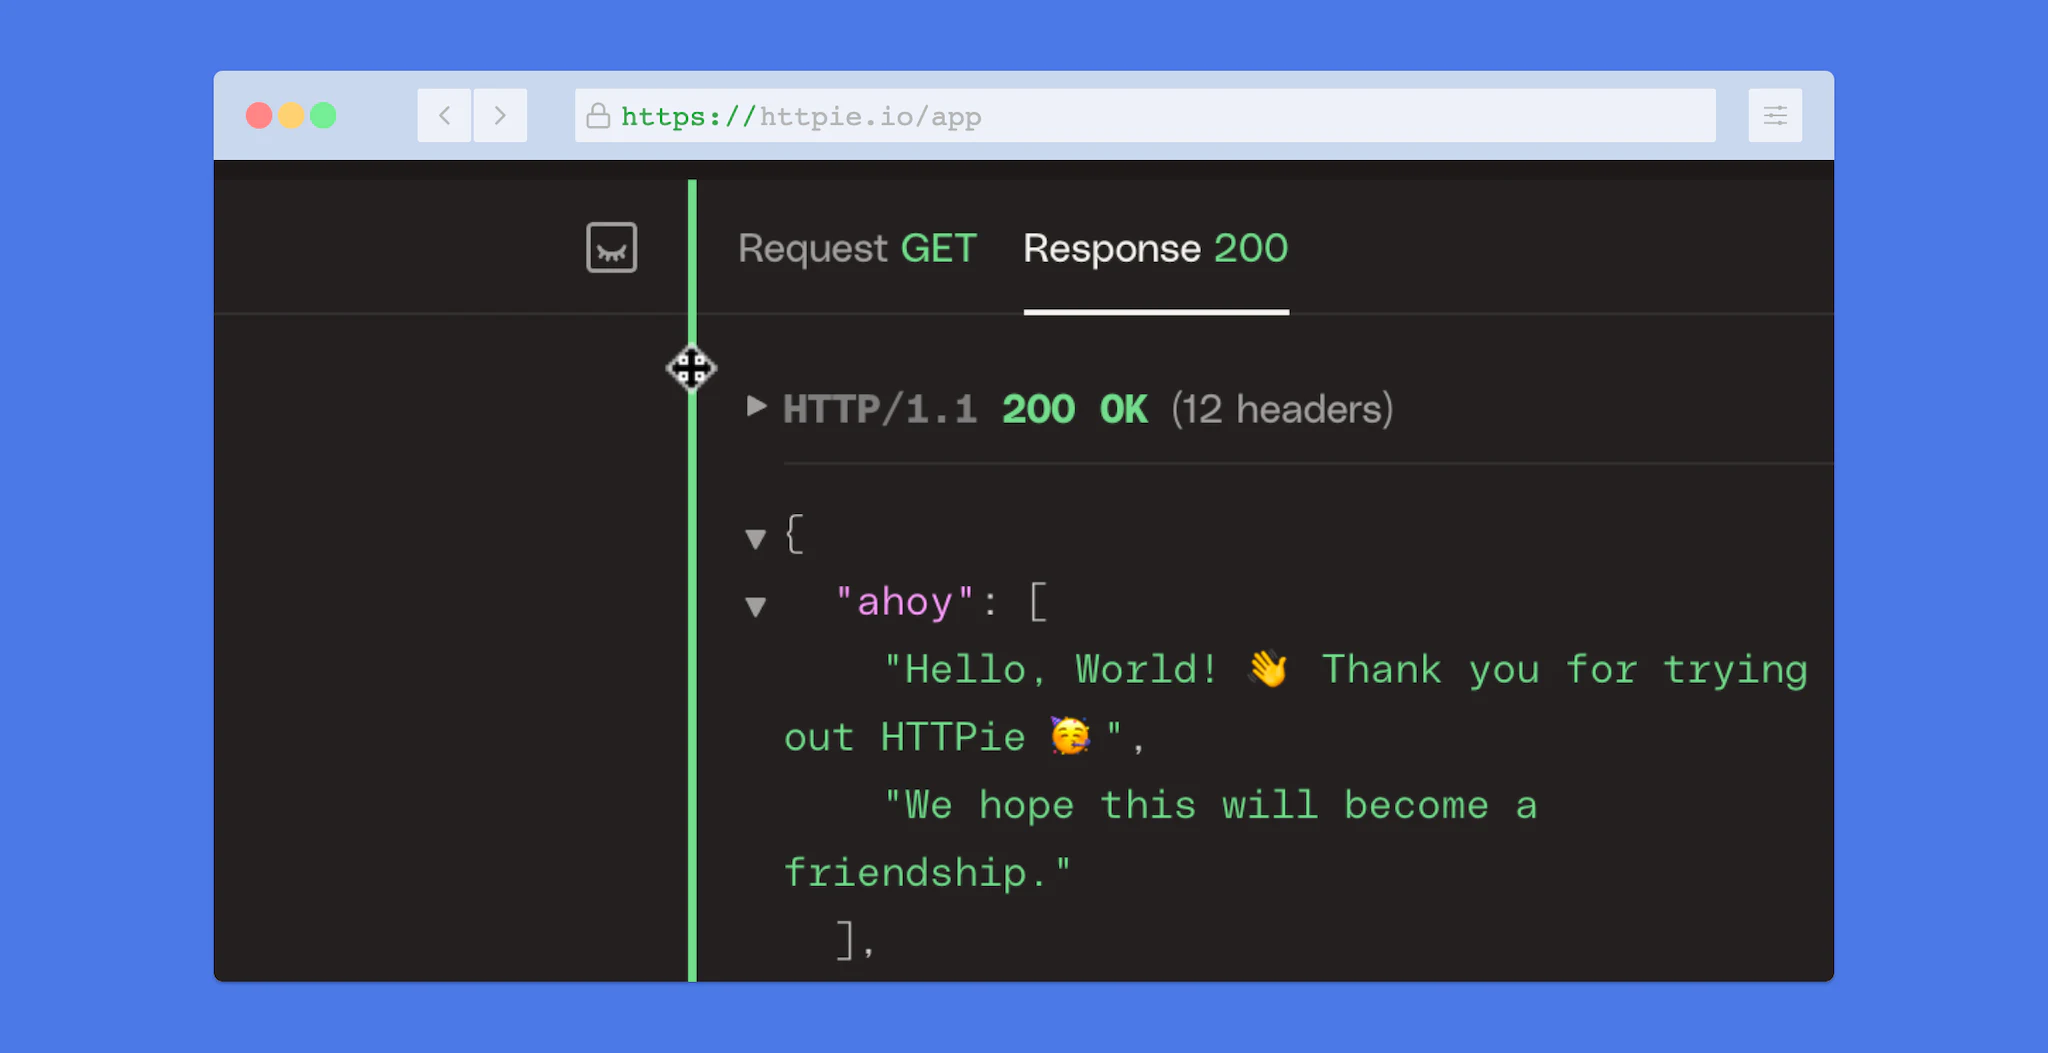
Viewing messages
In HTTPie you can view three HTTP messages: request sent, response, and the extra request preview.
In the request sent and response, headers are presented as a table and collapsed when there's a body. It makes the messages more readable, yet they'll still be exported in their standard format.
Copy and download messages
To export messages, copy them using the three-dot menu at the bottom right for a standard format.
Copy the entire message, copy just the headers, or copy only the body.
You can also save a body as a file directly from the client.
Rendered response body
When the server sends back a response type for which there’s a human-friendly preview mode, HTTPie renders the response as if you were in a browser to make it easier to digest.
It’s especially helpful when you’re debugging APIs and get back rich error pages, need to get through a CAPTCHA, etc.
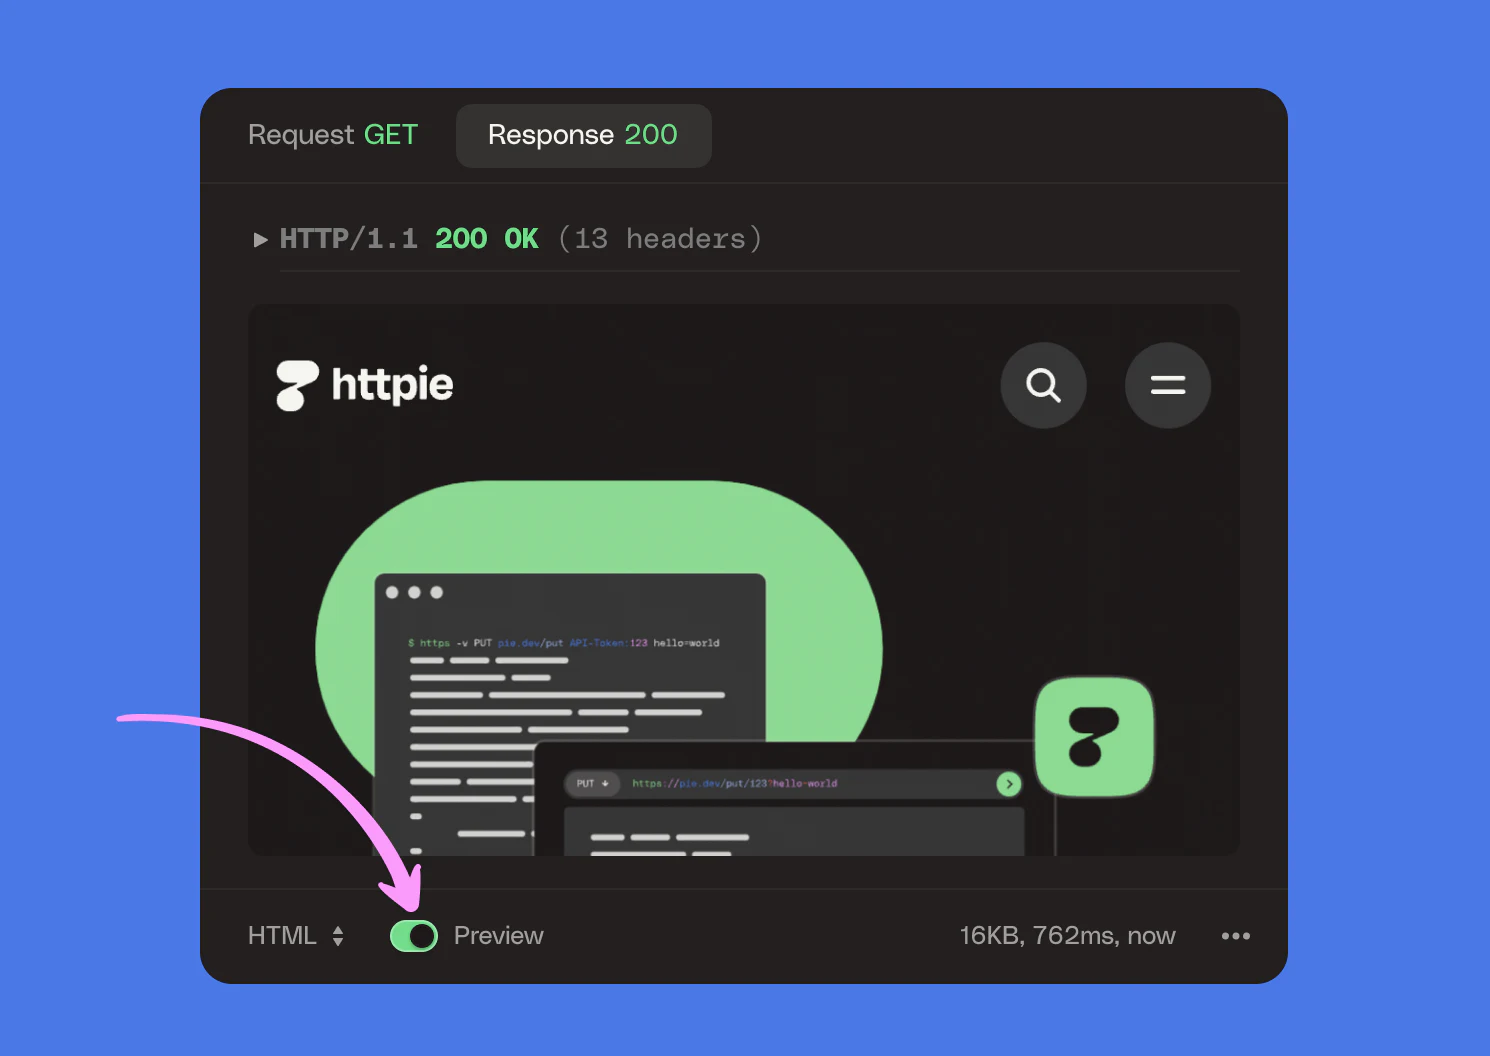
The preview mode is currently available for HTML responses. You can switch back to the source view by toggling it off.
Interactive URLs
URLs are one of the main building blocks of the internet, and links and HyperText have been with us since Web 1.0. Now, in the era of APIs, they get a whole new purpose of allowing machines to navigate different resources exposed through an API.
HTTPie makes URLs interactive in all contexts, including the obvious response body, the request body editor, headers, and other places where URLs can be expected to occur.
URL options
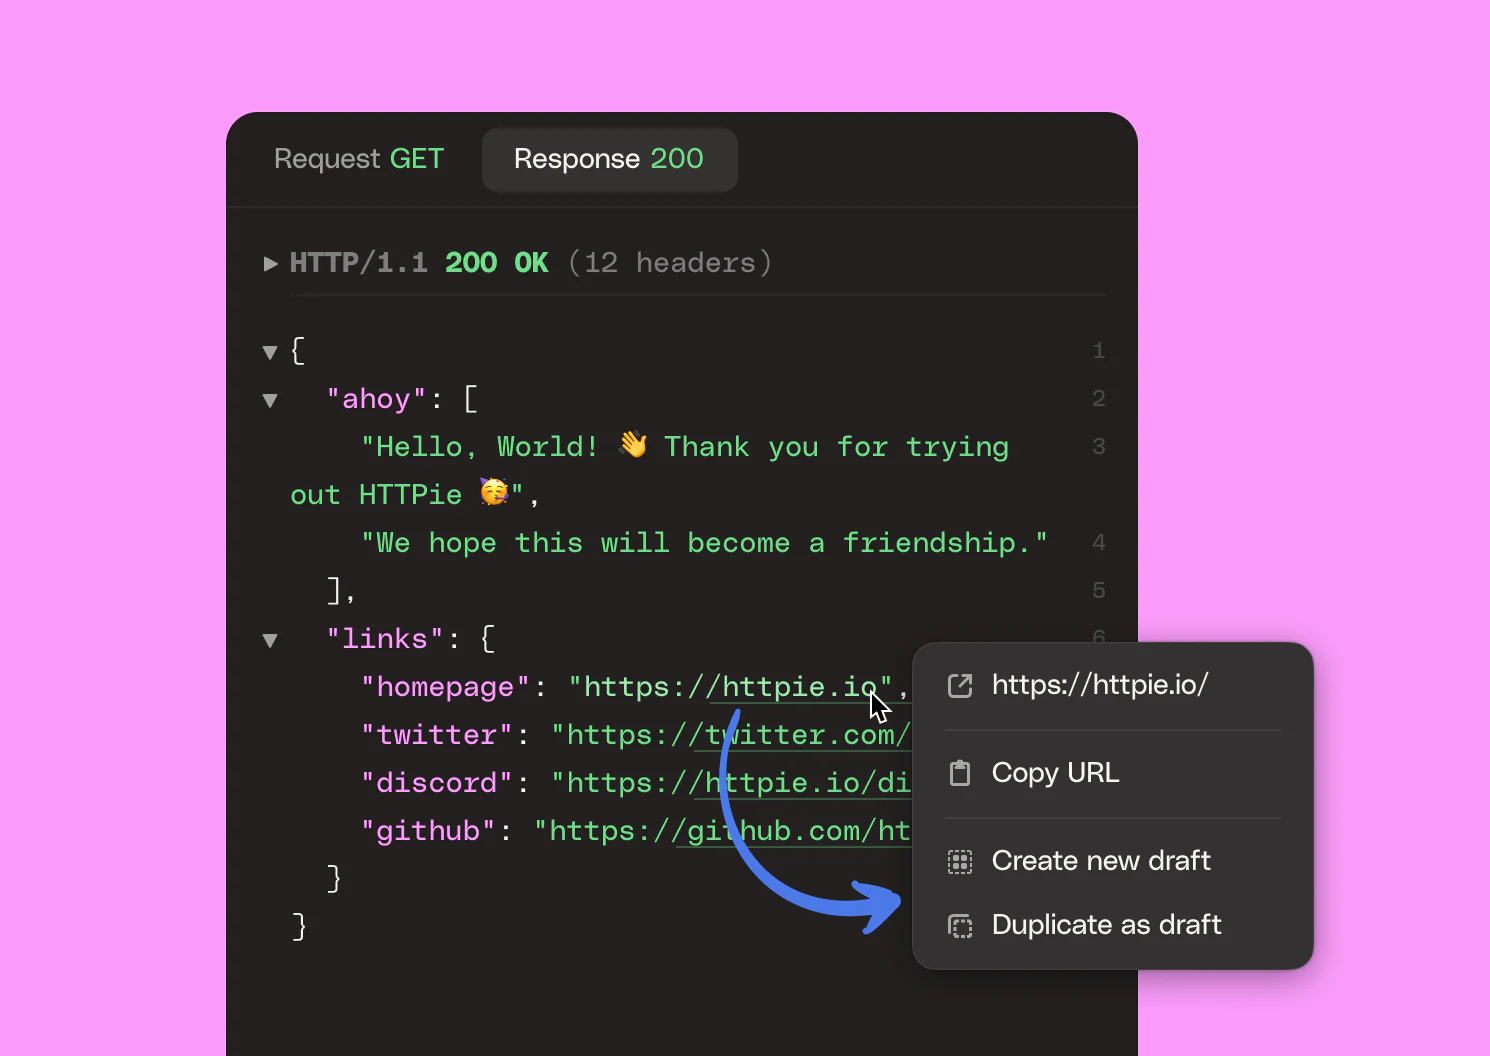
Clickable links have a subtle underline. When you spot one, control-click (⌘-click on macOS) or right-click it to get a menu with the URL options.
All links allow you to copy and open the URL in the browser. Links in the response additionally offer several shortcuts for creating a new request using the given URL:
- “Create new draft” creates a fresh new draft with that URL.
- “Duplicate as draft” creates a new draft that is a complete copy of the current request (i.e., with all your headers, request body, auth, etc.) while using the new URL.
- “Duplicate in collection” makes a copy of the current request with the new URL next to the original; only available if the current request belongs to a collection.
Relative URLs
Besides complete URLs, HTTPie also makes relative ones (like /api/users) interactive by prefixing the request’s base URL.
Search
Search is available everywhere where long content can appear: In the body editor and the preview, request, and response panels. With it, you won’t feel like you’re looking for a needle in a haystack.
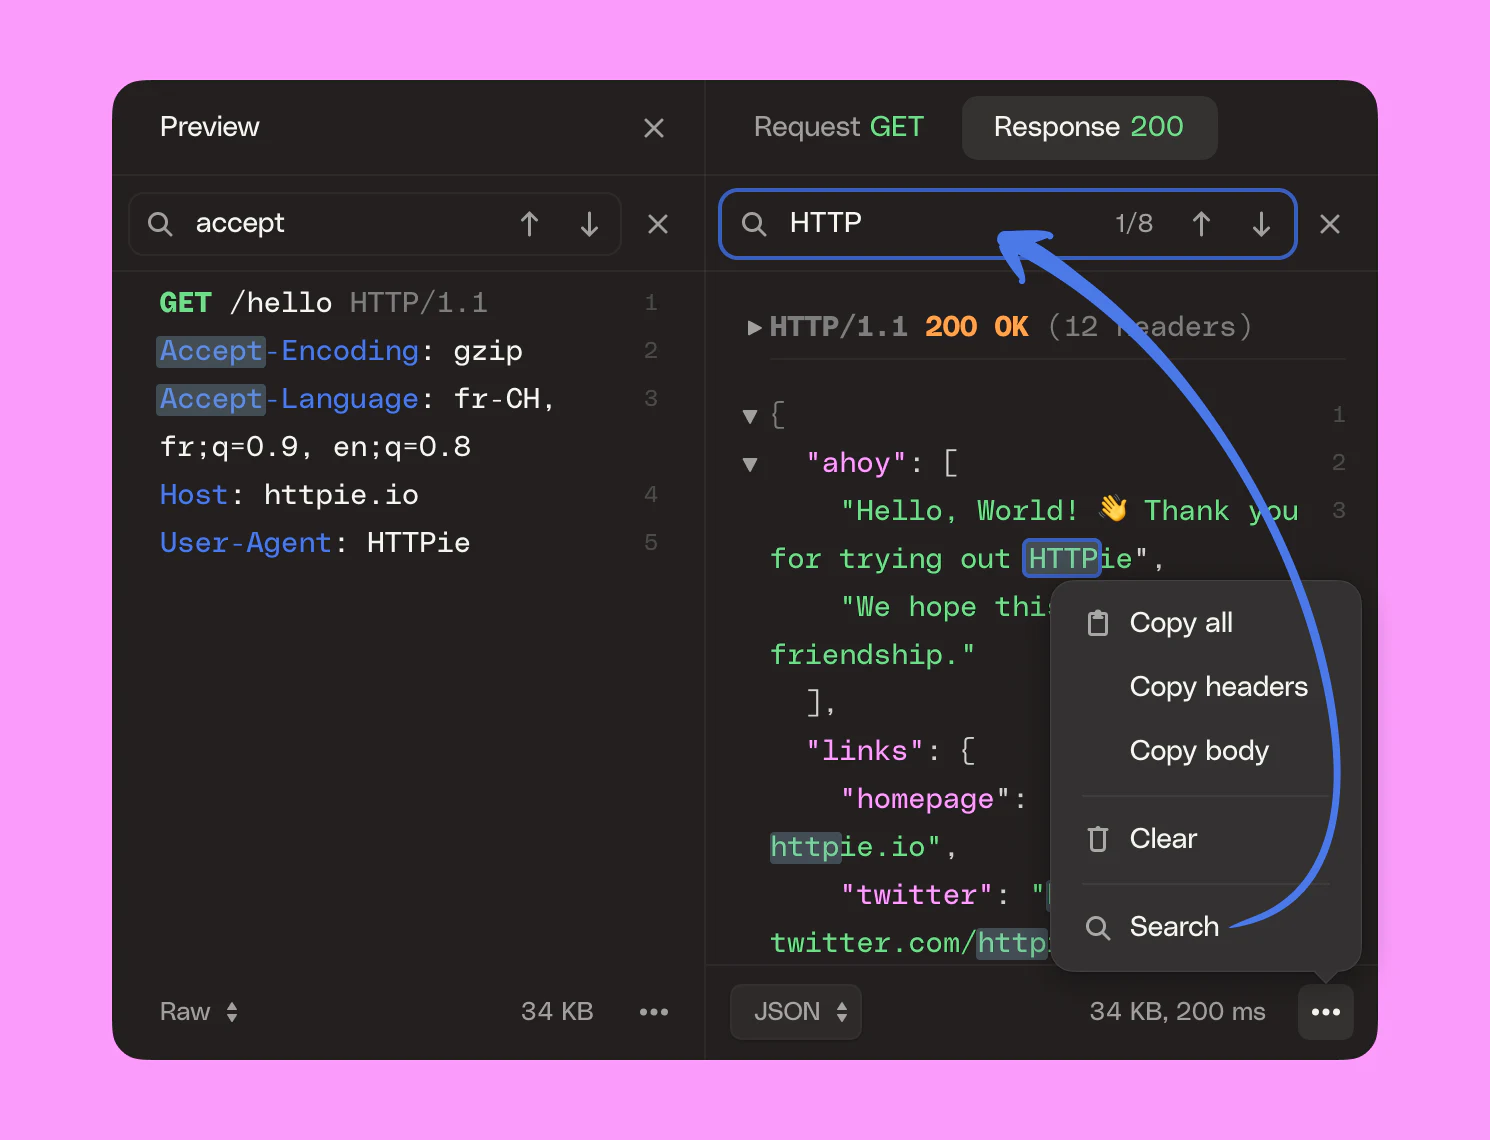
Activate the search field via a keyboard shortcut when the textarea is focused (macOS: ⌘F; Windows & Linux: ⌃F) or use the “Search” item in the menu.
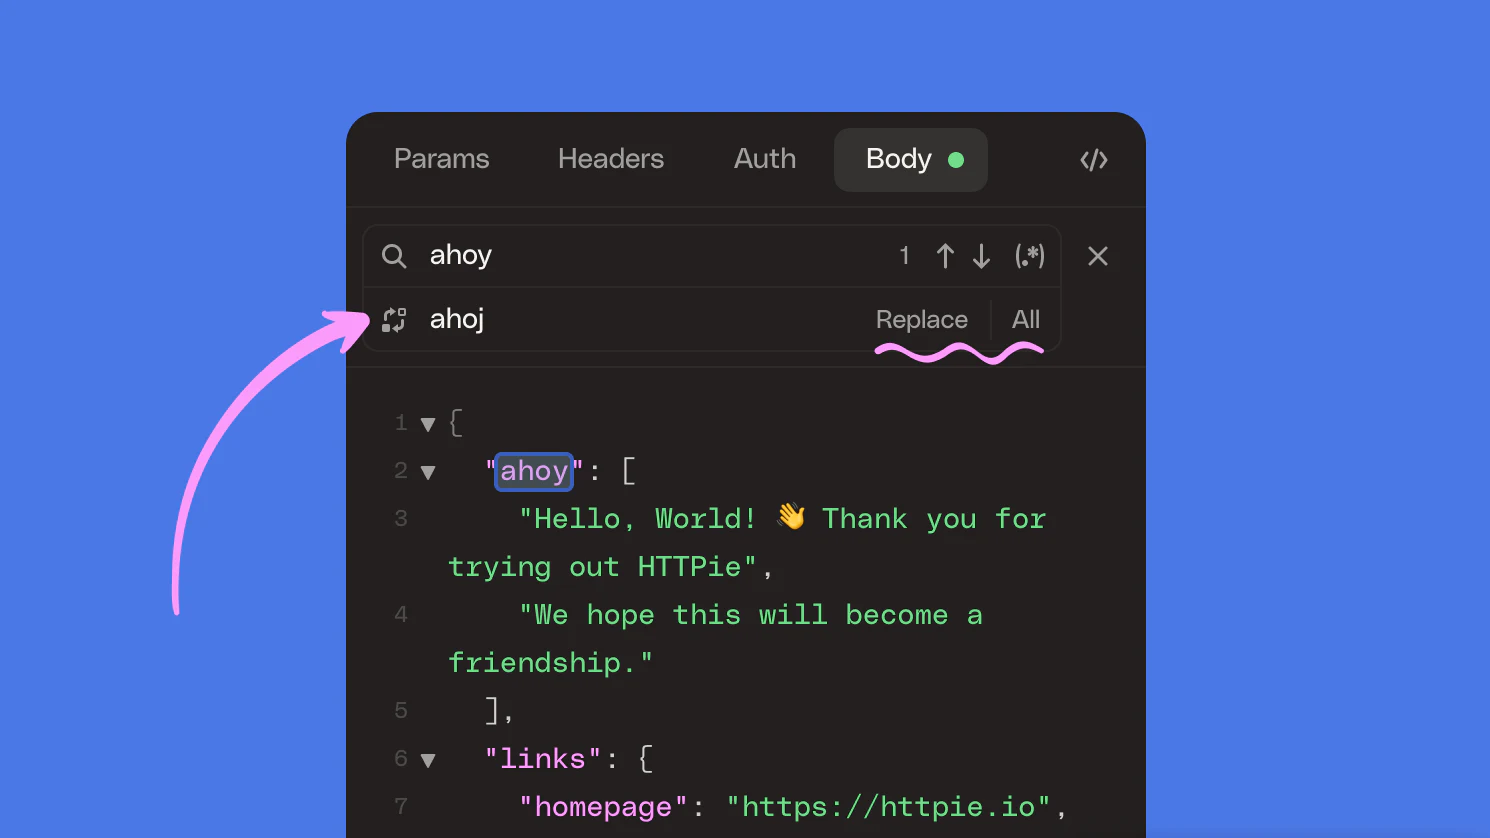
Search & replace
In editable code editors, like when editing the request body text, you can additionally perform search & replace. Use the buttons inside the second field to either “Replace” matching occurrences one by one or “All” at once.
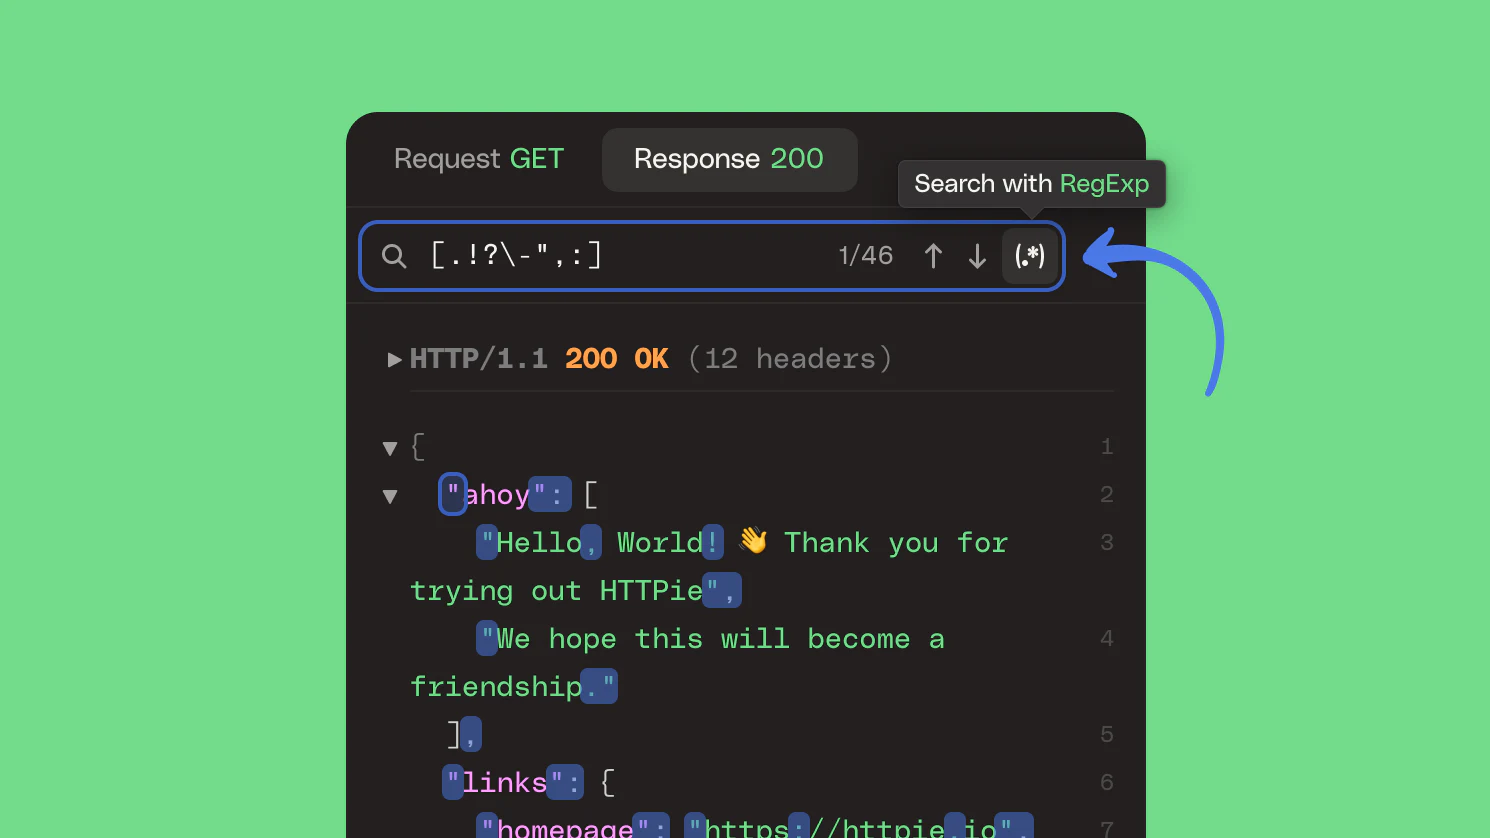
RegExp search
Regular expressions (aka RegExps) are a powerful tool for searching for patterns in text, and you can use them for text matching in HTTPie as well.
When searching & replacing using a RegExp, reference matching groups in the replace field using the dollar-group-number syntax, where $0 references the whole match, $1 is the first group, etc.
| Reference | Subject |
|---|---|
$0 | The whole match |
$1 | The first group |
$9 | The ninth group |
Filter
When talking to APIs you often deal with structured data like JSON, XML, and HTML. The explicit structure of these formats unlocks additional, more powerful ways of navigating and processing the data they contain.
With filtering, you can quickly analyze, transform, and selectively extract data from structured documents without leaving HTTPie.
The following data formats and query languages are available:
Activate the filter field via a keyboard shortcut when the textarea is focused (macOS: ⇧⌘F; Windows & Linux: ⇧⌃F) or use the “Filter” item in the panel’s menu.
Data filtering is available everywhere where structured data can appear: in the preview and the request and response panels.
To filter the request body data you’re editing, open the preview panel and activate the filter there. The preview shows the effective request body with all variables already substituted, which allows more robust filtering.
Filter vs Search
Data filtering and text searching are independent features. You can, for example, filter a massive JSON response and still search inside the filtered output. To do that, simply open both the filter field (⇧⌘F) and the text search field (⌘F).
Spaces
Spaces (short for workspaces) are containers for your projects. Each space is its own universe with a library, tab system, collections, saved requests, drafts, variables, and environments.
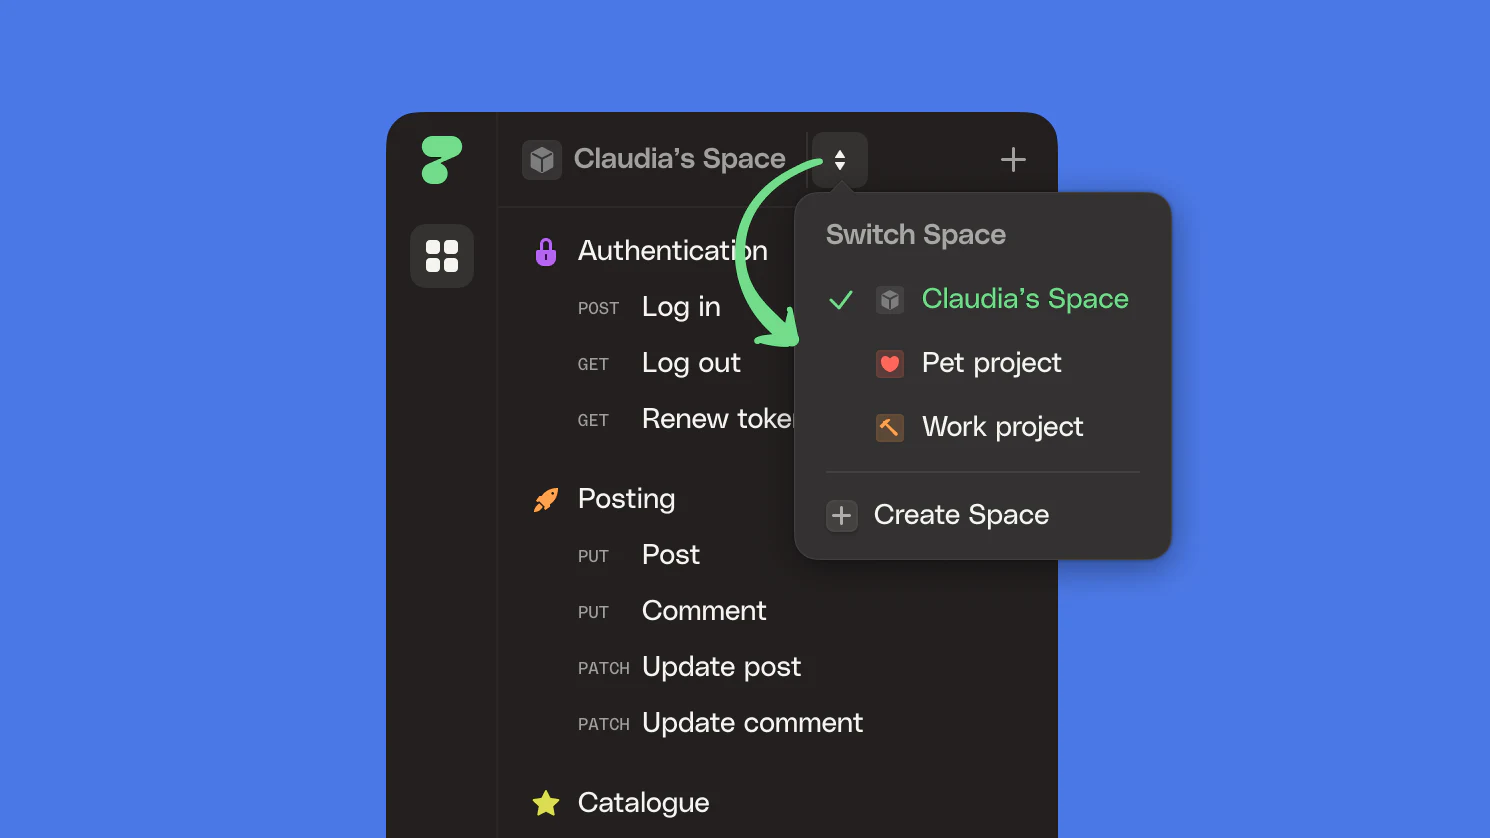
Multiple spaces
Your journey starts with a single space. But you can sign up and create as many spaces as you need.
When you have multiple spaces, you can easily switch from one to another.
Sidebar library
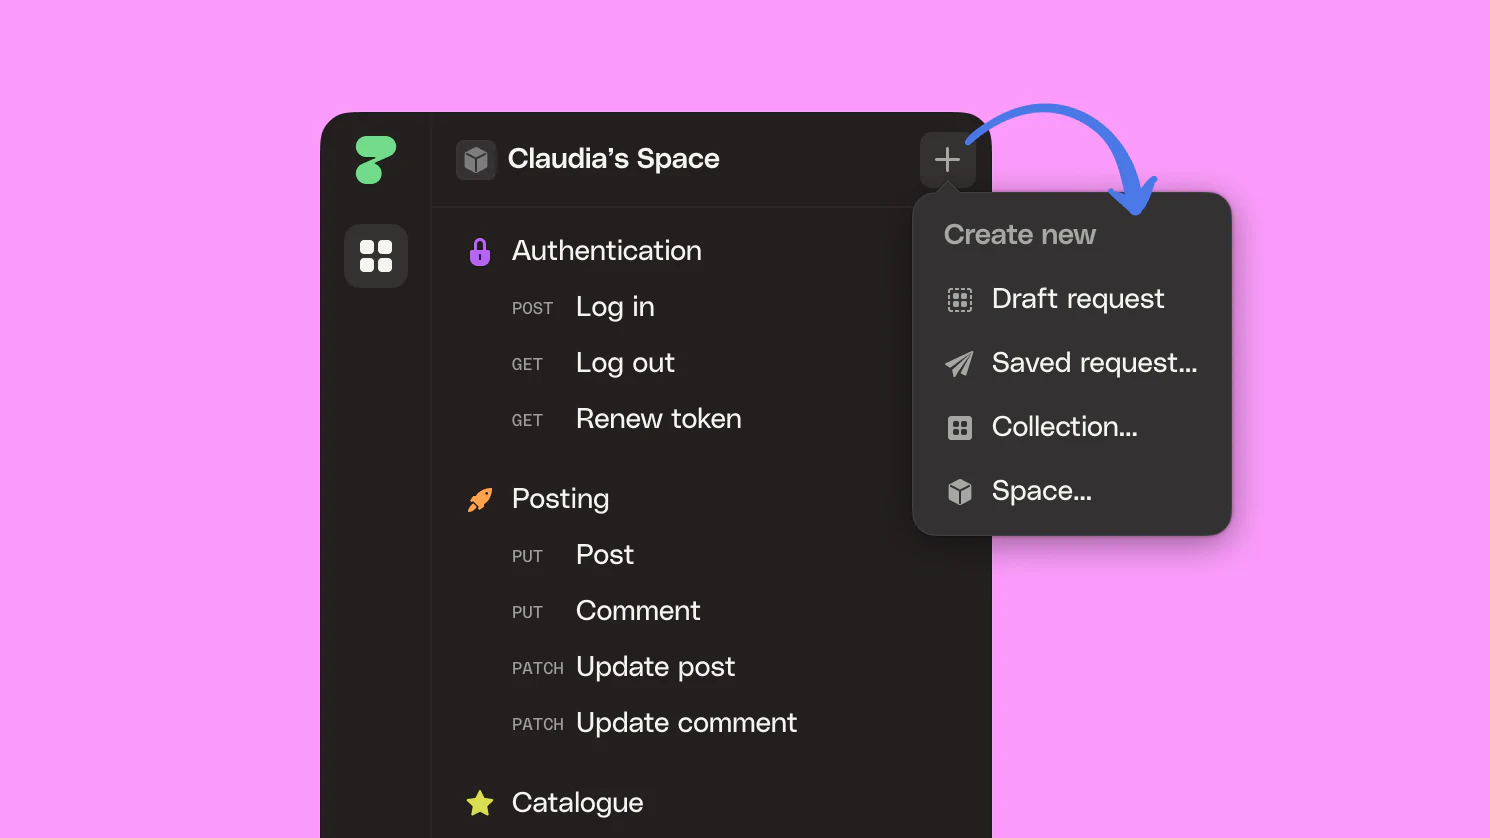
The sidebar is the home of the space library with all collections, saved requests and drafts.
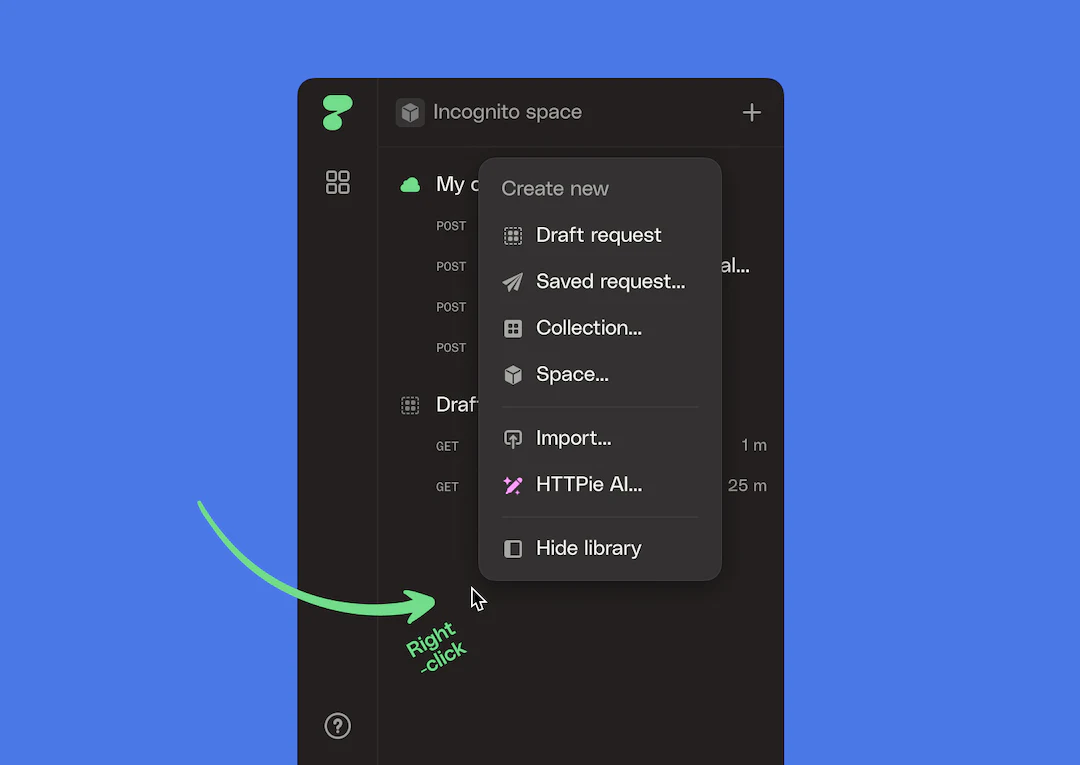
The versatile ➕ button allows you to create any space content from one place conveniently.
To make it more accessible, you can also invoke a similar menu through a right-click anywhere in the empty space in the sidebar.
Tab system
Tabs have been around almost since GUIs became a thing. For a good reason: they’re great for organization and juggling multiple things simultaneously. HTTPie has them, too.
Use them to have several requests open in a single window.

Spaces and collections also have their tabs. You can manage their nested content and inheritable values.
Just hit the space or collection name in the sidebar, and it opens up.
Collections
Collections are folders with ever-growing superpowers where you can store requests.
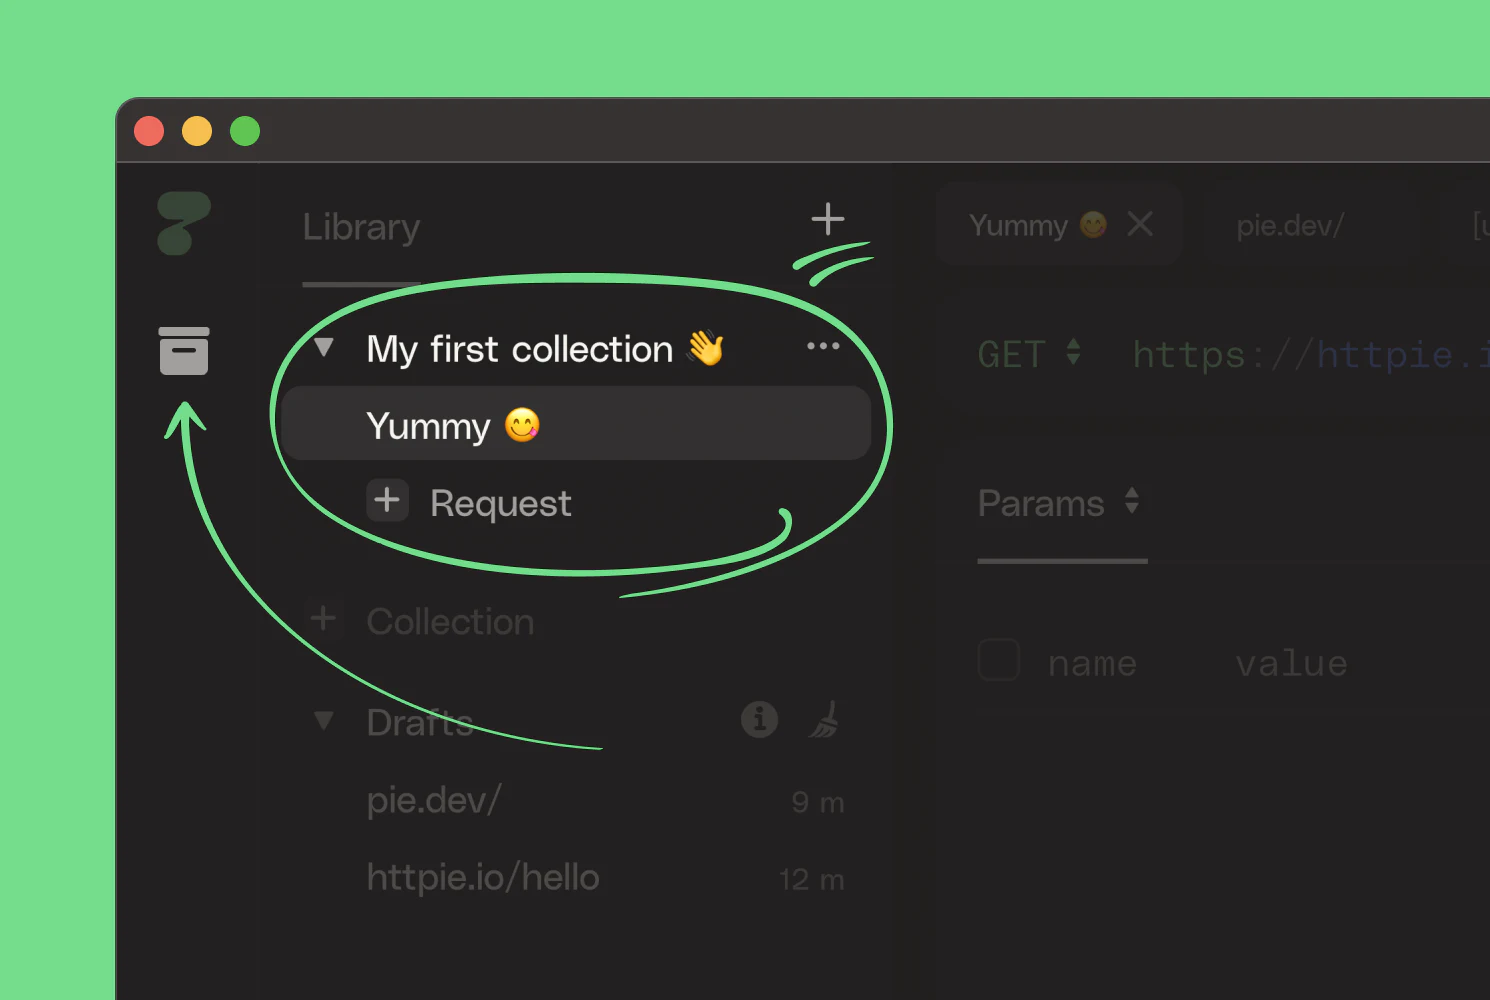
To save and organize requests, go to the sidebar, create a new collection, and start adding requests to it. Then, create as many more as you need, with as many requests as you need as well.
Saved requests
Saved requests is what HTTPie calls requests nested inside collections, as opposed to drafts.
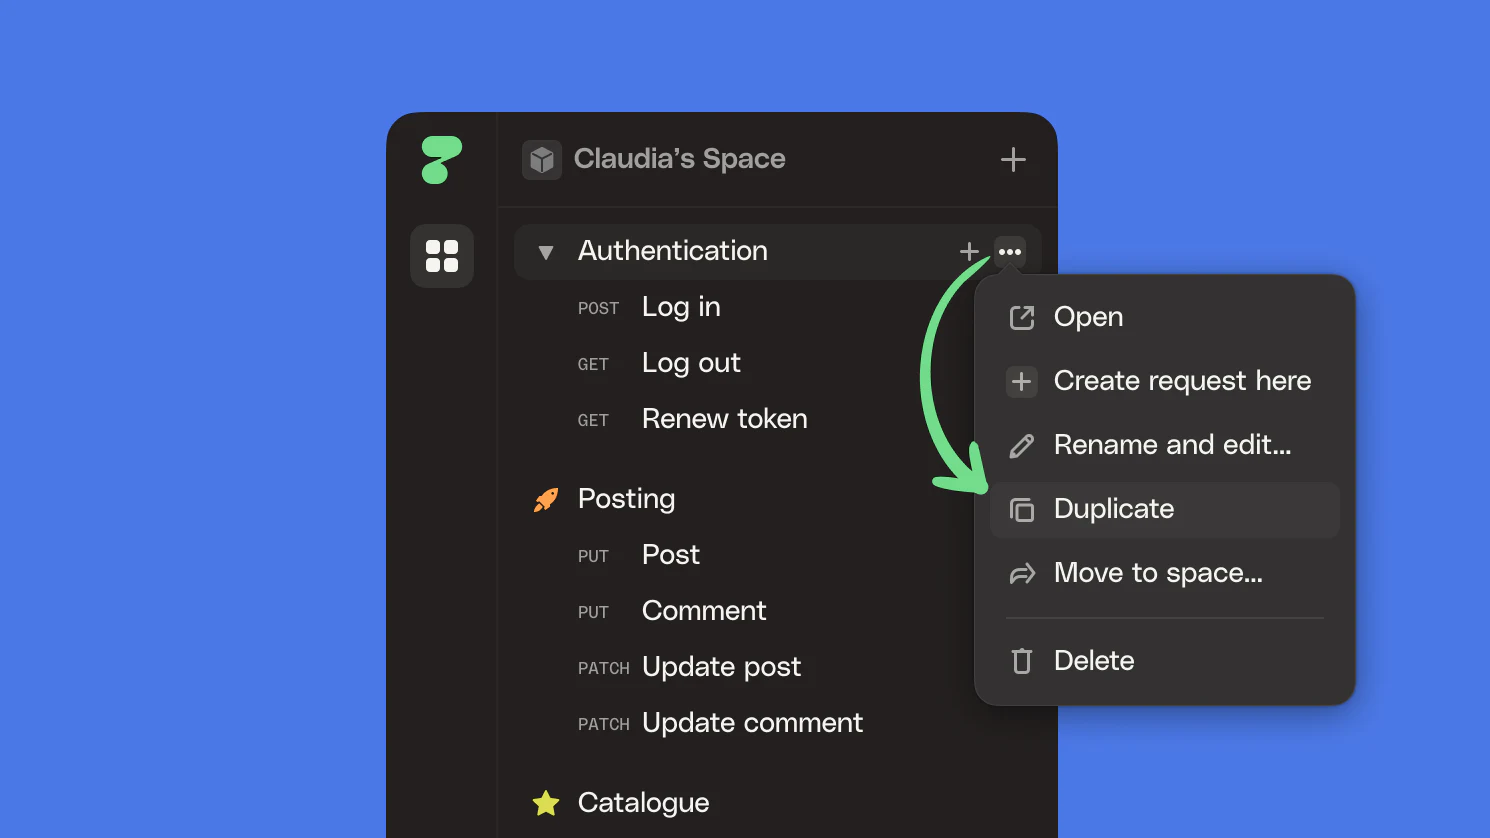
Moving collections and requests
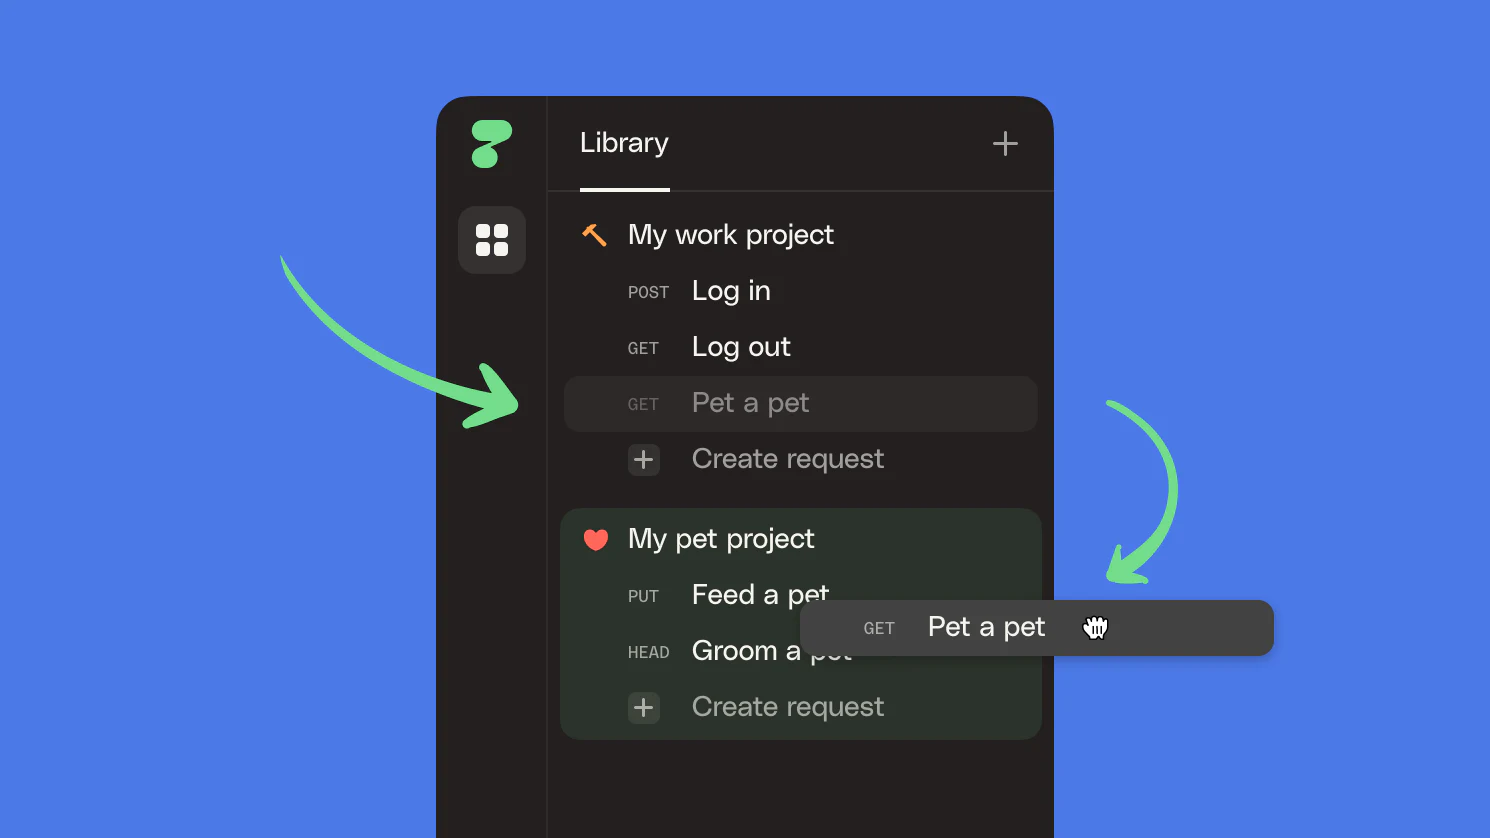
You can quickly move requests around from one collection to another, either with the intuitive drag-and-drop or through the request’s context menu.
Collections can be moved to a different space as well – no worries if you started at the wrong place. Nested requests will move, too.
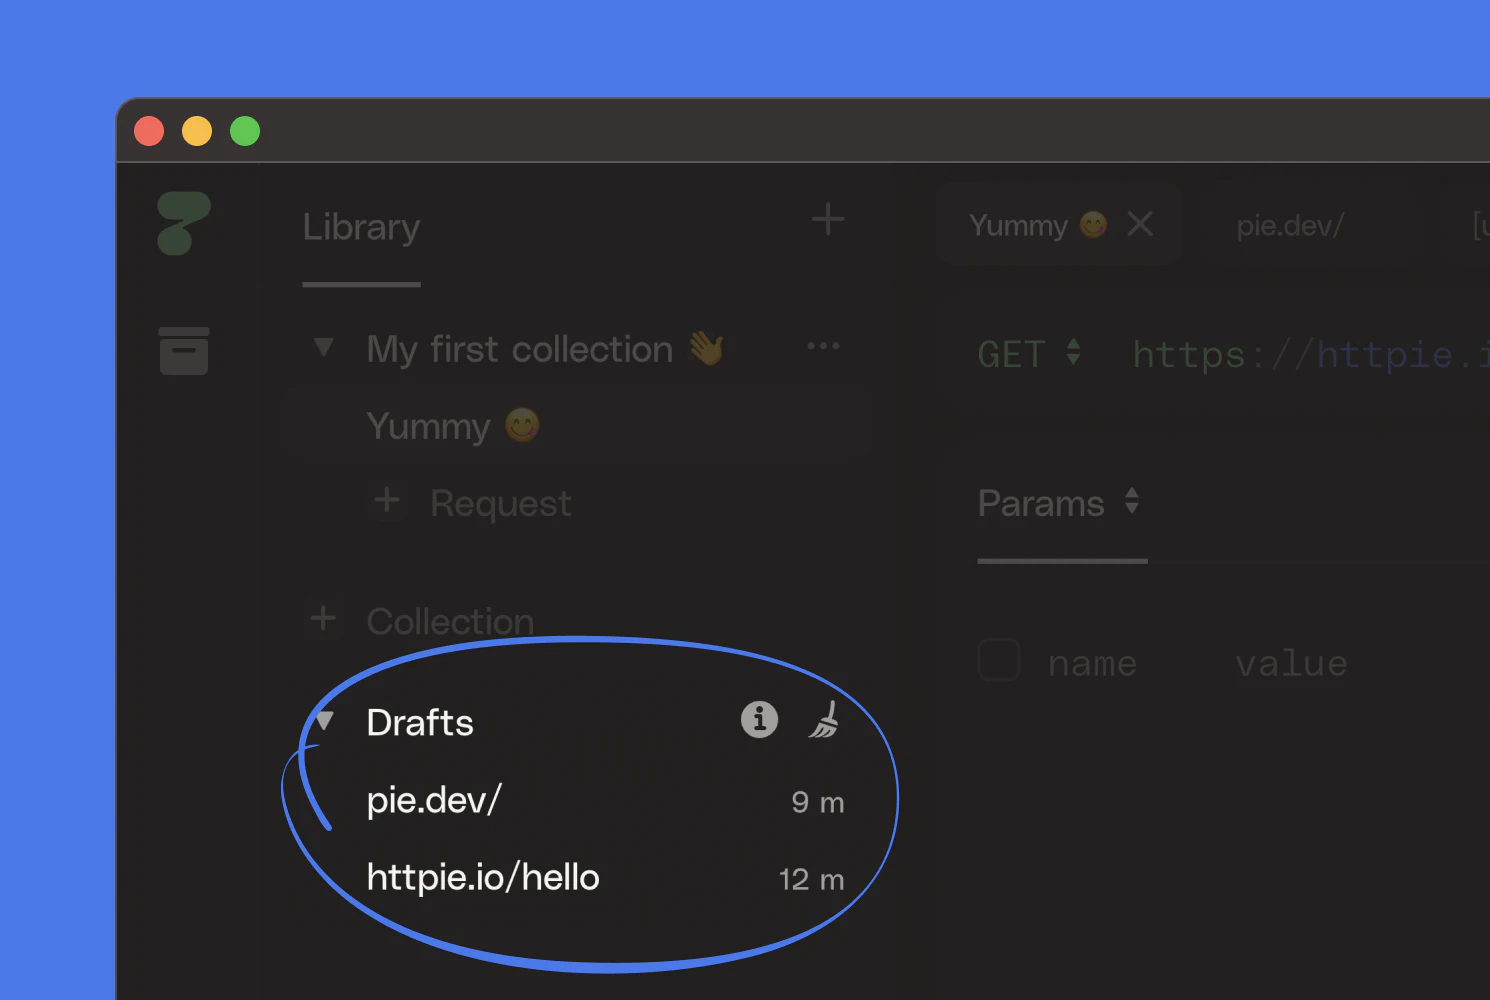
Drafts
Drafts are your ad-hoc requests, auto-saved in the built-in Drafts collection. They are fully functional and help you keep your collections uncluttered while experimenting with requests.
The importance of drafts will grow as HTTPie grows into a collaboration tool, as they'll always be your private safe room.
Save drafts
To keep a request around permanently and organized, move it to a collection.
Clear all drafts
If you don't need a draft anymore, you're free to delete it. Or clean all drafts at once if you need a fresh start.
Inheritance
Every container in HTTPie (such as spaces and collections) has ever-growing inheritance powers. It means its children inherit its settings.
Collection auth
If you use collections to group requests to the same API and that API has an authorization process, you only need to set the authentication credentials once and relax from then on.
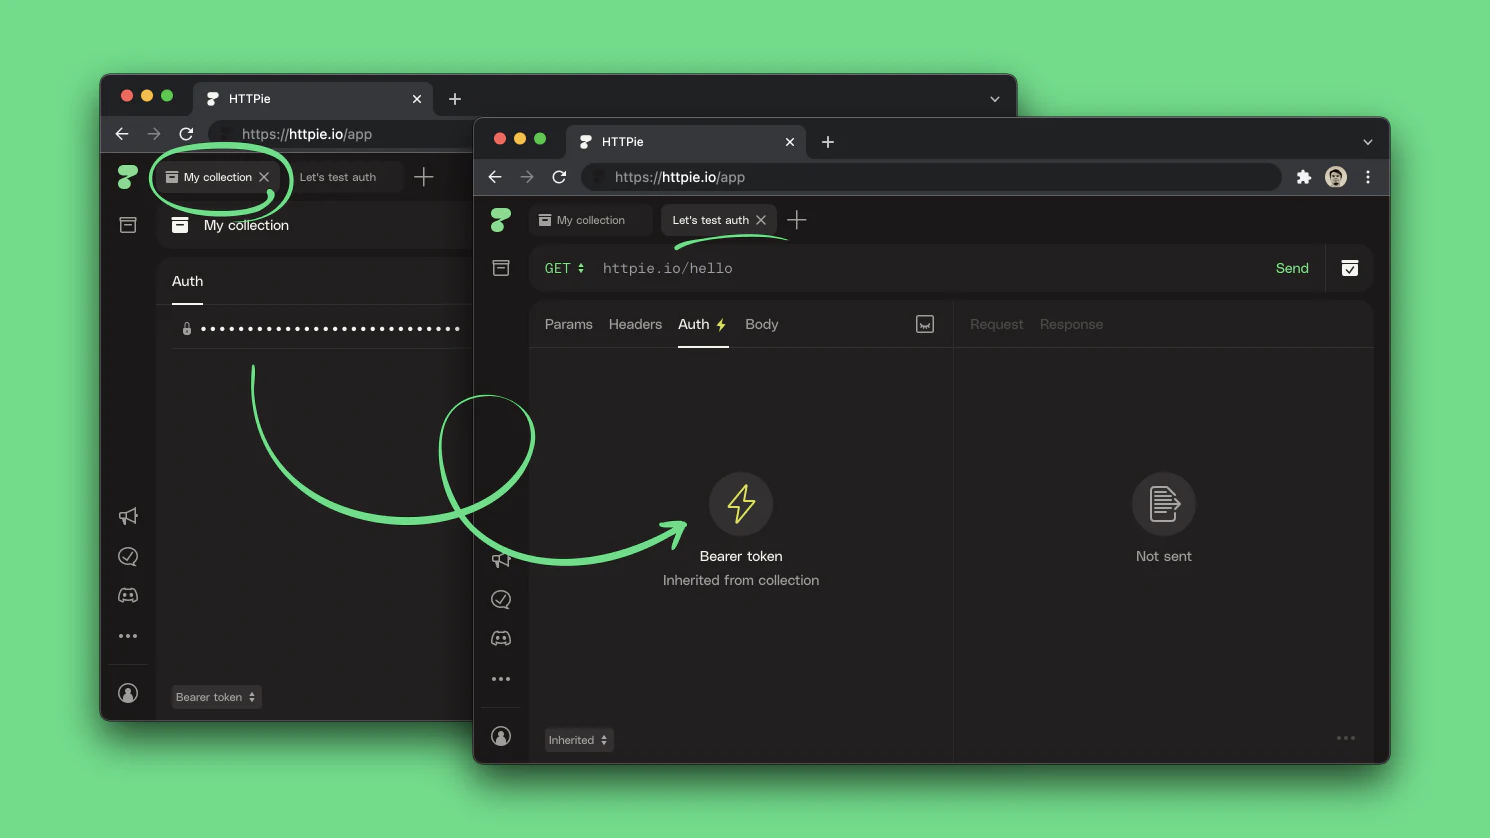
Set auth at the collection level in the collection tab, and it’ll auto-apply to every request that belongs to it.
If you go to a nested request, you’ll verify the inherited auth and be able to override it if needed.
Space variables and environments
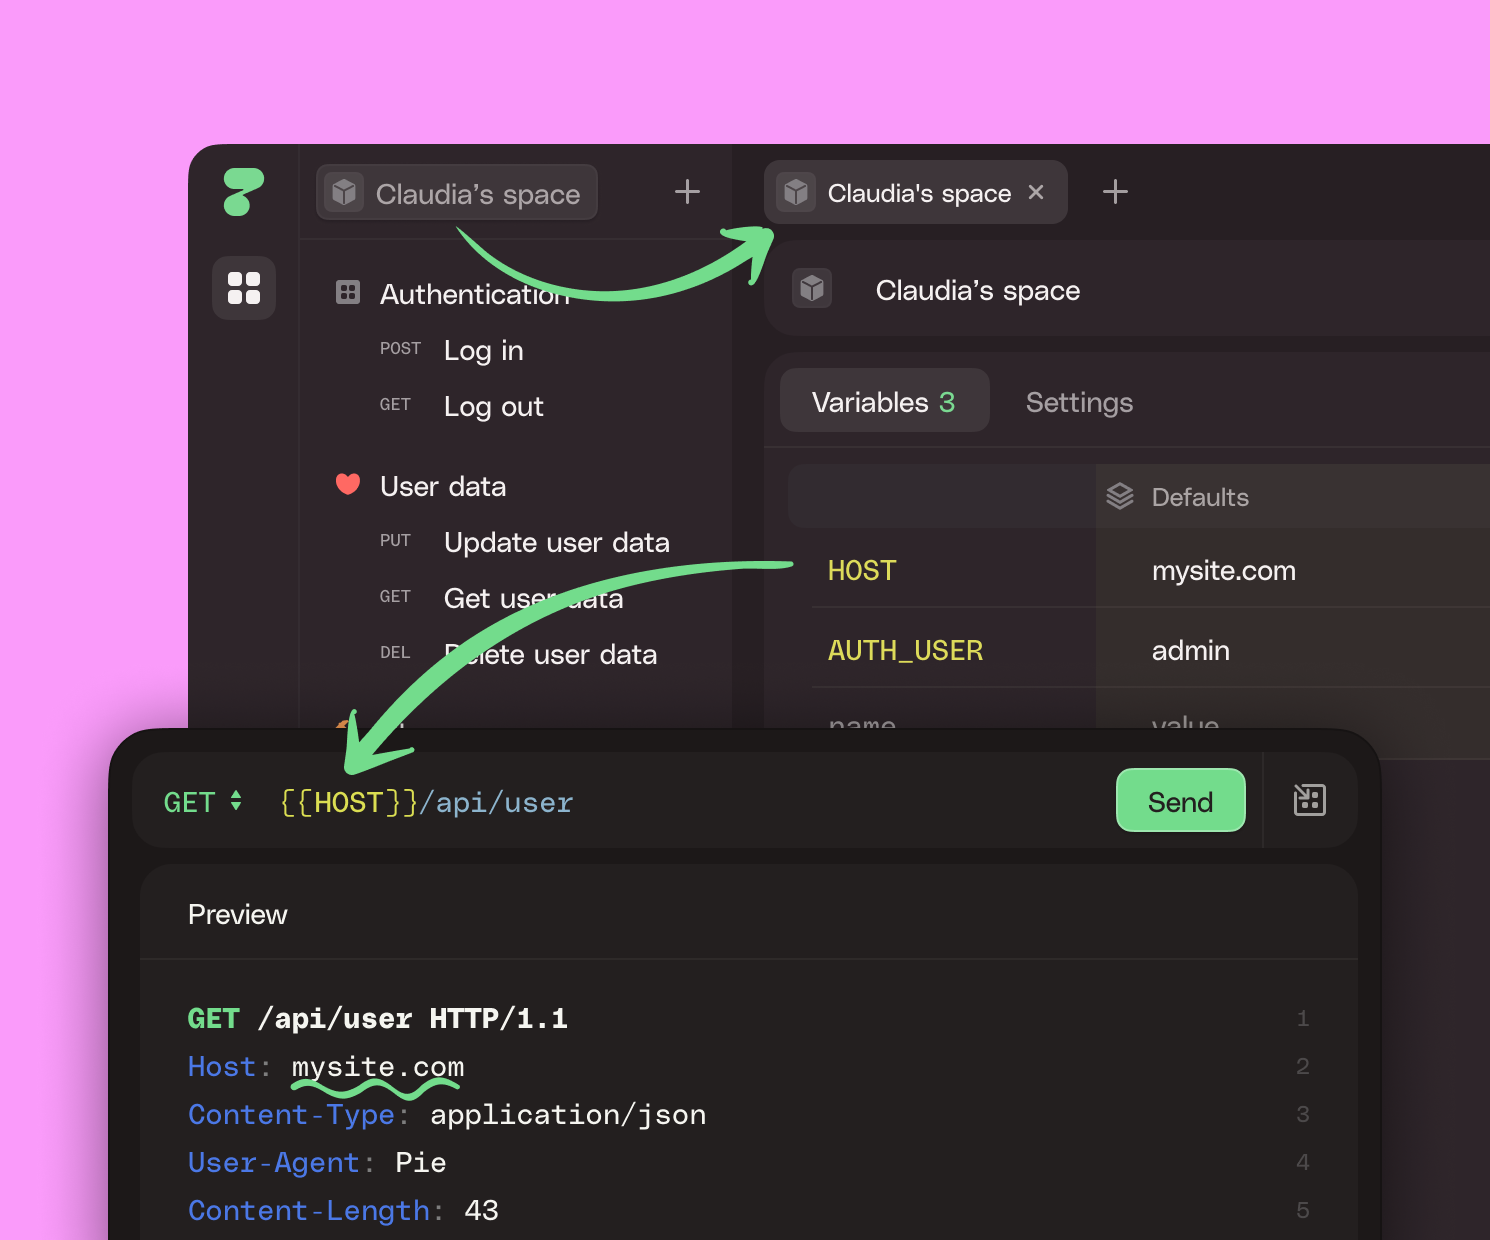
Variables and environments are at the space level in HTTPie. You can use them inside of its nested items.
Variables
Variables allow you to build requests in a clean and don’t-repeat-yourself way.
Defining variables
Define variables inside the current space tab.
Referencing variables
You can use the defined variables from any request or collection within the space using the {{VARIABLE_NAME}} syntax.
Secret variables
Mark a variable as secret, and HTTPie masks its values in the variable list so you don’t accidentally share them on a Zoom call, for example.
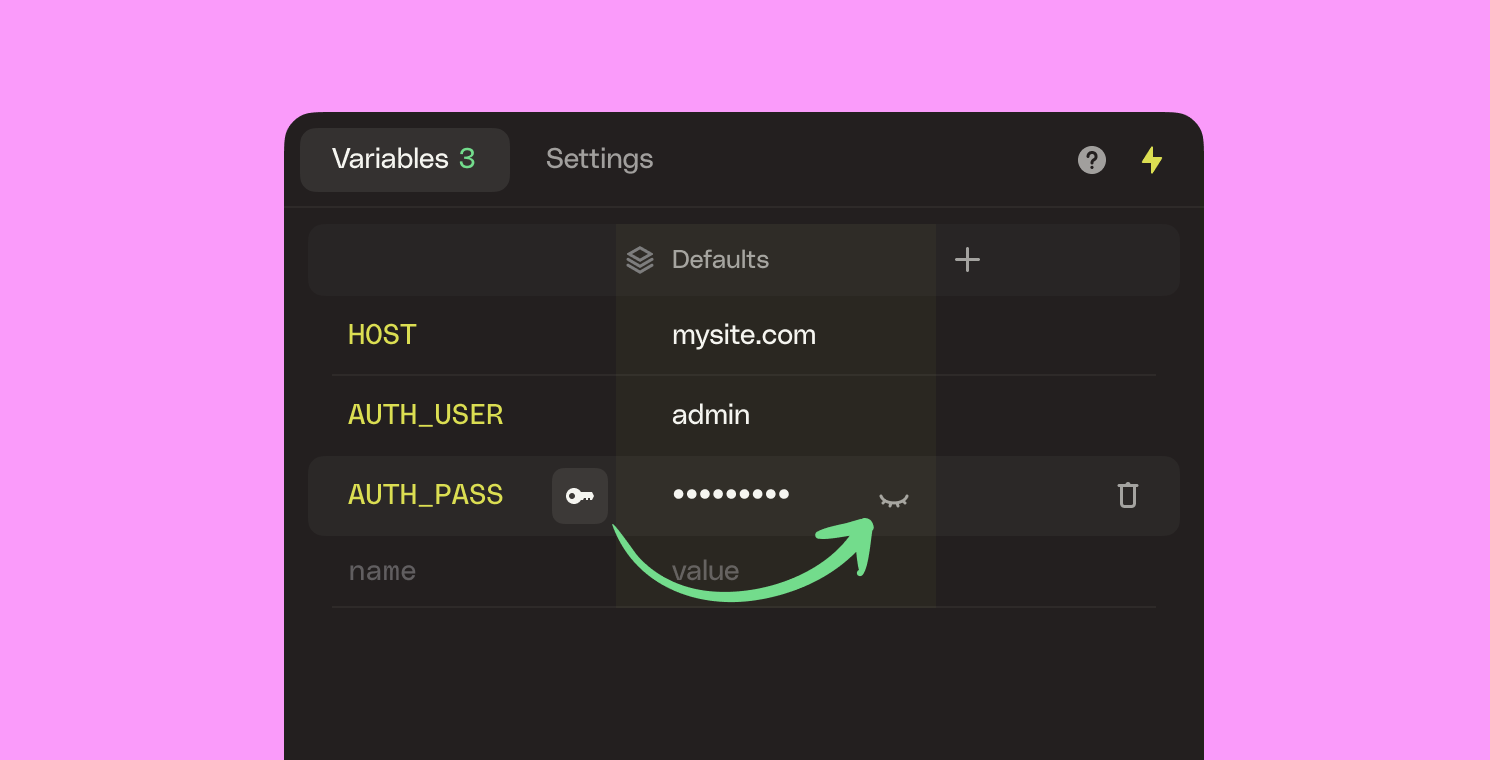
See local-only environments below for other advanced ways to deal with sensitive variables.
Debugging variables
It is often helpful to review the full HTTP request with variables already substituted before sending it. To do that, keep the preview panel open.
Undefined variables
If you reference a variable that doesn’t exist, HTTPie marks the reference red and prevents the request from being sent until the variable is declared. This way, you never have to deal with confusing results.
Recursive variables
You can reference a variable from another variable’s value. HTTPie resolves variables recursively to help you keep your spaces DRY.
Environments
Environments allow you to quickly swap between different contexts. A common practice is to have an API running in different environments—on your local machine, in staging, in production, etc.
Imagine you need to talk to the same API in production but also in a staging environment. The requests are the same, but the root URL and auth, for example, differ. You can turn those values into variables, so it’s easier to change them. And with environments, you can instantly toggle between different values for those variables:
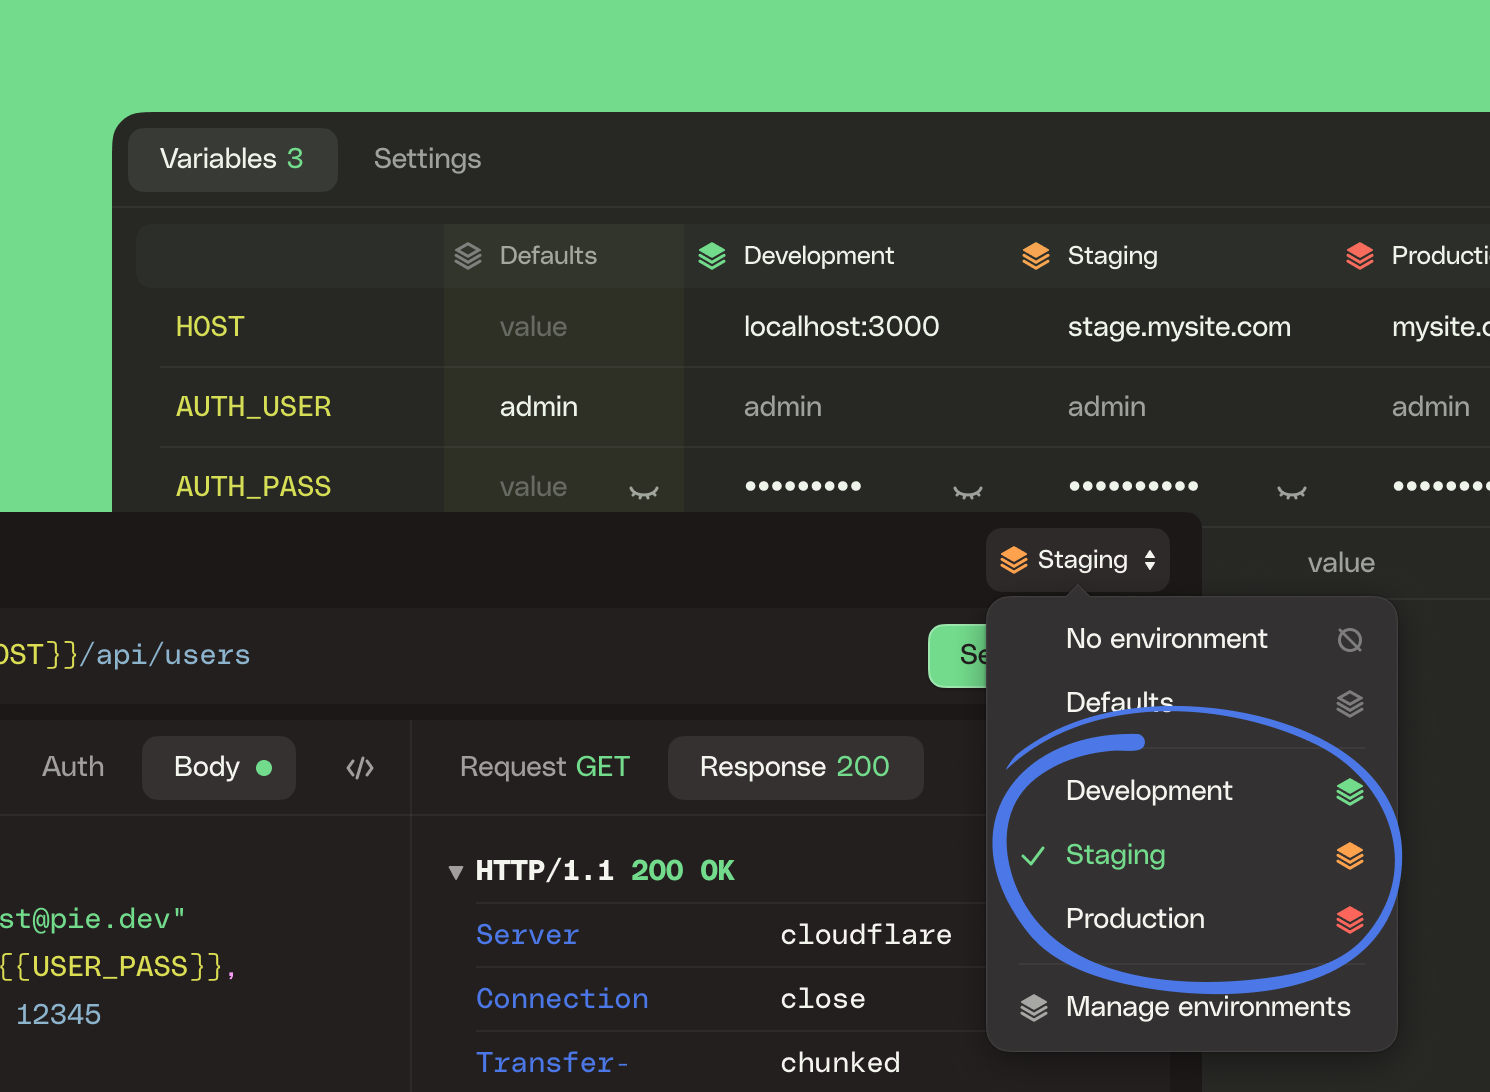
You can create as many environments as you like and switch between them using the menu at the top right of the app.
Environment structure
An environment is a named set of variable values. In the environments table, rows represent variables, columns represent environments, and inner cells are specific values for a variable in a specific environment. So once you declare a variable, it exists in every environment in the space (possibly with differing or empty values).
Defaults environment
Every space starts with an empty environment called “Defaults.” It works as a regular environment, and you can use it exclusively for simple use cases.
When you create additional environments, they use values from Defaults for variables where you don’t explicitly specify a custom value. If you don’t need a default value for a variable, you can simply leave its value in Defaults empty.
Local-only environments
If you want to prevent some data from syncing to the HTTPie cloud and across your devices, you can store it as values in a local-only environment.
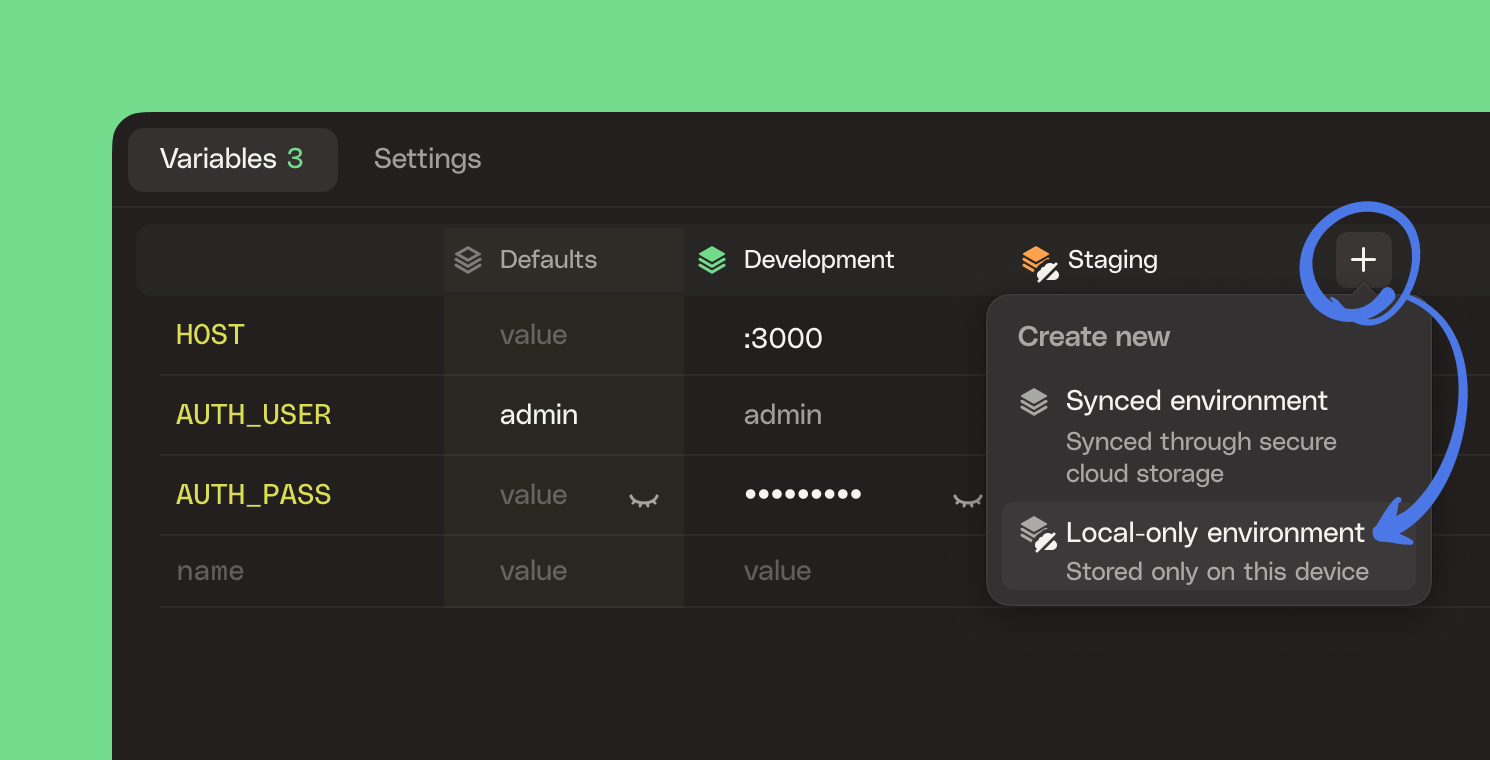
When creating an environment, select the option to create a local-only one, and its values will never leave your device.
No environment
In some situations, you might want to temporarily prevent requests from accessing your variables altogether. By selecting the “No environment” option, you can achieve just that:
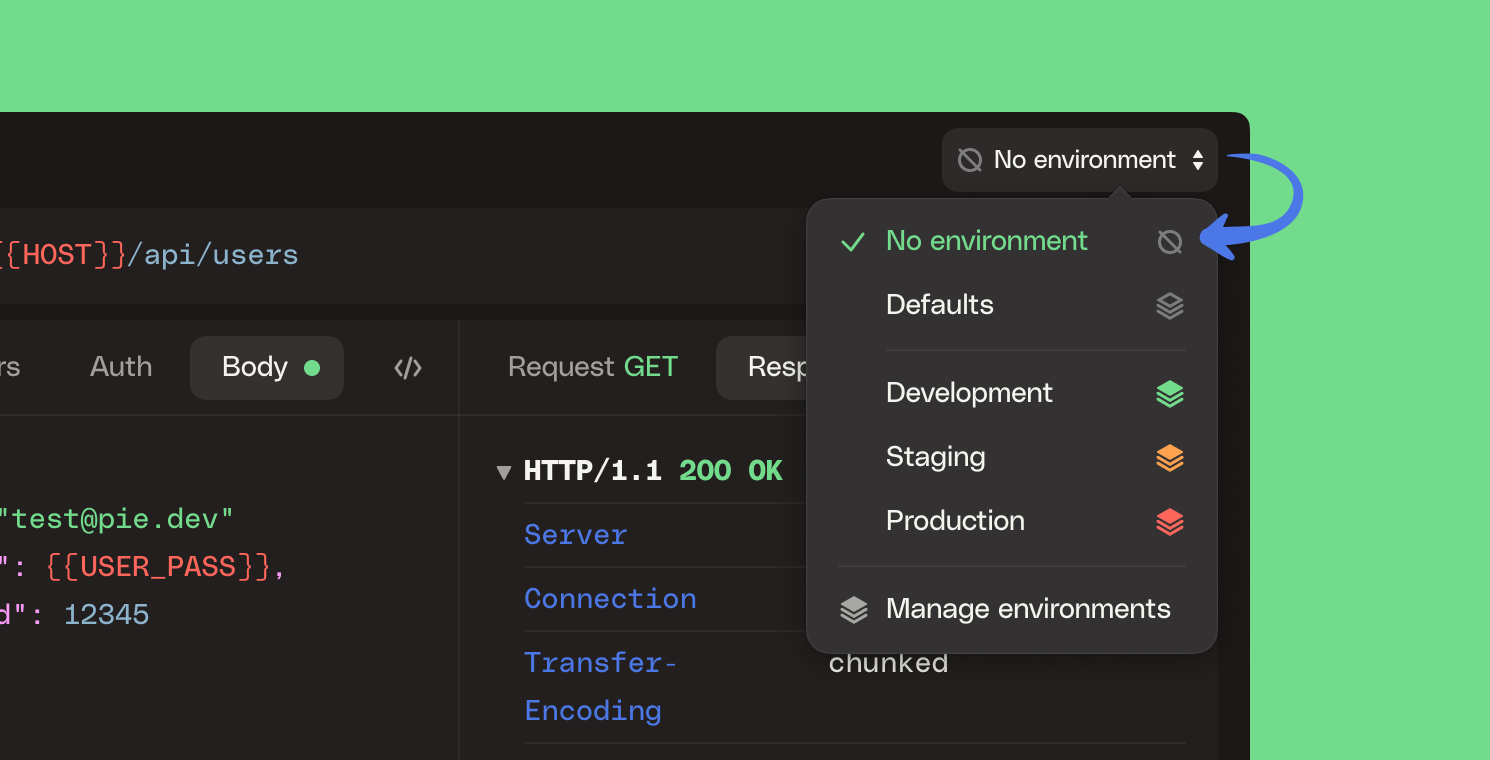
Currently, this option is most useful for debugging your requests. But, because variables can contain sensitive data, the importance of this feature will grow as HTTPie continues to add various import and sharing mechanisms.
Duplication
You can duplicate almost any entity in HTTPie. This allows you to have templates and save time.
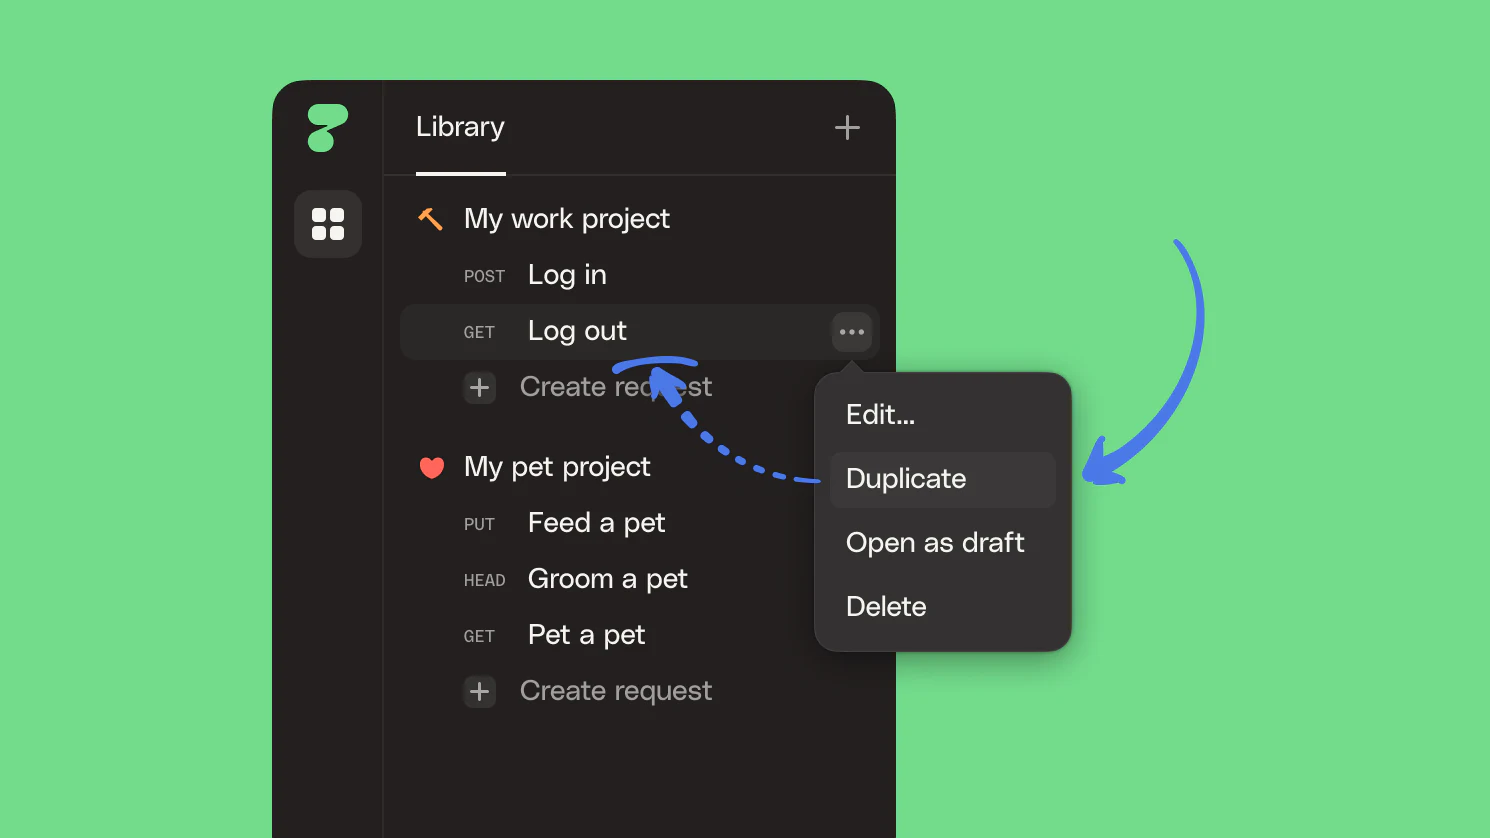
Duplicate requests
You can duplicate requests inside their collection as well as open them as a new draft for some ad-hoc testing.
Duplicate collections
You can also duplicate whole collections for fast reuse.
Duplicate environments
Environments are duplicable as well, as local or synced.
Profile
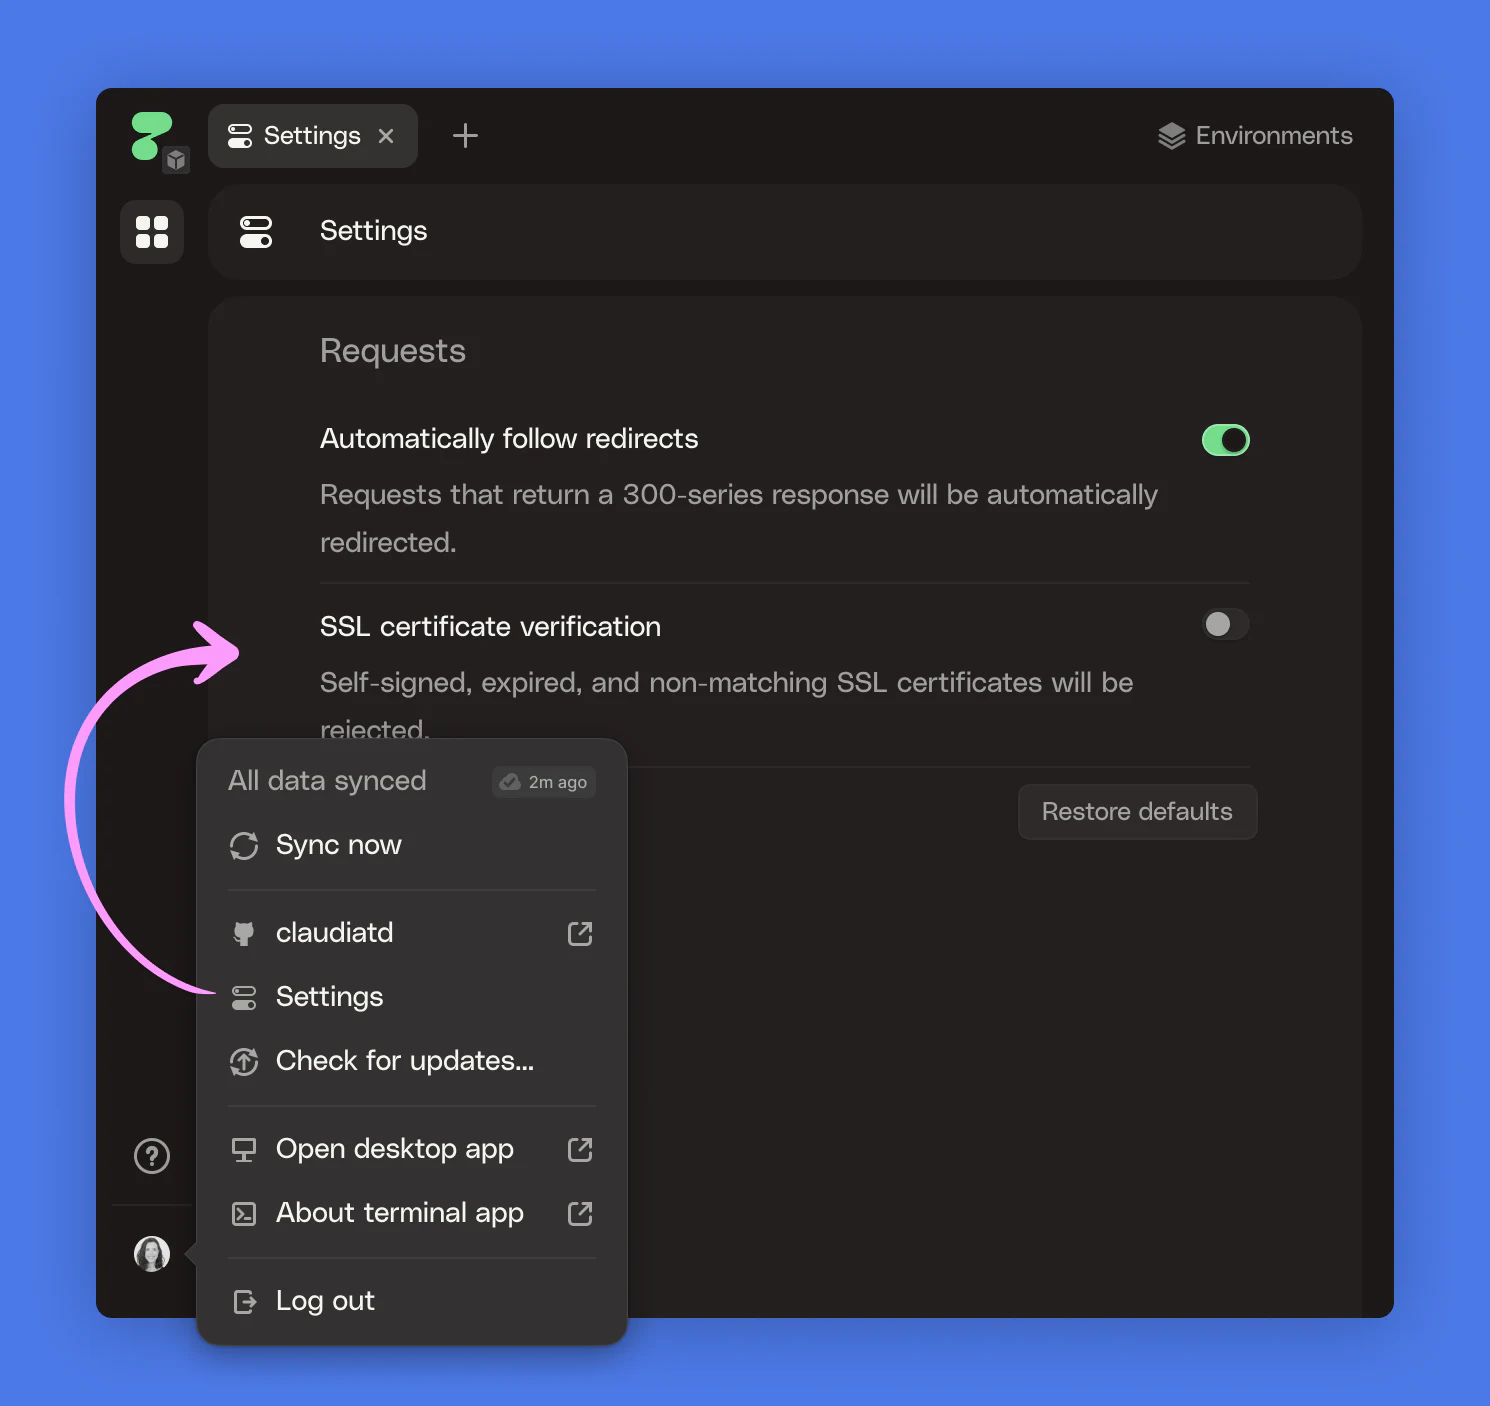
Under your avatar, in the bottom left corner, you have a menu with your profile and session info. Here you find everything related with your account, and also syncing, app updates and settings.
Incognito
You can use HTTPie for Web & Desktop without an account. When you are not logged in—when you’re incognito—you still have access to most features apart from sync, creating new spaces, etc.
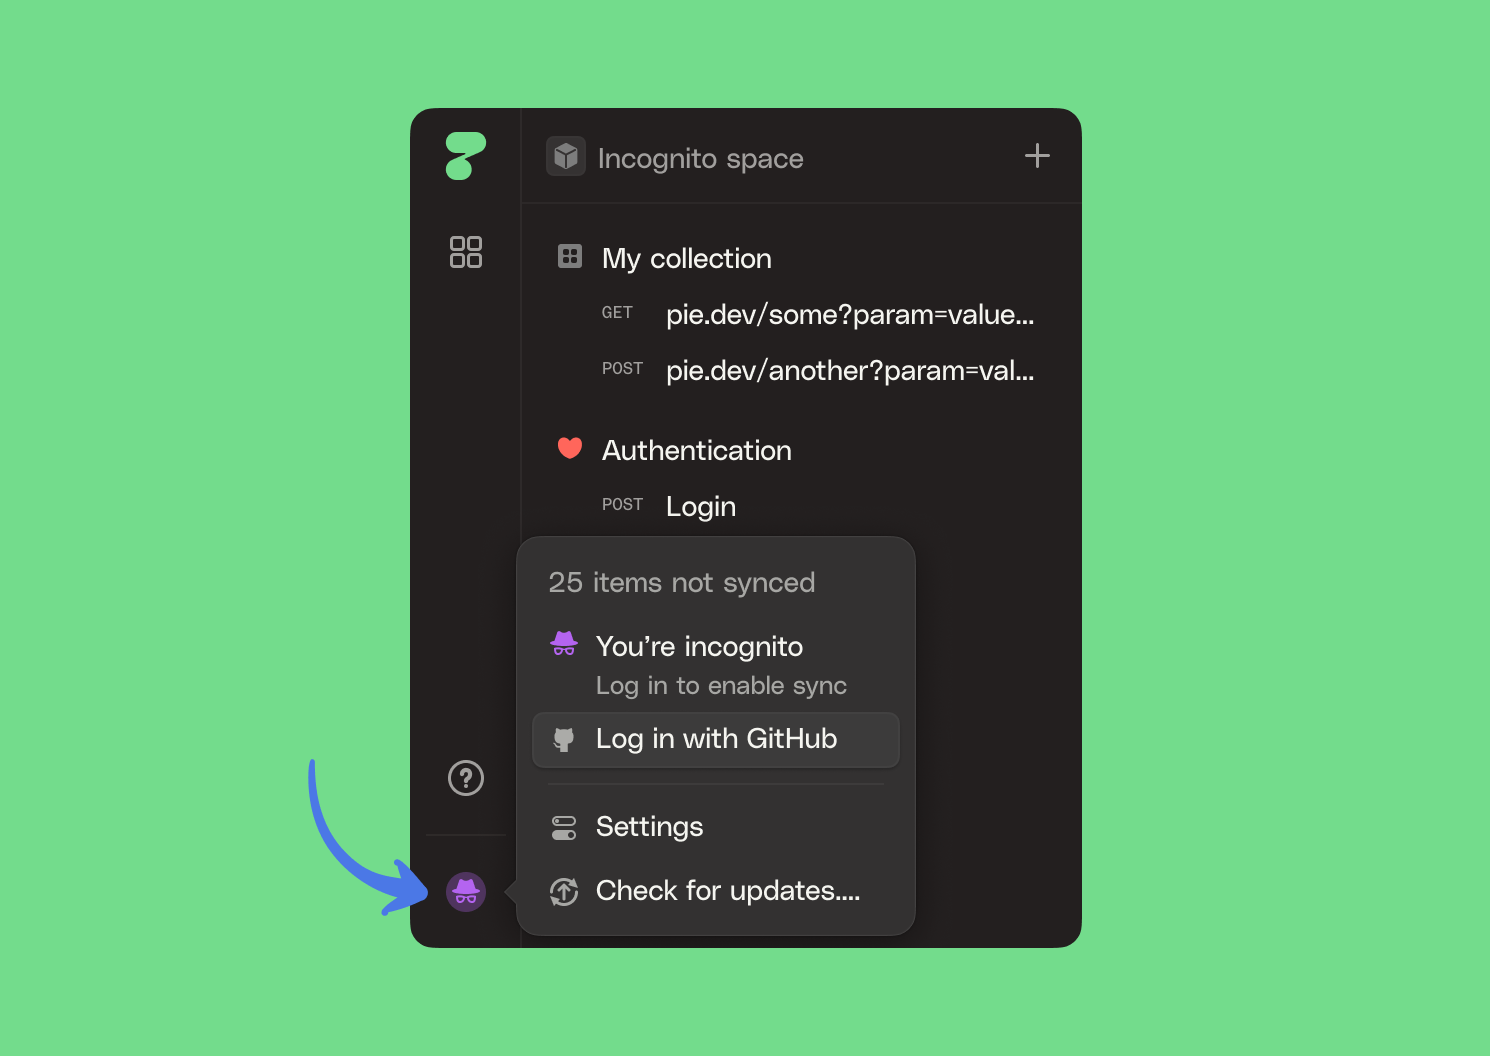
The incognito mode works with local storage. When you decide to log in or sign up, we sync your incognito space into your account, and you can continue to work uninterrupted.
Account
You can create an HTTPie account to unlock various benefits like:
- Unlimited spaces
- Secure cloud backup of your data
- Real-time sync across your devices
- AI assistance
Sign up
To create a new account, select “Log in with GitHub…” in the profile menu.
Log in
To log into your existing account, select “Log in with GitHub…” in the profile menu.
Log out
To log out and delete all local data from the app, select “Log out…” in the profile menu.
Data storage
HTTPie always persists your data in local storage, which allows you to work offline and incognito. Yet, with the data cloud sync, you can fully benefit from the entire HTTPie universe.
Real-time sync
As long as you have an account and you're connected to the Web, your data is backed up to our secure cloud and synchronized across your devices.

When you change something, it’s instantly updated on your other clients. Start working in the Web app, switch to the Desktop app, and check some request details on your phone later.
Trigger sync manually
Triggering sync manually shouldn't be necessary, but, if you ever need to, select "Sync now" in the profile menu.
Sync status
To see the current sync status, check out your profile menu.
Data security
All synced data is encrypted at transit between the HTTPie cloud and clients (SSL) and at rest in a backed-up AWS RDS storage with redundancy (AES).
All sensitive data—your requests, auth credentials, variables, etc.—are additionally encrypted at the server-side before storage and decrypted on client access (AES).
Offline
You might be wondering, can I still test my local API on a plane trip if I need to? Sure thing! HTTPie works offline first.
You can continue to work as usual when your computer is offline (or our cloud is temporarily down). HTTPie simply continues to persist your data in local storage and resumes syncing once the connection is restored.
Auto-save
You don’t have to worry about hitting save because HTTPie continuously auto-saves your work.
App updates
HTTPie continuously improves the app and releases frequent updates with new features and bug fixes.
Auto-updates
The desktop app downloads new versions automatically, even though you don’t have to install them right away.
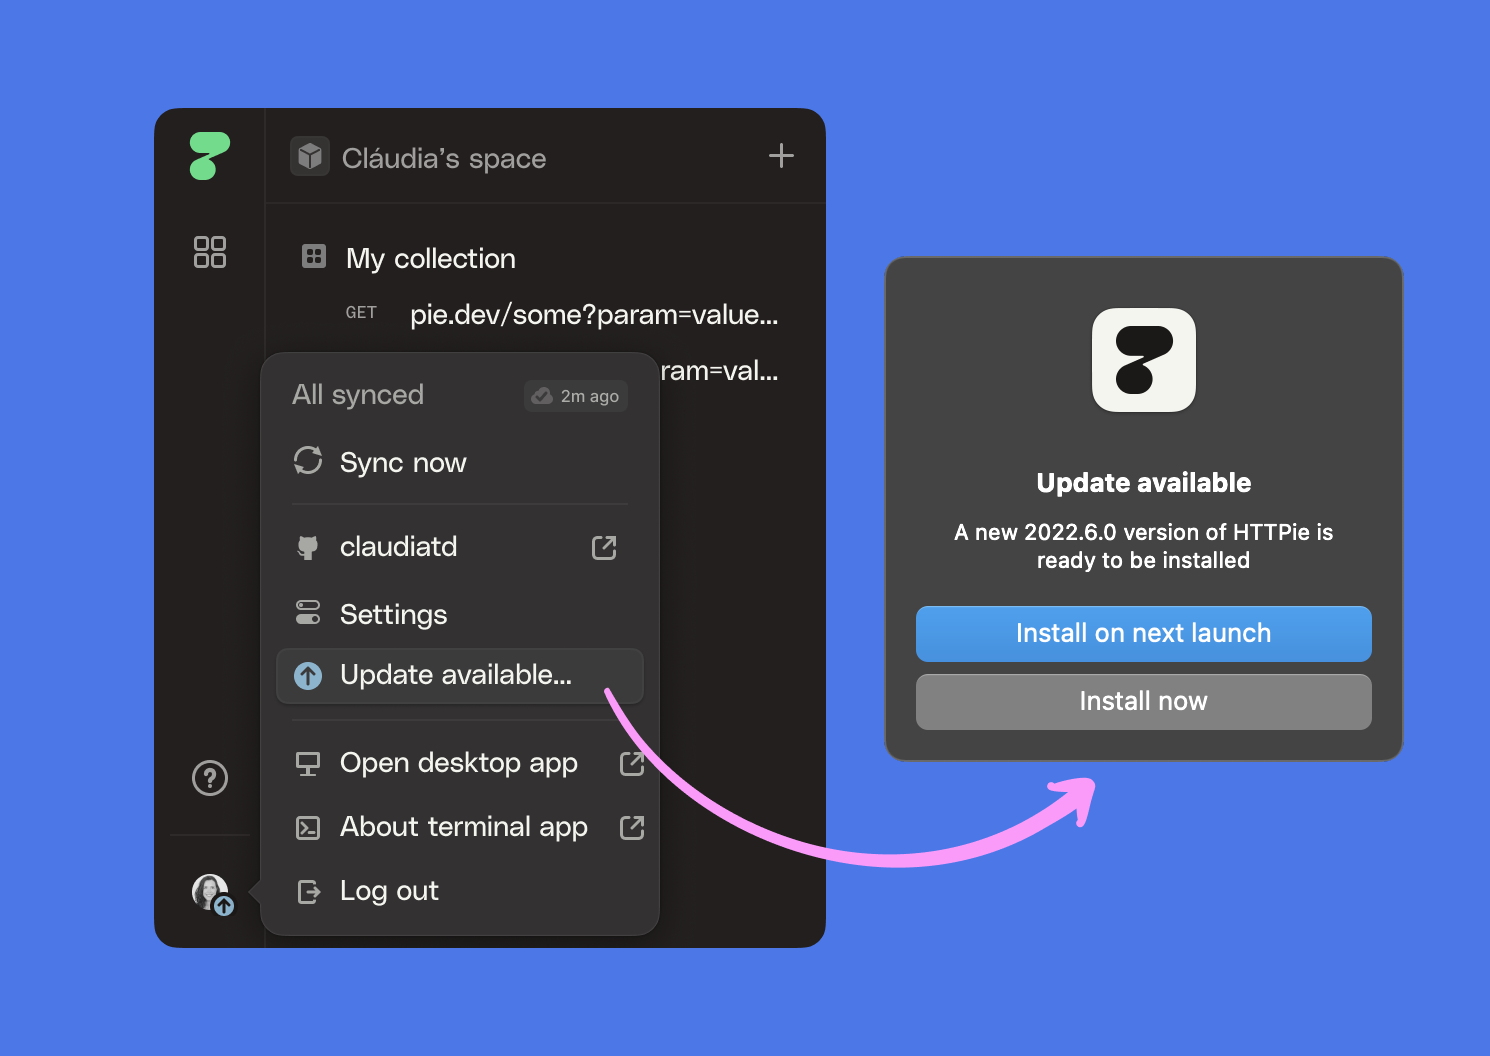
You can check for updates and see the app update status straight in the profile menu. This makes it easy for you to have the greatest and latest version of HTTPie always installed.
Check for updates
Select "Check for updates…" in the profile menu.
See your app version
Select "Check for updates…" in the profile menu. Given you are up-to-date, your current version will be displayed.
Required updates
The auto-update system is integrated with sync, and the update status in the profile menu will tell you when an update is required to maintain compatibility with the HTTPie cloud.
Settings
HTTPie for Web & Desktop continues in the tradition of HTTPie for Terminal and comes equipped with a thoughtful set of defaults reflecting the needs of most users and most of their use cases.
However, when it comes to a product as use case-rich as an API development platform, stopping at the defaults level doesn’t provide enough flexibility. Some means of customization are necessary.
To provide more flexibility, settings have their dedicated tab. You can open it from the profile menu. For now, you can change your interface and request preferences there.
Redirect behavior
Auto redirects is the most common behavior in graphical HTTP clients (from browsers to API testing tools). HTTPie has adopted them as well: when you make a request to http://httpie.io/hello, for example, HTTPie for Web & Desktop will now follow the redirect to https://httpie.io/hello.
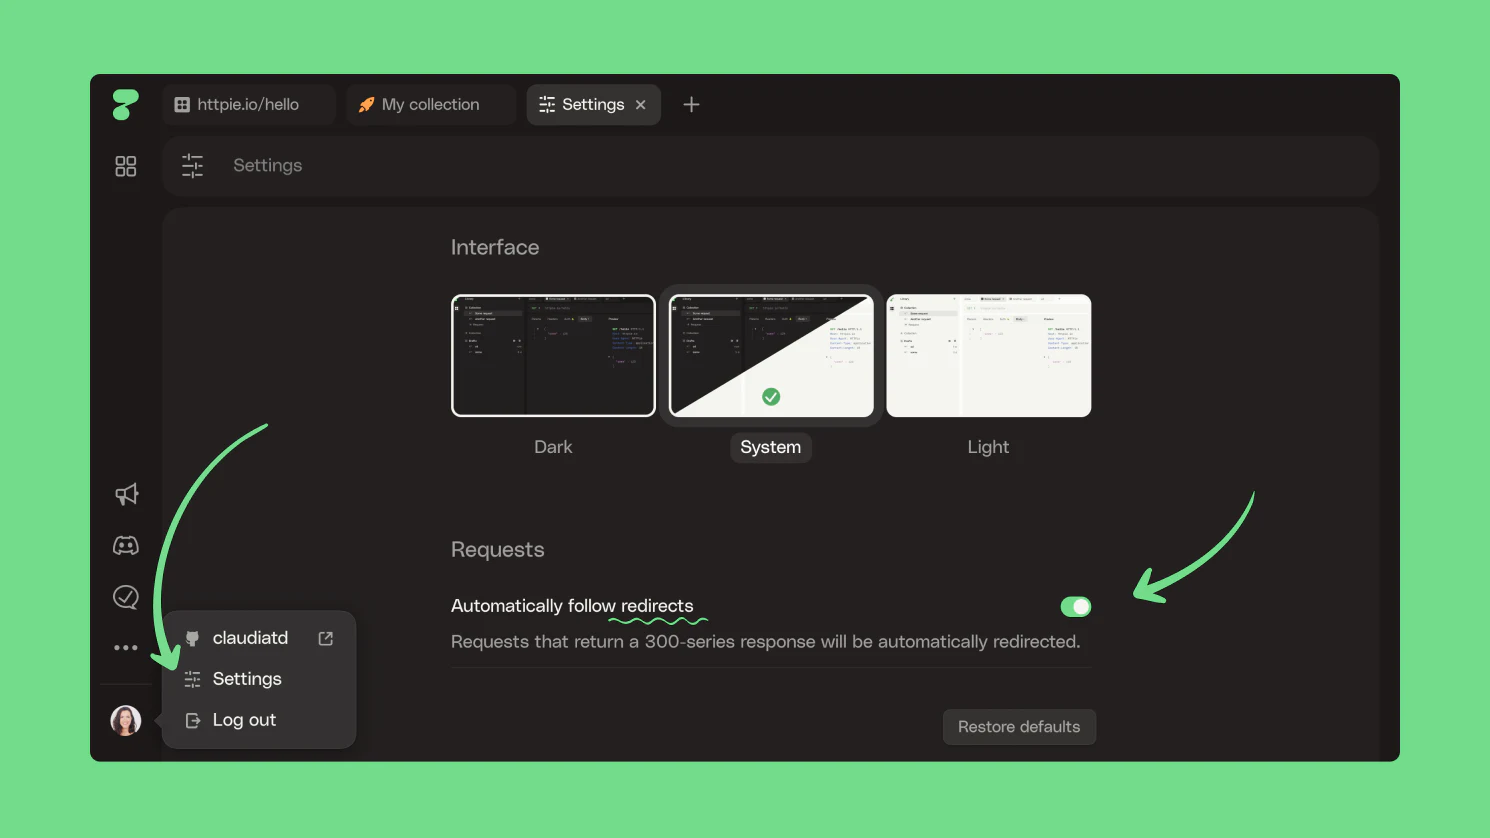
Suppose that’s not something you want, and you prefer the default no-follow behavior from HTTPie for Terminal instead. No worries, you can disable this option.
SSL validation
By default, HTTPie verifies the server SSL certificate and rejects self-signed, expired, and non-matching certificates. Still, you can disable this validation:
When you run into an SSL error and wish to allow invalid certificates temporarily, you can do that straight from the response view:
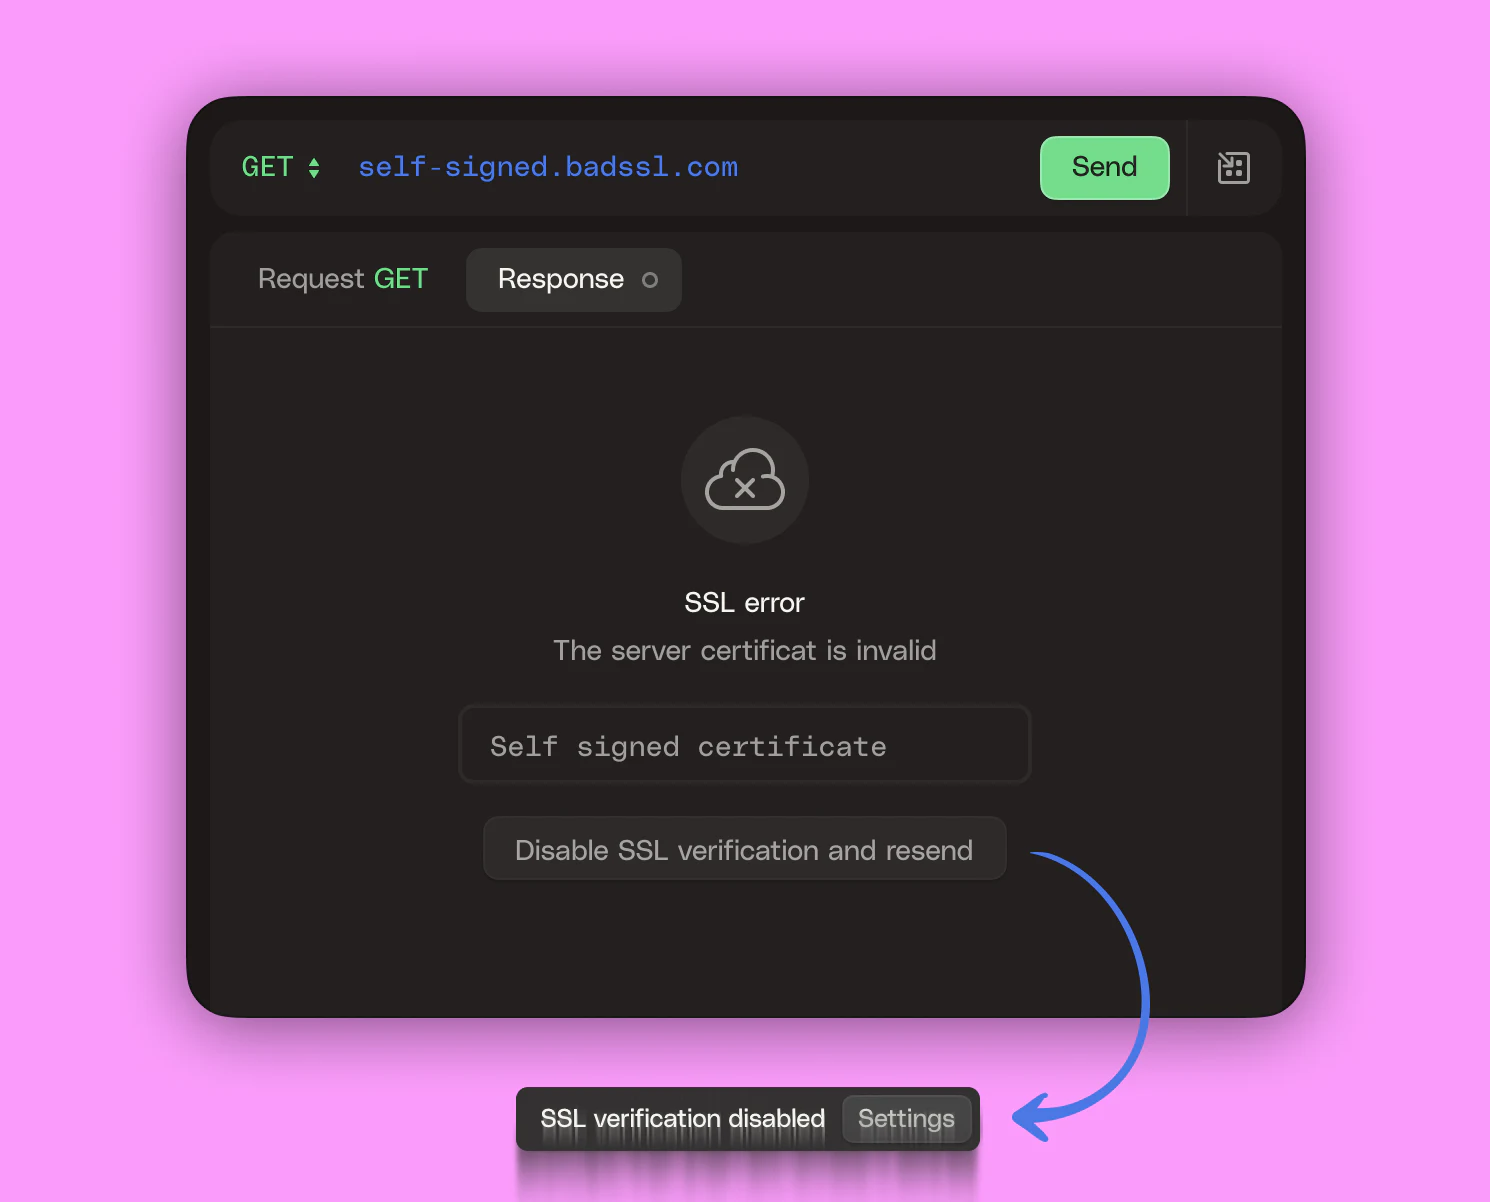
Turn it on again from the settings when you’re finished.
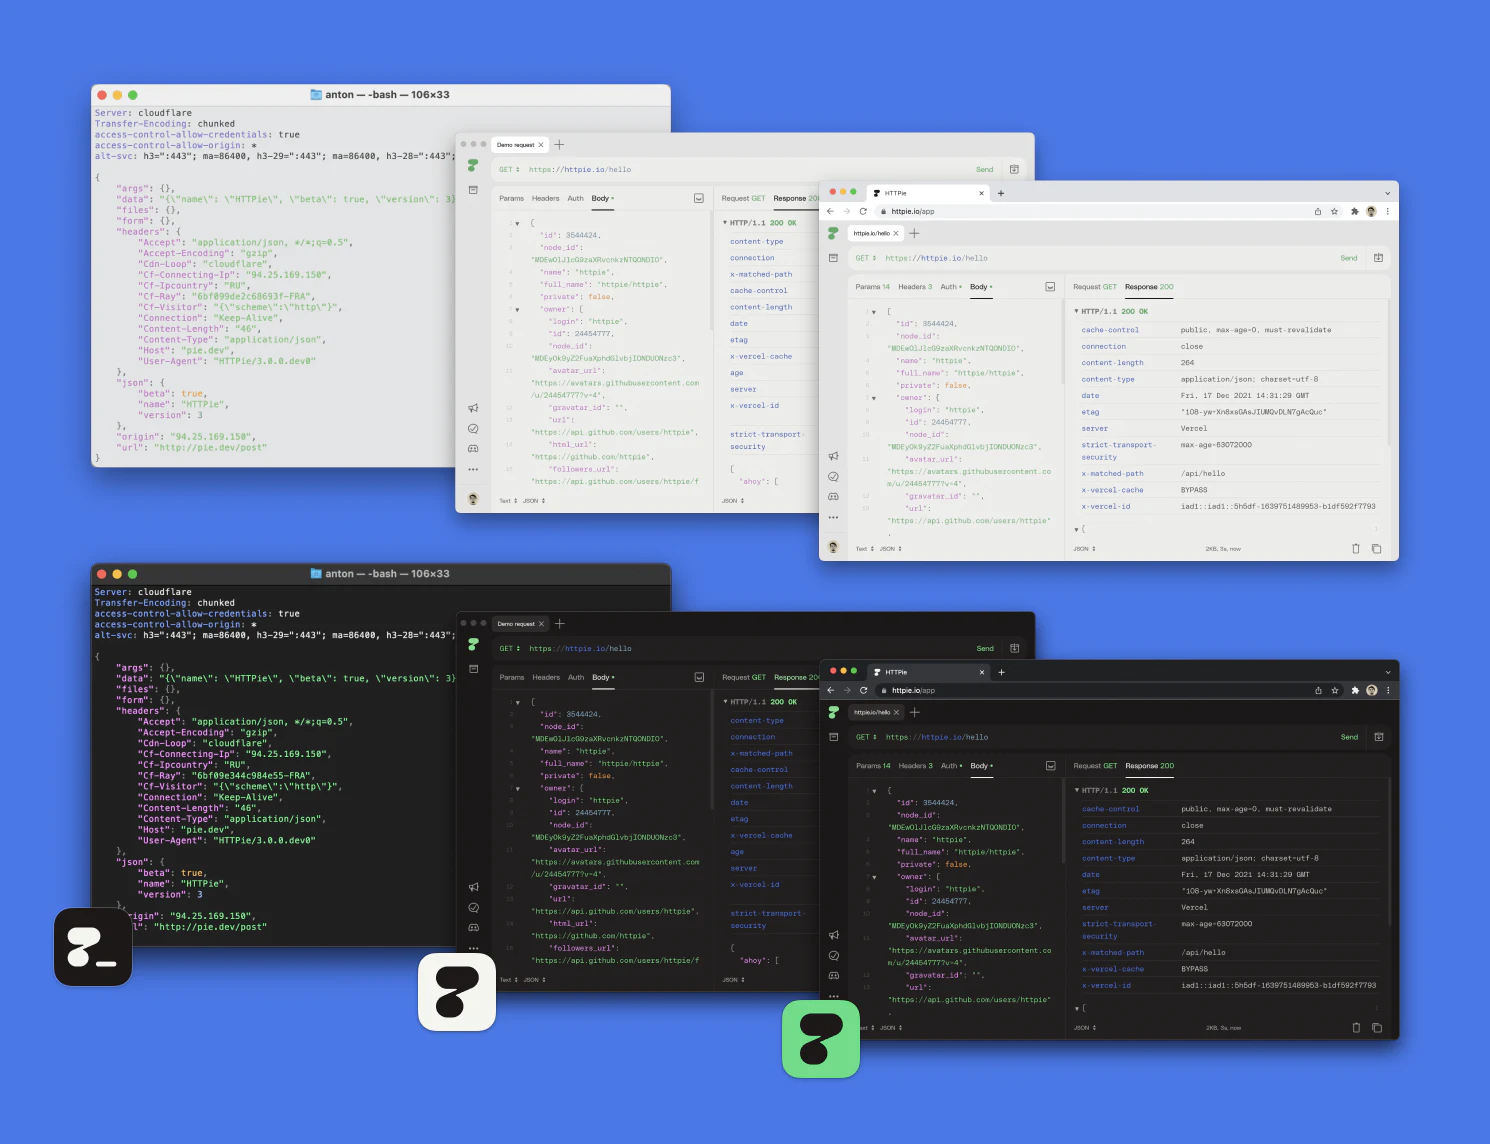
HTTPie universe
HTTPie is the first API testing platform with clients for the Web, Desktop, and Terminal.
-
HTTPie for Web – The easiest way to try HTTPie is through your browser. When you encounter a web limitation (such as the ability to test APIs running on localhost and behind a firewall), we’ll offer you the option to switch to the desktop app. Try it whenever you feel like making a new API request.
-
HTTPie for Desktop - With HTTPie's dedicated desktop app, you can test APIs running on localhost and behind a firewall. A focused app also serves as a protection against distraction rabbit holes, which are just a bit harder to avoid when working in the browser. Download the app, and start working locally and without distractions.
-
HTTPie for Terminal – The original flavour. Check it out.
Mobile and touch support
The app is 100% responsive (both Web and Desktop), and you can use all features on touch devices as well.
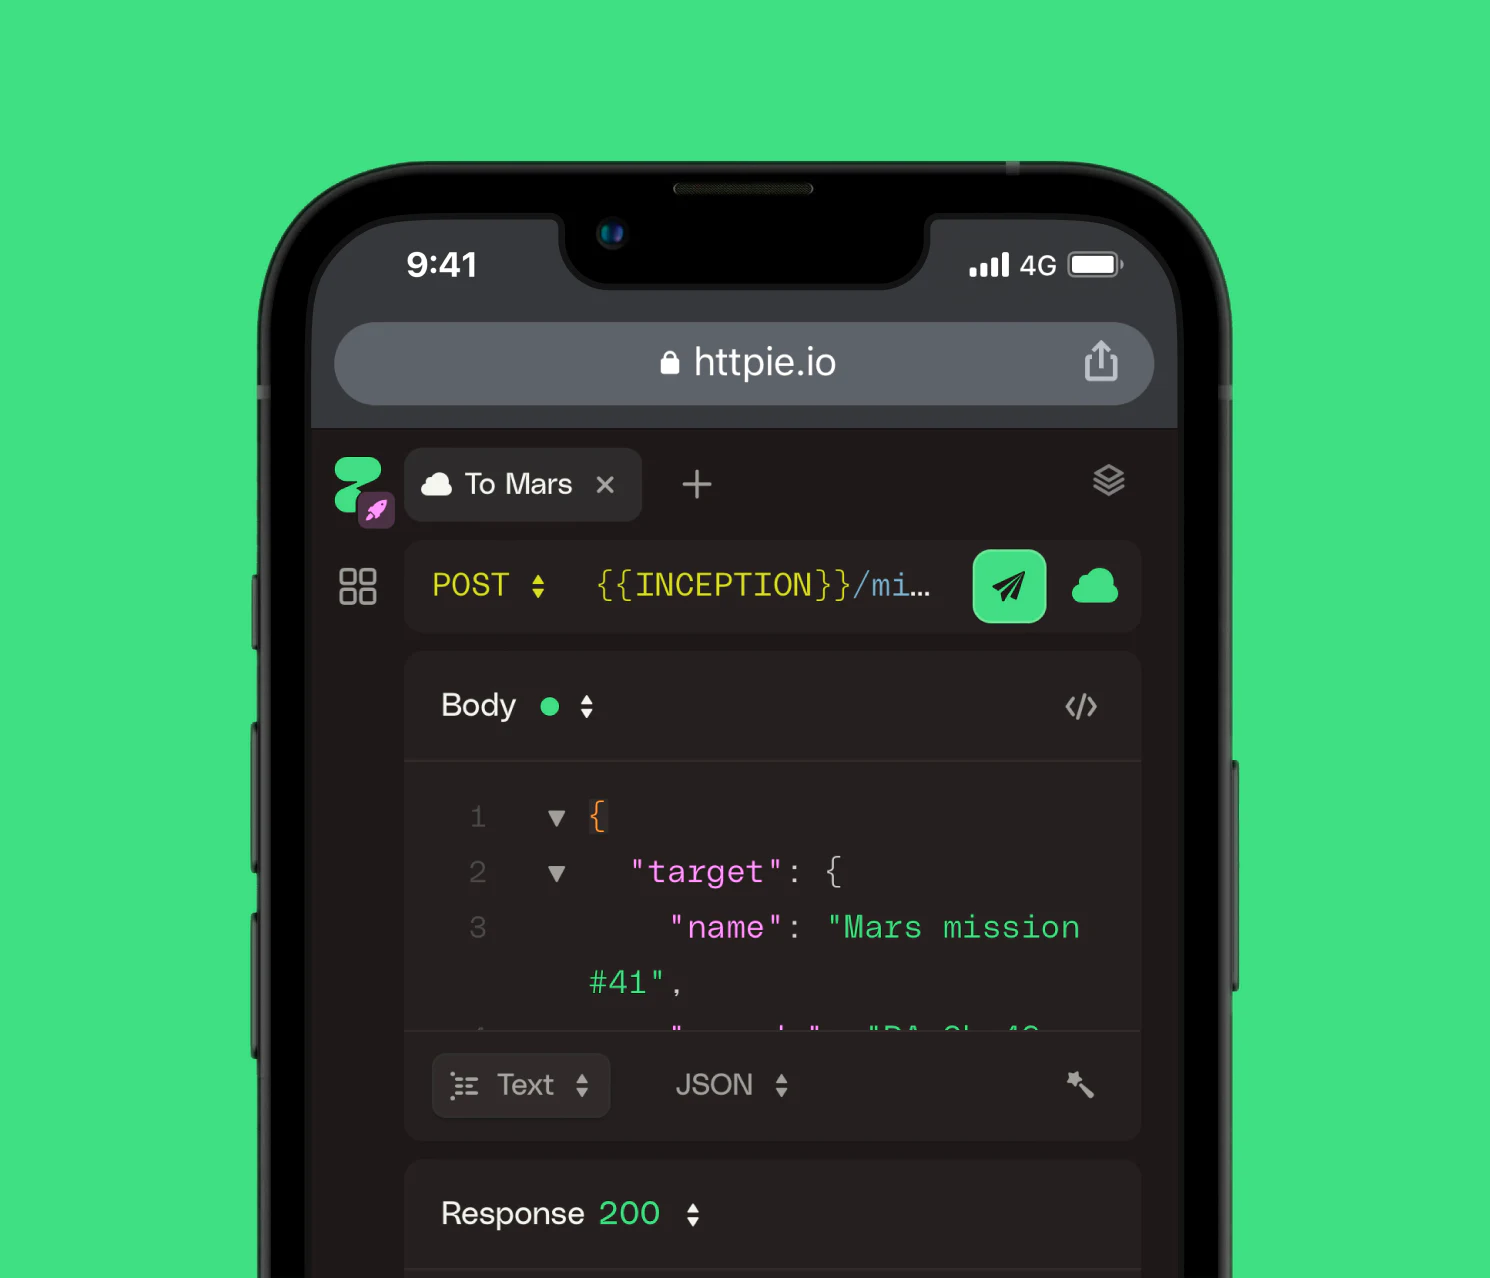
Mobile-friendliness is one of those features that you don’t need most of the time. But when you need it, you really need it. And with HTTPie, you can get work done comfortably from anywhere, anytime.
Keyboard shortcuts
Even with top-notch drag-and-drop support throughout the app, the goal for HTTPie for Web & Desktop is to become fully controllable via well-designed keyboard shortcuts.
All components are keyboard-accessible, and you can navigate to and invoke all actions using the ⇥ Tab and ↩ Enter keys.
See the sections below for an overview of all the shortcuts available today.
Global keyboard shortcuts
These shortcuts are available on the desktop today, and we’ll bring a version of them to the Web over time.
| Action | macOS | Windows & Linux |
|---|---|---|
| New tab (draft) | ⌘ T | ⌃ T |
| Close tab | ⌘ W | ⌃ W |
| Next tab | ⌃ ⇥ ⇧ ⌘ } | ⌃ ⇥ |
| Previous tab | ⌃ ⇧ ⇥ ⇧ ⌘ { | ⌃ ⇧ ⇥ |
| Nth tab | ⌘ 1–8 | ⌃ 1–8 |
| Last tab | ⌘ 9 | ⌃ 9 |
| Toggle library | ⌘ B ⌃ ⌘ S | ⌃ B |
| Open settings | ⌘ , | ⌃ , |
| Open AI prompt | ⌘ I | ⌃ I |
Request keyboard shortcuts
You can use these shortcuts when a request tab is open.
| Action | macOS | Windows & Linux |
|---|---|---|
| Focus URL | ⌘ L | ⌃ L |
| Send request | ⌘ ↩ | ⌃ ↩ |
| Send request (desktop only) | ⌘ R | ⌃ R |
Code editor shortcuts
These shortcuts are available in the body editor and the preview, request, and response panels when the textarea or search field has focus.
| Action | macOS | Windows & Linux |
|---|---|---|
| Trigger autocomplete (e.g., inside a GraphQL query) | ⌃ Space | ⌃ Space |
| Open search | ⌘ F | ⌃ F |
| Open filter | ⇧ ⌘ F | ⇧ ⌃ F |
| Next occurrence | ⌘ G | ⌃ G |
| Previous occurrence | ⇧ ⌘ G | ⇧ ⌃ G |
| Next occurrence (inside search box) | ↩ | ↩ |
| Previous occurrence (inside search box) | ⇧ ↩ | ⇧ ↩ |
AI assistance
While in preview, you can use HTTPie AI for free with an HTTPie account.
AI assisted requests
HTTPie AI assistant uses artificial intelligence to allow you to create requests using human language.
You can type your prompt directly in HTTPie’s URL field. It’s similar to typing a search query in your browser’s address bar instead of the exact URL.
Alternatively, you can open the HTTPie AI dialog from the “+” menu in the library. In the desktop app, you can also use ⌘I. There’s a difference in that when you start in the URL field, accepting the generated request will update the one in the current tab instead of creating a new one.
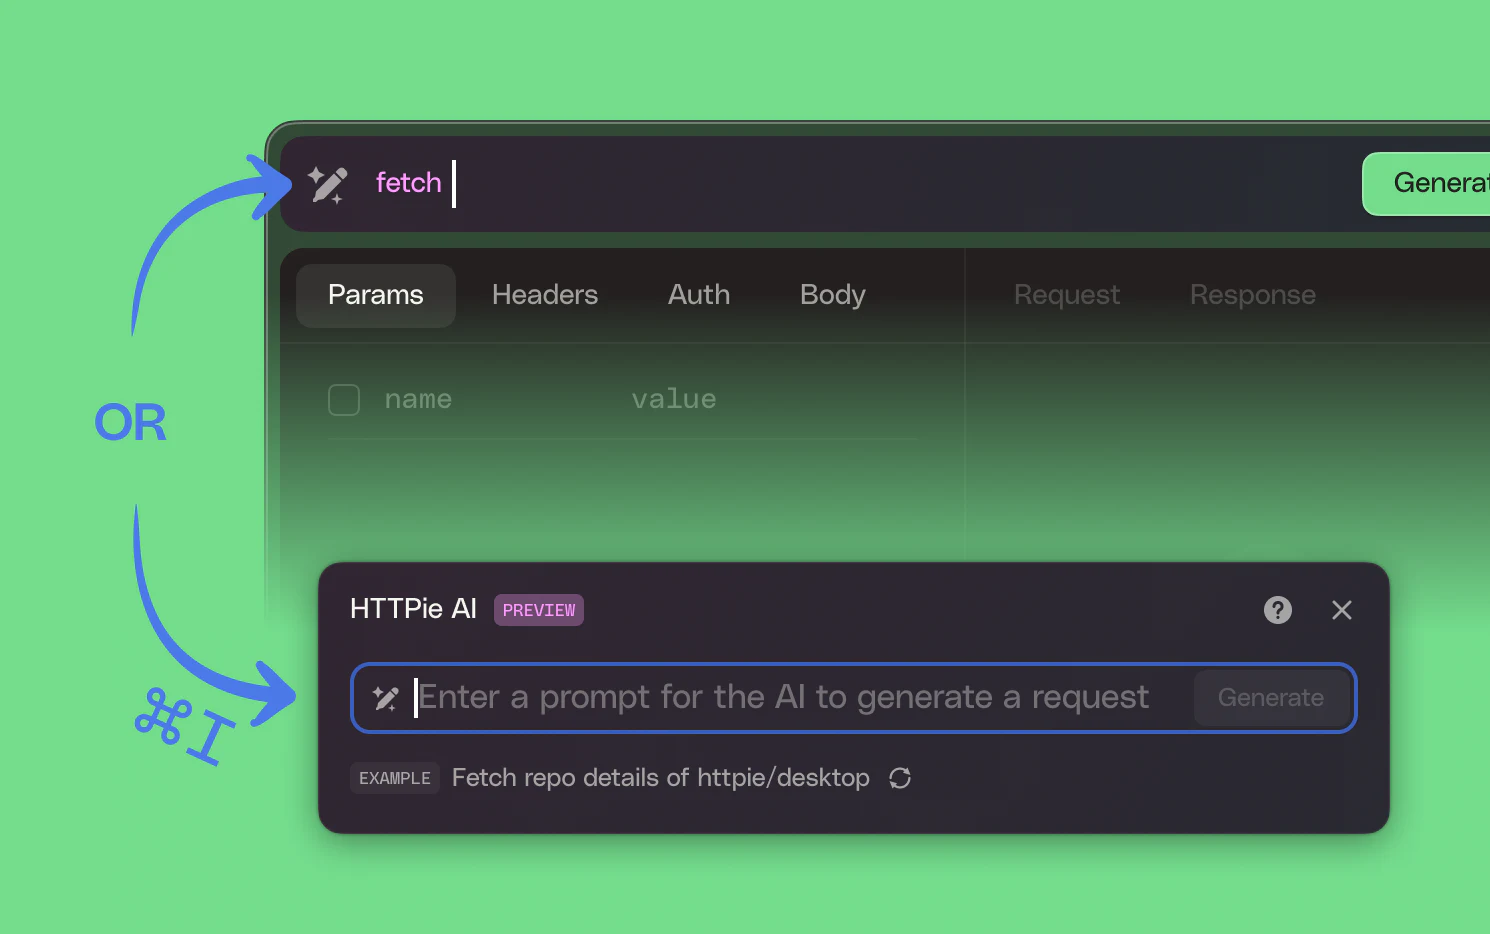
Then hit “Generate” to get a suggestion.
If you like the request, save it. The saved request automatically gets a short name generated by the AI. If you don’t like it, you can hit “Generate” again, which often produces a different result. You can also try editing the prompt. If the request includes any placeholders or obvious errors, you can modify it straight from the dialog before saving it (or you can do that after).
There are two strategies for writing HTTPie prompts: describing the request and describing the intent.
Describing the request
You can ask the AI to generate an HTTP request by describing its low-level components like the URL, headers, and body:
Generate an array of 3 blog posts with title, author, and summary and post it to localhost 3000 api as user agent HTTPie AI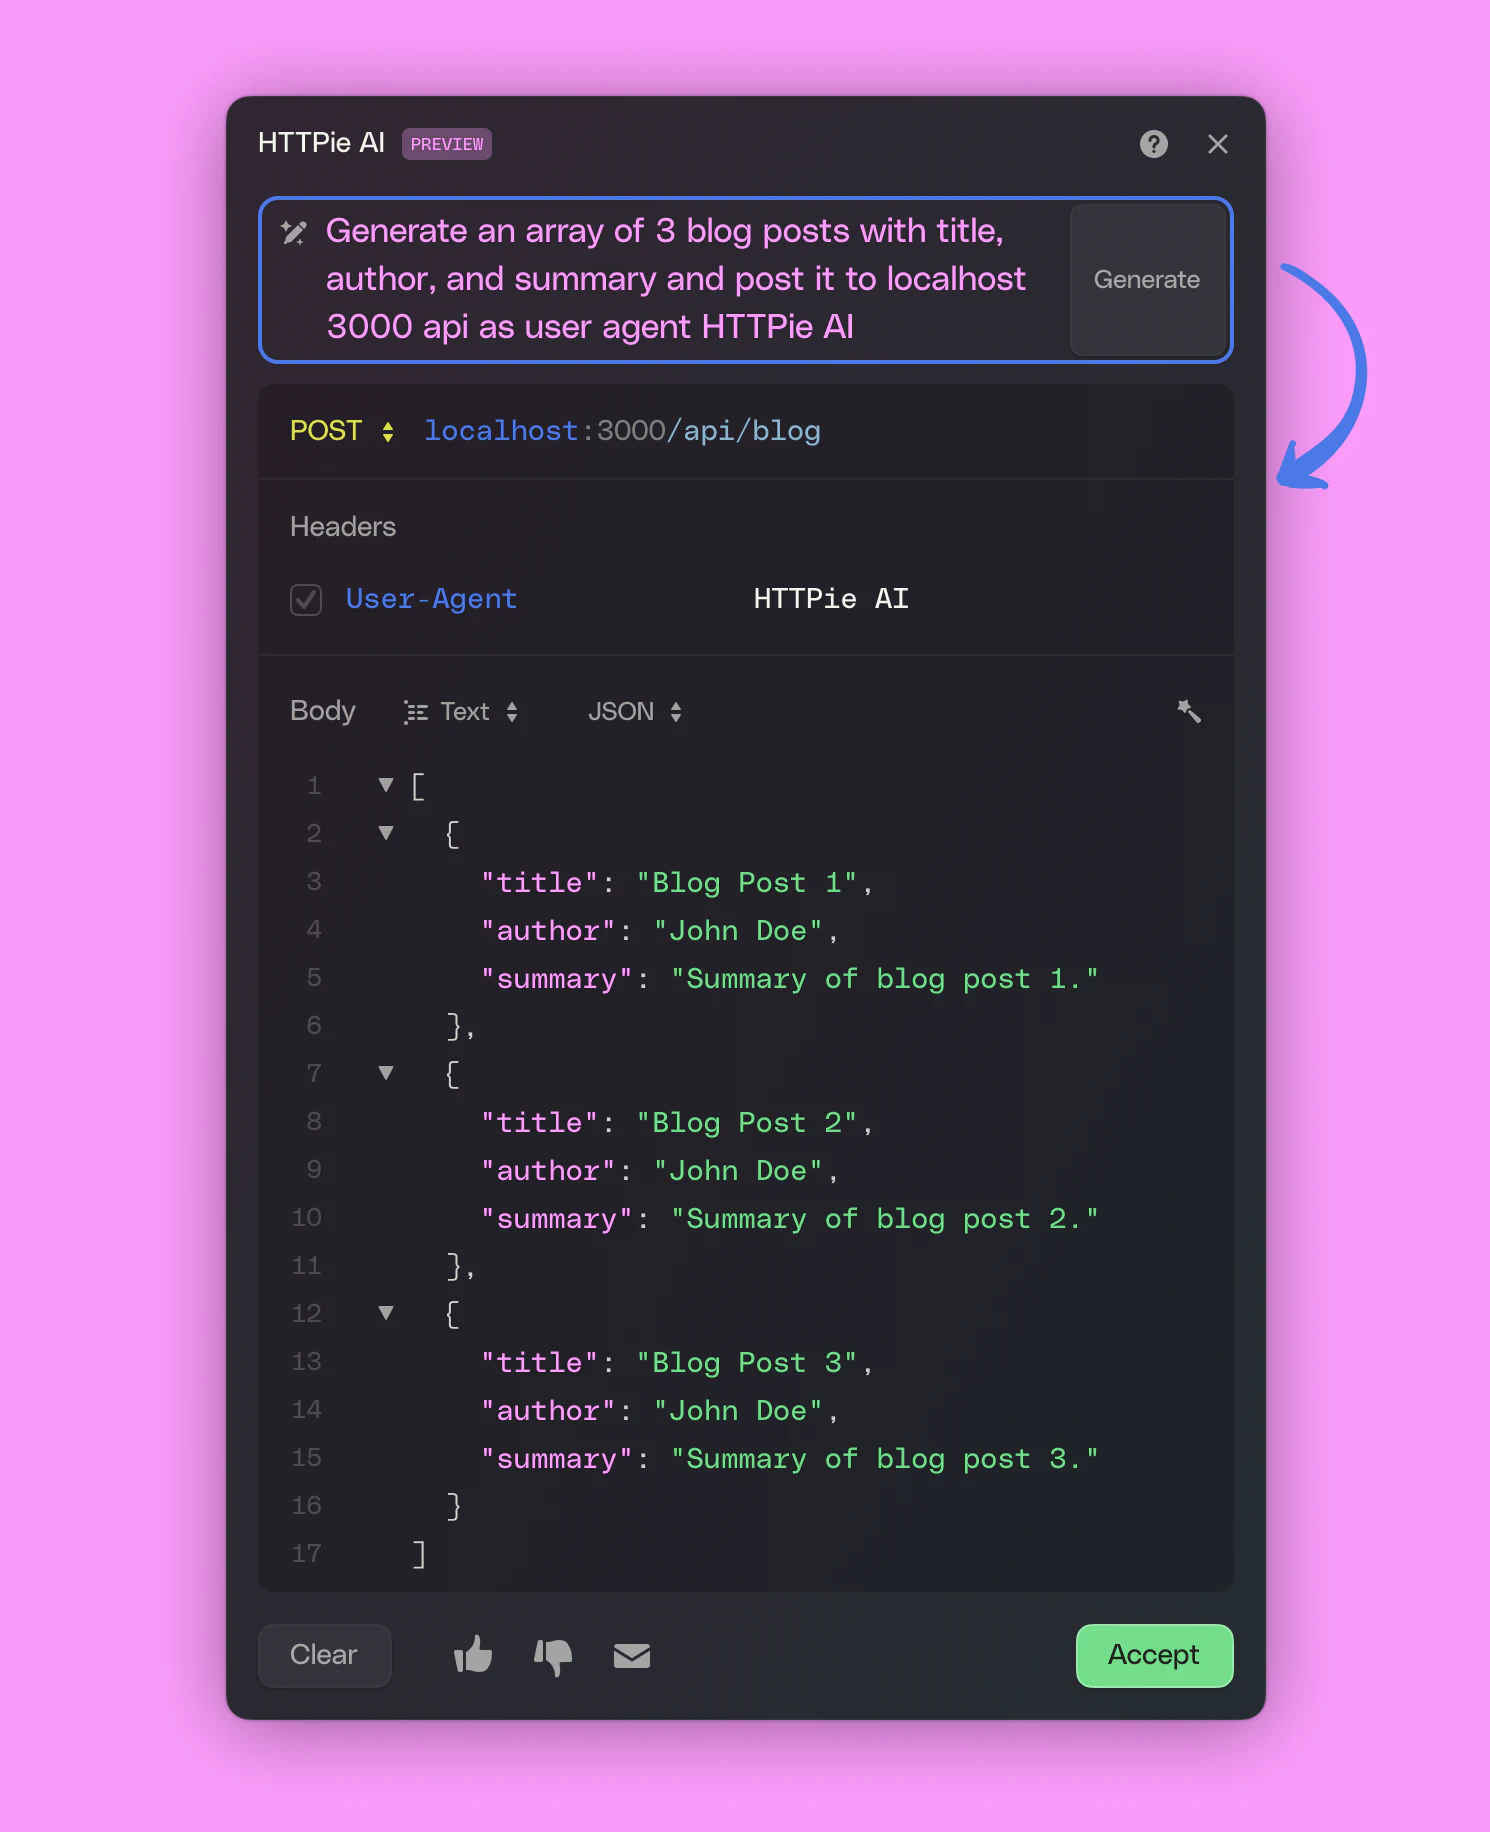
Describing the intent
For actions involving public APIs of popular services, you can describe the high-level tasks you want to accomplish:
List GitHub users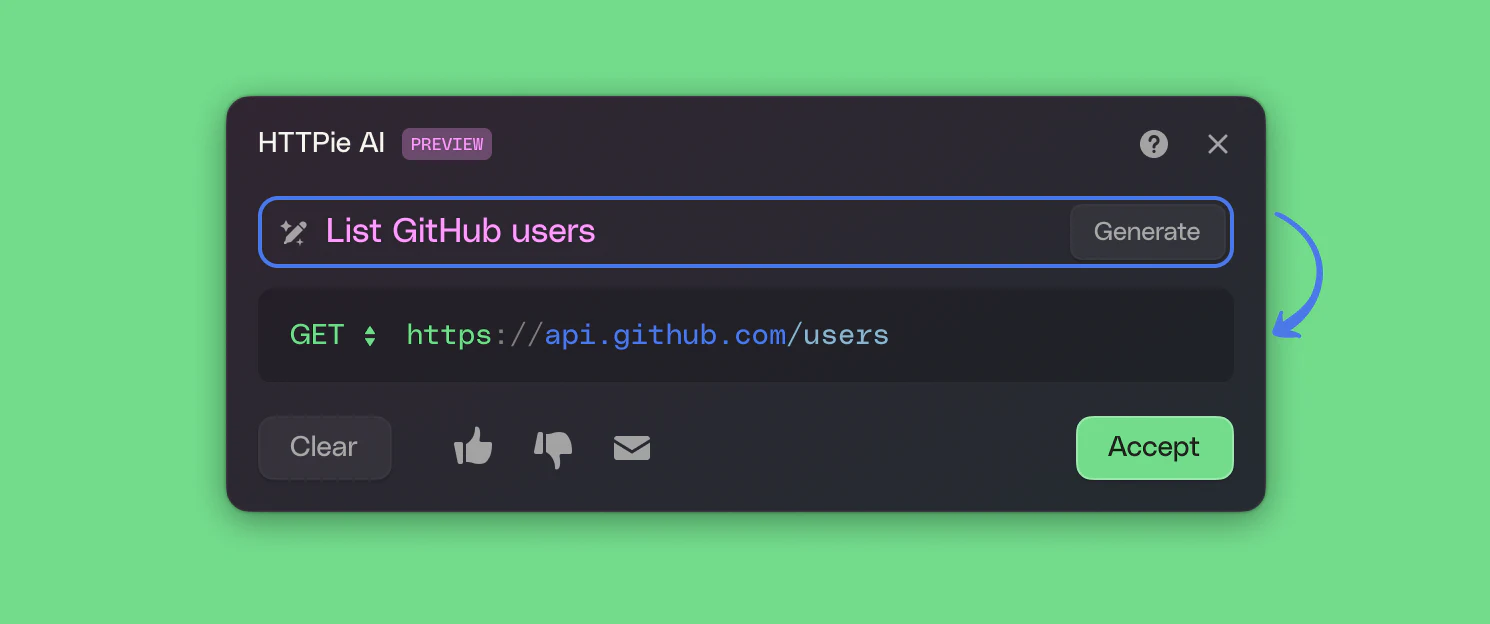
Here is another example where the model picks up that we mean a GitHub repo:
Fetch last release details of httpie/desktop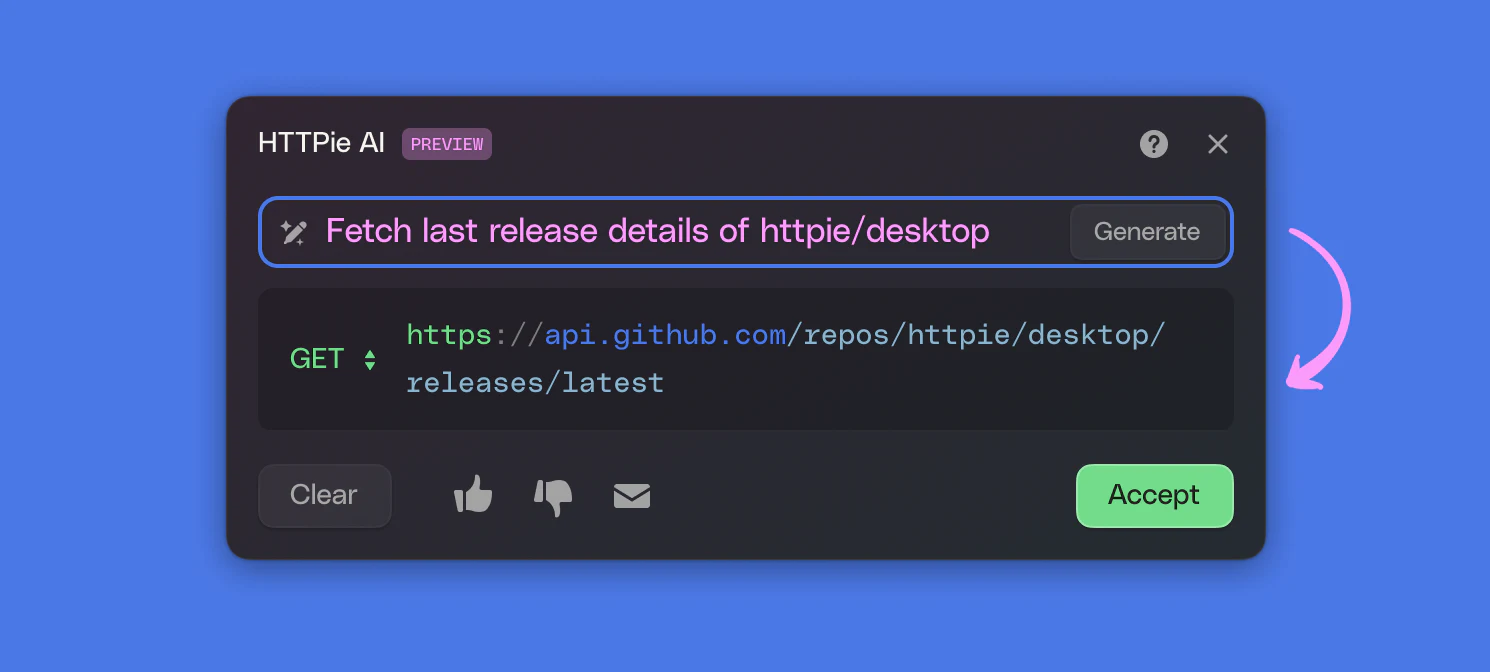
Personalization
HTTPie aims to be perfectly tailored to your API requests & responses, but you'll always know better. The ultimate power is yours.
App theme
Regarding user interfaces, one of the never-ending debates is about dark theme vs. light theme. Whatever side you are on, you can feel right at home in HTTPie.
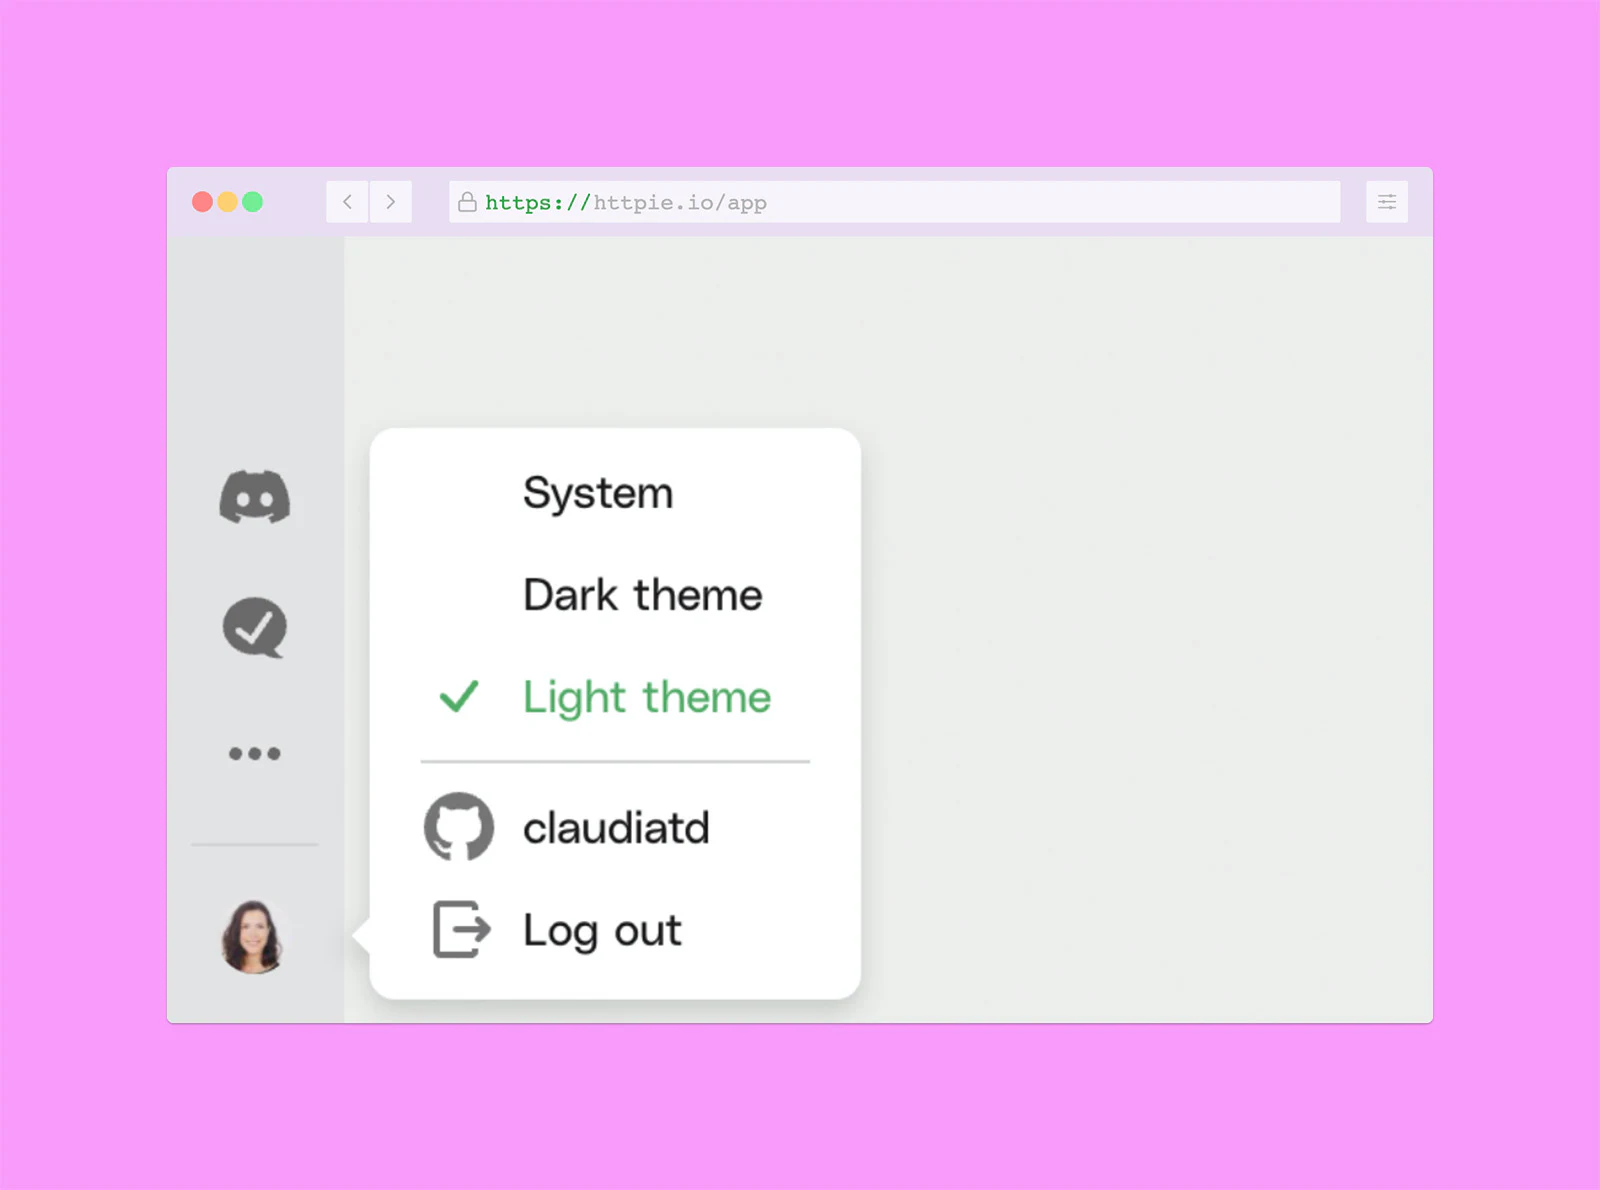
Find the theme switcher in the settings, where you can stay with the default dark theme, switch to the light one, or have the app automatically adjust to fit your system theme.
Layout customizations
HTTPie's panel system is constantly growing more customizable.
You can choose to show or hide the library sidebar.
You can turn on or off the preview panel on the button at the right of the request form tabs. Depending on your window size, it will be open before the response panel; otherwise, it will open on top.
You can expand and collapse collections and drafts in the library sidebar as you wish. (However, HTTPie automatically expands the collection when you activate the request's tab.)
Furthermore, you can choose your preferred panels' width by clicking and dragging the panel dividers to make them wider or narrower—the same for the sidebar.
Reordering
HTTPie orders each item by the creation time by default. But you should fully own your organization, right?
In addition to moving requests between collections, you can drag-and-drop them to reorder them. And you can reorder collections as well.
Also, drag-and-drop tabs and place them in your preferred order.
And do the same to reorder any form or table item.
Except for environment reordering, where you can use the shift left/right menu items.
Naming
Part of keeping a space organized is naming each item; it helps to recall and differentiate them.
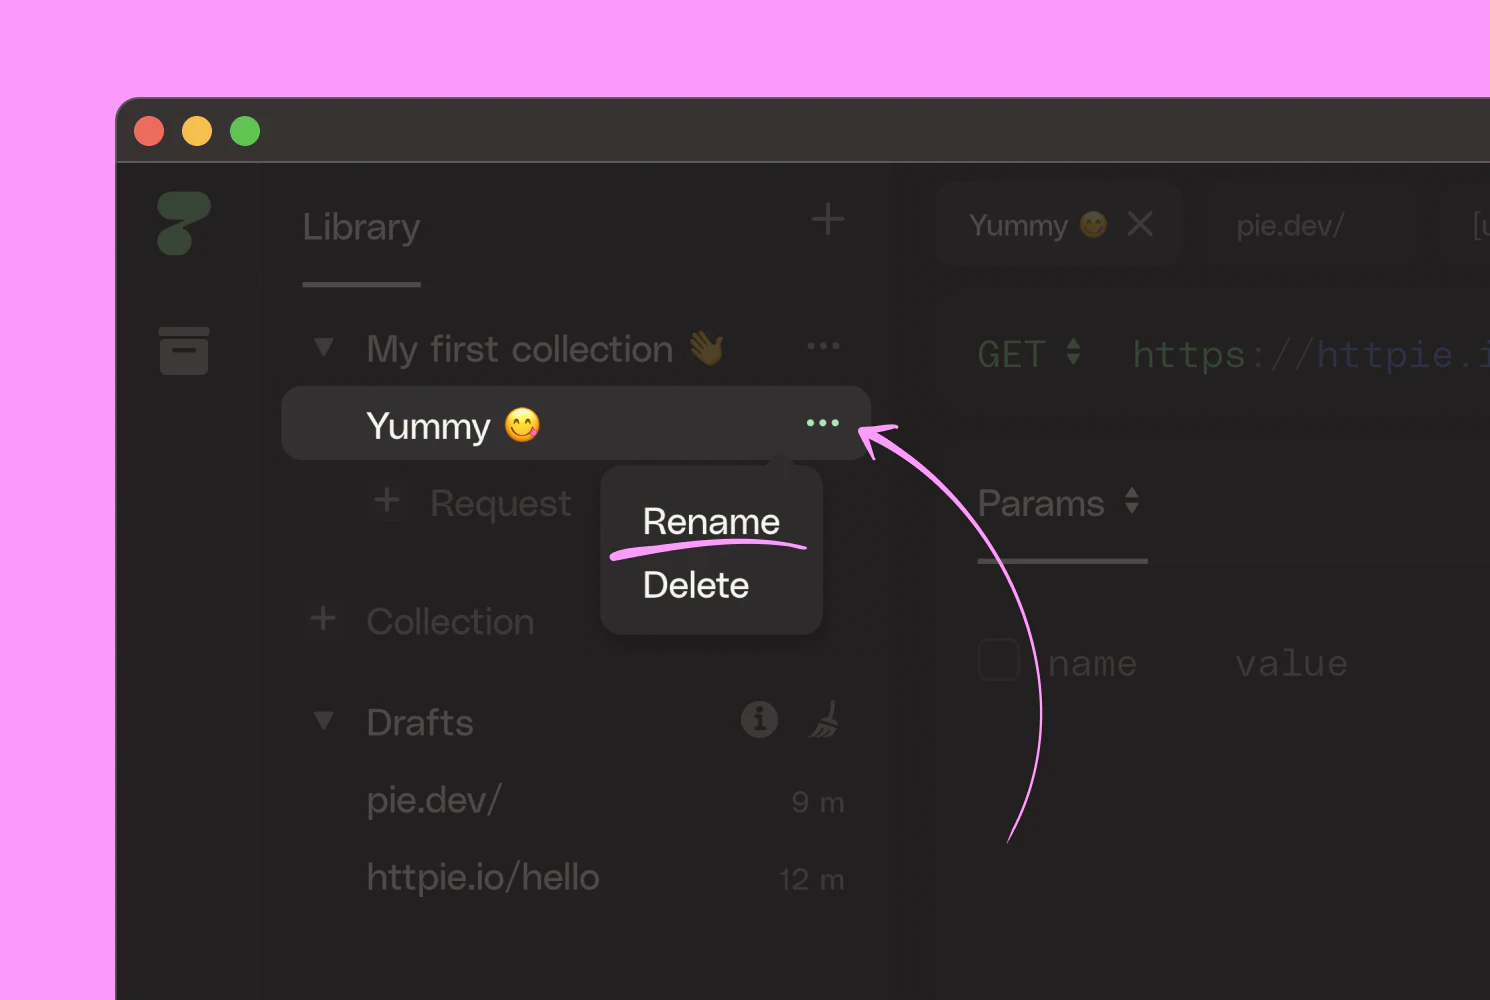
With a double click, you can rename an item through its tab or the sidebar library. Simple!
But then comes the complicated part: picking a good name. Here are two tips:
- HTTPie shows the HTTP method next to the request name. The <method> <name> pair works nicely as a <verb> <noun> sentence.
- An emoji can be worth a thousand words 😜.
- If you choose not to name a request, the URL will be used dynamically to identify it.
Icons
A picture is worth a thousand words. You can use icons to give your projects a personal touch and help you orient in your workspace at a glance without taking up much screen real estate.
Customize a space or collection with an icon and color when creating or editing a space or collection.
Interface design
You may have already noticed that we obsess over user experience in places where humans meet APIs.
Unified code style
We designed the new HTTPie brand with the incredibly talented team at Koto. Part of the brand is an extended product palette, which we—as a developer tools company—designed with beautiful code syntax highlighting in mind.
Below is a page from our style guide and an example of how it cascades down through a Tailwind CSS config to our design system and to the product:
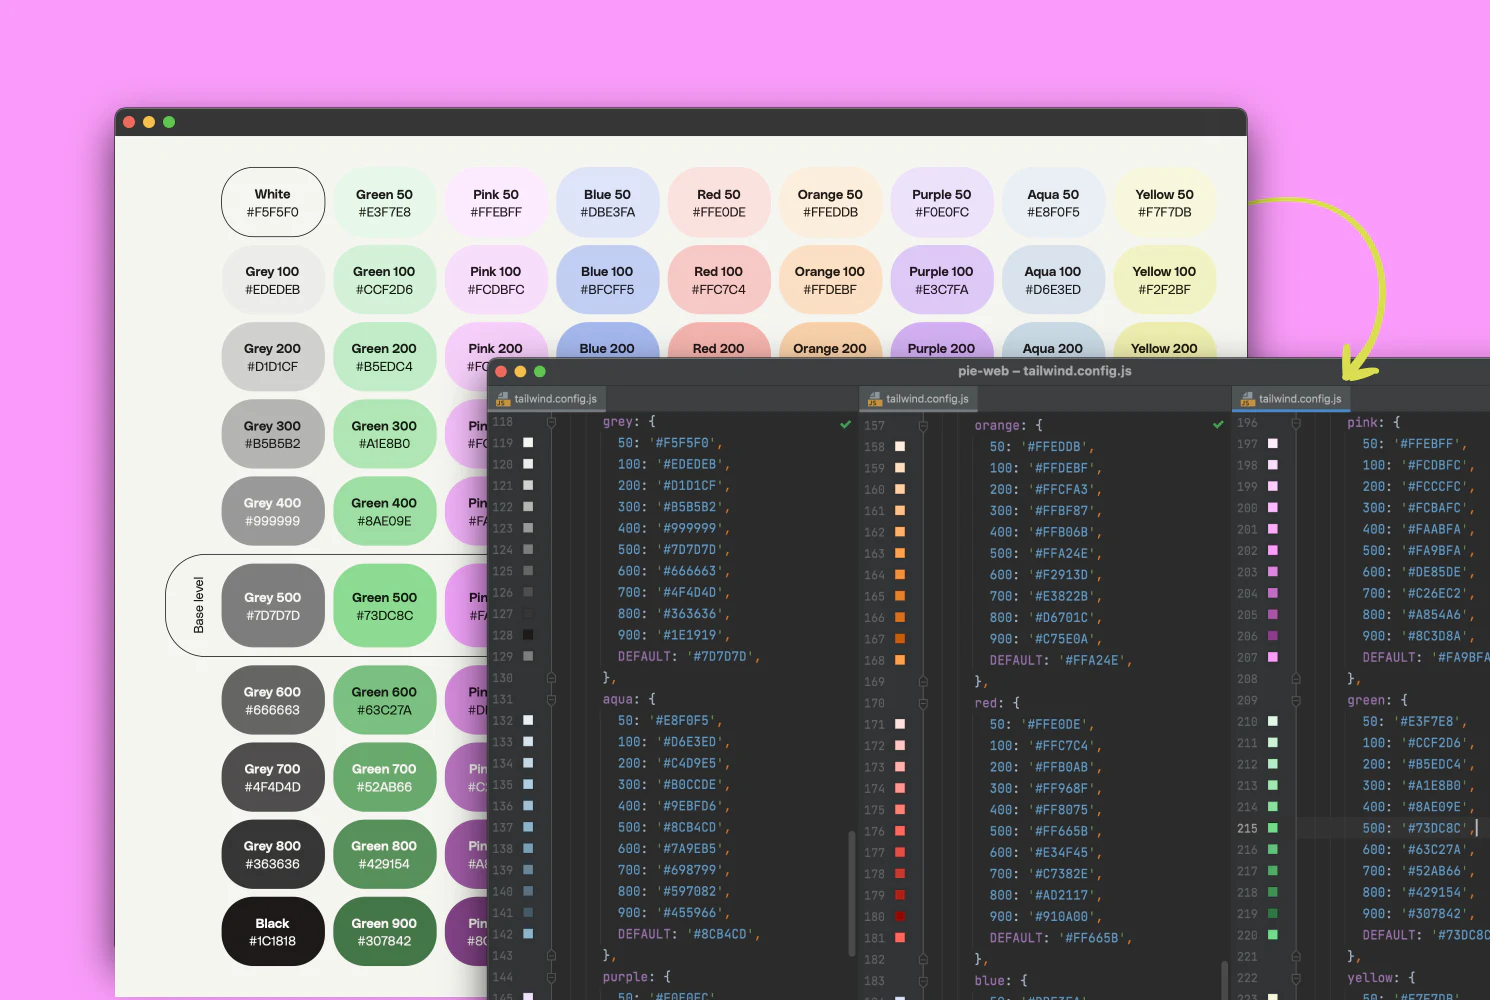
This way, you’ll have a consistent experience across all HTTPie apps.
Refined cursor system
We like to simplify things, a lot. For example, let's look at the cursor system.
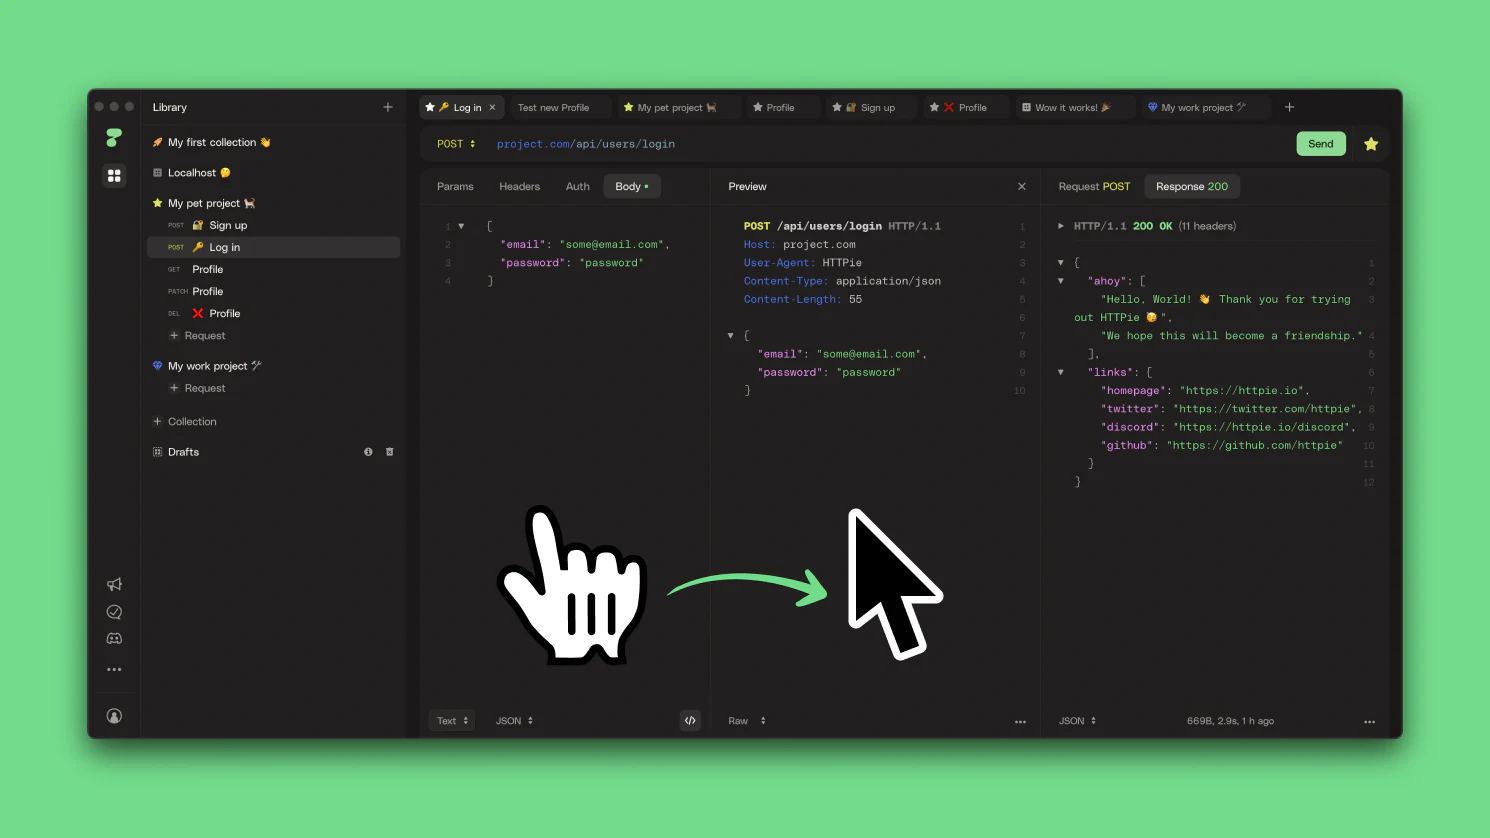
Pointer cursors were invented to indicate links on the Web. It is tempting to adopt them for all active elements in apps that use web technologies, like we initially did. However, after a thorough research, we decided to say goodbye to pointer cursors.
We continue to use them for elements that are actual web links. But just like modern native apps, you’ll now see subtle hover effects and regular cursors for all other active UI elements instead. This makes the UI feel quieter and the experience more pleasant.
Contextual dialogs
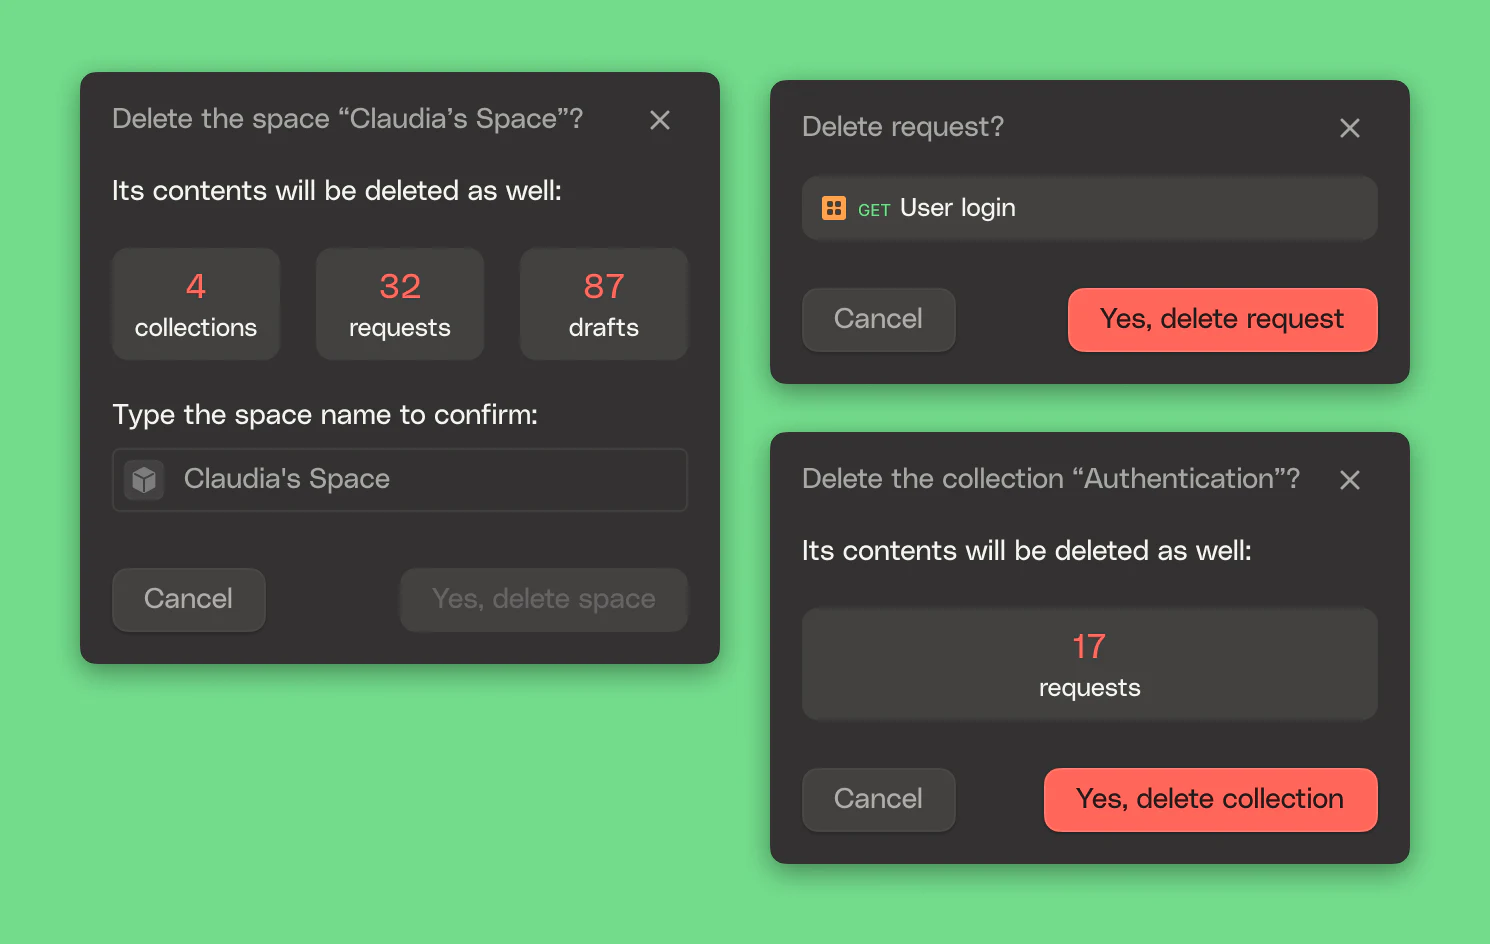
When you’re in the flow, you do things somewhat automatically. That’s great; HTTPie users should be fast and productive. Some sensitive actions, though, need special attention and care – e.g., deleting something.
That’s why the confirmation modals are contextually informative, to make you fully aware of what you are doing and ensure that’s what you want to do.
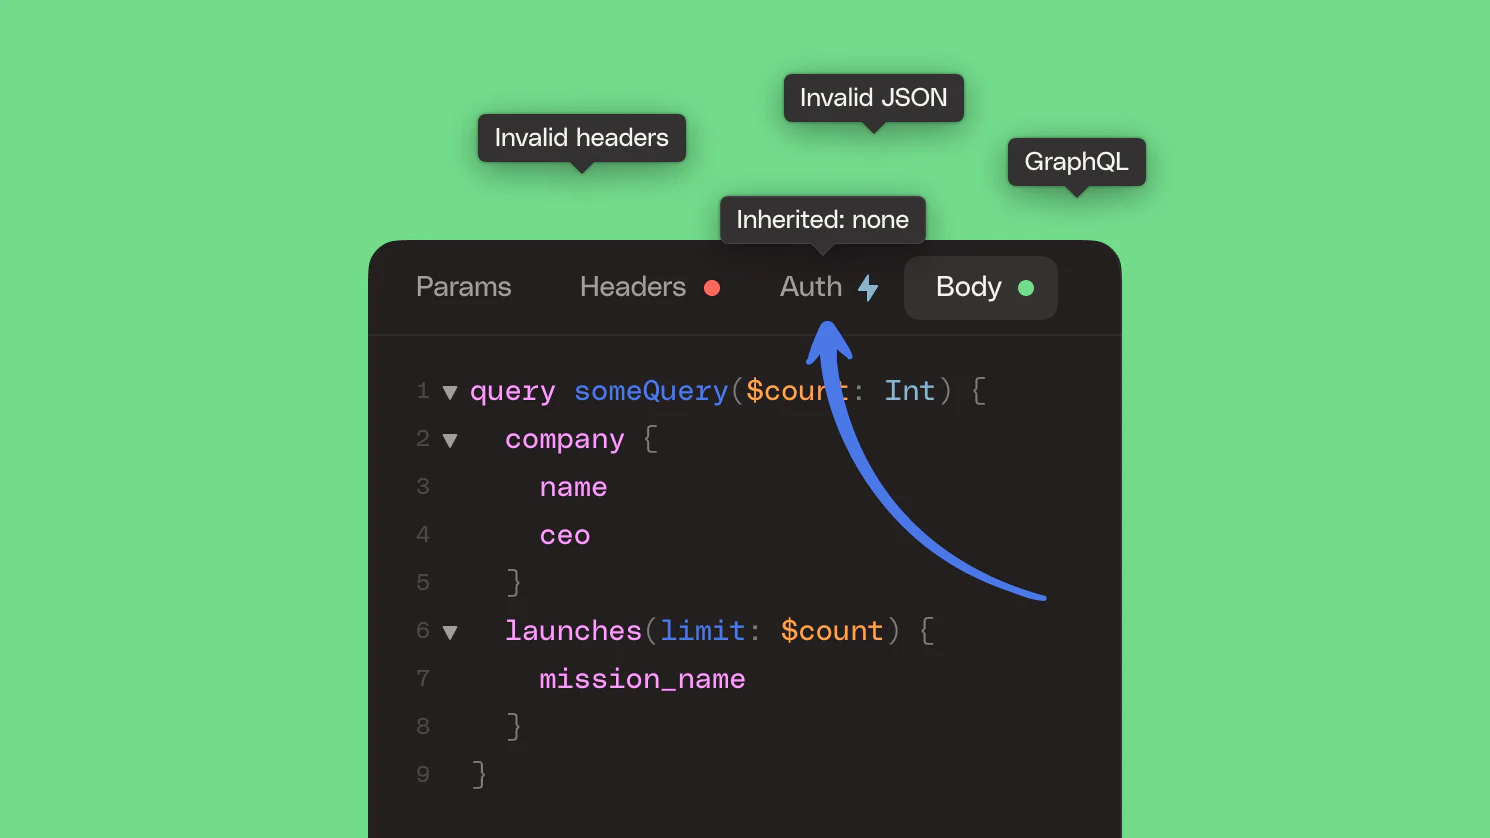
Tooltips
There are tooltips all around to help you understand the interface, provide help, and let you peek at the content inside a hidden element.
Provide feedback
- Thoughts? Questions? Shoot us an email at feedback@httpie.io.
- You can also help us improve by completing a quick survey.
Community and support
- Follow @httpie or join our Discord community to stay up to date.